INSPECTION
Inspection · Vehicles built from May 2007
| INSPECT WINDSHIELD WIPER SWITCH ASSEMBLY (for LHD) |

Check the front wiper switch.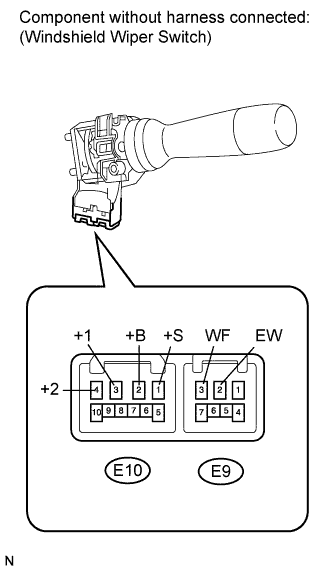

Measure the resistance according to the value(s) in the table below.
- Standard resistance:
Tester Connection
Switch Condition
Specified Condition
E10-1 (+S) - E10-3 (+1)
INT
Below 1 Ω
OFF
E10-2 (+B) - E10-3 (+1)
MIST
LO
E10-2 (+B) - E10-4 (+2)
HI
Check the front washer switch.
Measure the resistance according to the value(s) in the table below.
- Standard resistance:
Tester Connection
Switch Condition
Specified Condition
E9-2 (EW) - E9-3 (WF)
ON
Below 1 Ω
OFF
10 kΩ or higher
Check the intermittent operation.
Connect the voltmeter's positive (+) lead to terminal E10-3 (+1) and the negative (-) lead to terminal E9-2 (EW).
Connect the battery's positive (+) lead to terminal E10-2 (+B) and the negative (-) lead to terminal E9-2 (EW) and E10-1 (+S).
Turn the wiper switch to the INT position.
Connect the battery's positive (+) lead to terminal E10-1 (+S) for 5 seconds.
Connect the battery's negative (-) lead to terminal E10-1 (+S). Operate the intermittent wiper relay and check the voltage between terminals E10-3 (+1) and E9-2 (EW).
- OK:
- Voltage changes as shown in the illustration below.
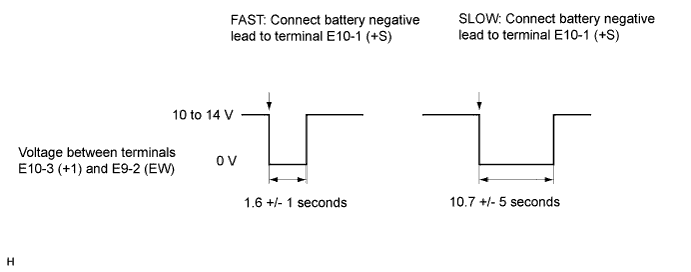
If the result is not as specified, replace the switch assembly.
Check the front washer operation.
Turn the wiper switch OFF.
Connect the battery's positive (+) lead to terminal E10-2 (+B) and the negative (-) lead to terminals E10-1 (+S) and E9-2 (EW).
Connect the voltmeter's positive (+) lead to E10-3 (+1) and the negative (-) lead to terminal E9-2 (EW).
Turn the washer switch ON and OFF, and check the voltage between terminals E10-3 (+1) and E9-2 (EW).
- OK:
- Voltage changes as shown in the illustration below.
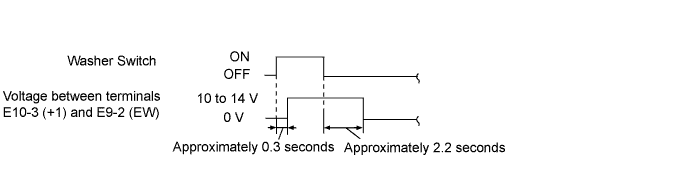
If the result is not as specified, replace the switch assembly.
Check the rear wiper switch.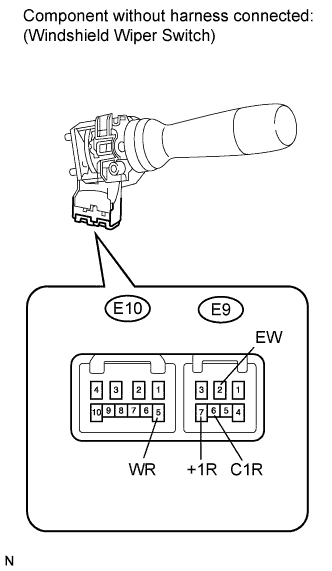
Measure the resistance according to the value(s) in the table below.
- Standard resistance:
Tester Connection
Switch Condition
Specified Condition
E9-2 (EW) - E9-6 (C1R)
LO
Below 1 Ω
E9-2 (EW) - E9-7 (+1R)
HI
E9-2 (EW) - E9-6 (C1R)
OFF
10 kΩ or higher
E9-2 (EW) - E9-7 (+1R)
Check the rear washer switch.
Measure the resistance according to the value(s) in the table below.
- Standard resistance:
Tester Connection
Switch Condition
Specified Condition
E9-2 (EW) - E10-5 (WR)
ON
Below 1 Ω
OFF
10 kΩ or higher
| INSPECT WINDSHIELD WIPER SWITCH ASSEMBLY (for RHD) |
Check the front wiper switch.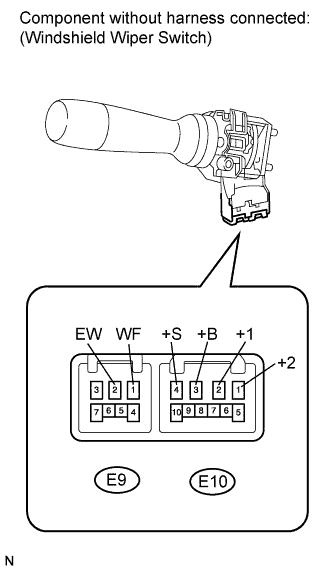
Measure the resistance according to the value(s) in the table below.
- Standard resistance:
Tester Connection
Switch Condition
Specified Condition
E10-4 (+S) - E10-2 (+1)
INT
Below 1 Ω
OFF
E10-3 (+B) - E10-2 (+1)
MIST
LO
E10-3 (+B) - E10-1 (+2)
HI
Check the front washer switch.
Measure the resistance according to the value(s) in the table below.
- Standard resistance:
Tester Connection
Switch Condition
Specified Condition
E9-2 (EW) - E9-1 (WF)
ON
Below 1 Ω
OFF
10 kΩ or higher
Check the intermittent operation.
Connect the voltmeter's positive (+) lead to terminal E10-2 (+1) and the negative (-) lead to terminal E9-2 (EW).
Connect the battery's positive (+) lead to terminal E10-3 (+B) and the negative (-) lead to terminal E9-2 (EW) and E10-4 (+S).
Turn the wiper switch to the INT position.
Connect the battery's positive (+) lead to terminal E10-4 (+S) for 5 seconds.
Connect the battery's negative (-) lead to terminal E10-4 (+S). Operate the intermittent wiper relay and check the voltage between terminals E10-2 (+1) and E9-2 (EW).
- OK:
- Voltage changes as shown in the illustration below.
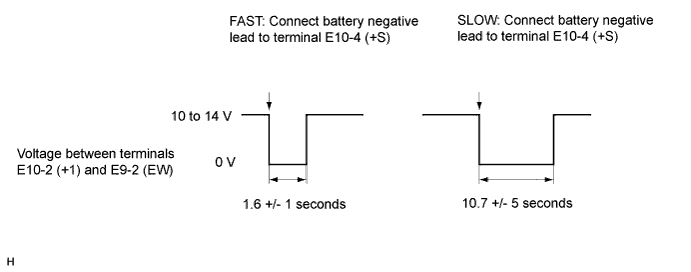
If the result is not as specified, replace the switch assembly.
Check the front washer operation.
Turn the wiper switch OFF.
Connect the battery's positive (+) lead to terminal E10-3 (+B) and the negative (-) lead to terminals E10-4 (+S) and E9-2 (EW).
Connect the voltmeter's positive (+) lead to E10-2 (+1) and the negative (-) lead to terminal E9-2 (EW).
Turn the washer switch ON and OFF, and check the voltage between terminals E10-2 (+1) and E9-2 (EW).
- OK:
- Voltage changes as shown in the illustration below.
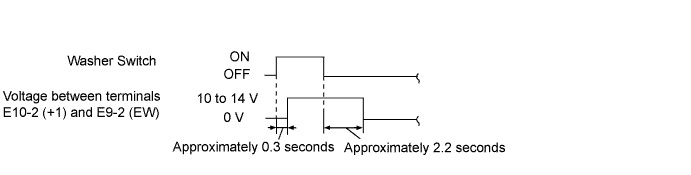
If the result is not as specified, replace the switch assembly.
Check the rear wiper switch.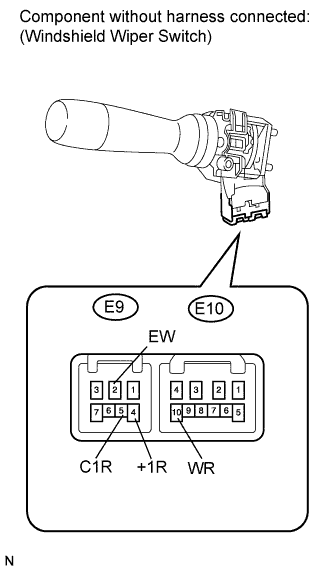
Measure the resistance according to the value(s) in the table below.
- Standard resistance:
Tester Connection
Switch Condition
Specified Condition
E9-2 (EW) - E9-5 (C1R)
LO
Below 1 Ω
E9-2 (EW) - E9-4 (+1R)
HI
E9-2 (EW) - E9-5 (C1R)
OFF
10 kΩ or higher
E9-2 (EW) - E9-4 (+1R)
Check the rear washer switch.
Measure the resistance according to the value(s) in the table below.
- Standard resistance:
Tester Connection
Switch Condition
Specified Condition
E9-2 (EW) - E10-10 (WR)
ON
Below 1 Ω
OFF
10 kΩ or higher