ON-VEHICLE INSPECTION
Inspection · Vehicles built May 2007 – Jul 2008
Versions by build date: May 2007 – Jul 2008 Aug 2008 – Jun 2010 from Jul 2010
| INSPECT IGNITION COIL ASSEMBLY |

Check for DTCs.
- NOTICE:
- If any DTC is present, perform troubleshooting in accordance with the procedure for that DTC.
Remove the ignition coil assembly and spark plug (Click here).
Check that sparks occur.
Disconnect the 6 fuel injector connectors.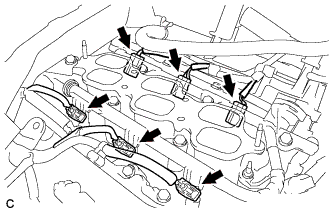

Install the spark plug to ignition coil, and connect the ignition coil connector.
Ground the spark plugs.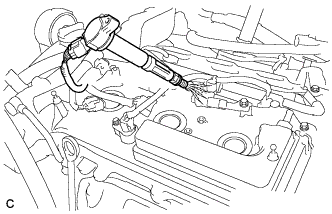
Check if spark occurs at each spark plug while the engine is being cranked.
- NOTICE:
- Be sure to ground the spark plugs during the inspection.
- Replace the ignition coil if it receives an impact.
- Do not crank the engine for more than 2 seconds.
- Be sure to ground the spark plugs during the inspection.
Perform the spark test according to the flowchart below:
Check that the ignition coil connector is securely connected.
- Result:
Result
Action
NG
Connect securely
OK
Go to next step
Perform a spark test on each ignition coil.
- Replace the ignition coil with a known good one.
- Perform the spark test again.
- Result:
Result
Action
NG
Go to next step
OK
Replace ignition coil
- Replace the ignition coil with a known good one.
Check the spark plug (to INSPECT SPARK PLUG).
- Result:
Result
Action
NG
Replace spark plug
OK
Go to next step
Check the power supply to the ignition coil.
- Turn the ignition switch on (IG).
- Check that there is battery voltage at the ignition coil positive (+) terminal.
- Result:
Result
Action
NG
Check wiring between ignition switch and ignition coil
OK
Go to next step
- Turn the ignition switch on (IG).
Measure the resistance of the crankshaft position sensor (Click here).
- Result:
Result
Action
NG
Replace crankshaft position sensor
OK
Go to next step
Check the IGT signal from the ECM (Click here)
- Result:
Result
Action
NG
Check ECM
OK
Repair wiring between ignition coil and ECM
Using a 16 mm plug wrench, install the spark plugs.
- Torque:
- 18 N*m{ 183 kgf*cm , 13 ft.*lbf }
Connect the 6 fuel injector connectors.
Install the ignition coil assembly (Click here).
| INSPECT SPARK PLUG |
- NOTICE:
- Never use a wire brush for cleaning.
- Never attempt to adjust the electrode gap on a used spark plug.
- Never use a wire brush for cleaning.
Check the electrode.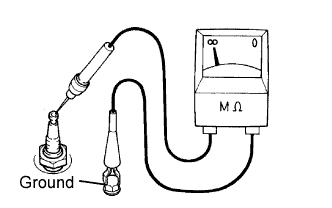
Using a megohmmeter, measure the insulation resistance.
- Standard insulation resistance:
- 10 MΩ or higher
- HINT:
- If the result is below 10 MΩ, clean the plug and measure the resistance again.
- If a megohmmeter is not available, perform the following inspection instead.
- If the result is below 10 MΩ, clean the plug and measure the resistance again.
Alternative inspection method:
Quickly accelerate the engine to 4000 rpm 5 times.
Remove the spark plugs.
Visually check the spark plug.
If the electrode is dry, the spark plug is functioning properly. If the electrode is damp, proceed to the next step.
Check the spark plug for any damage to its threads and insulator. If there is damage, replace the spark plug.
- Recommended spark plug:
Manufacturer
Spark Plug Type
DENSO
FK20HR11
- NOTICE:
- Use only the listed spark plug or equivalent to ensure engine performance and smooth driveability.
Check the spark plug electrode gap.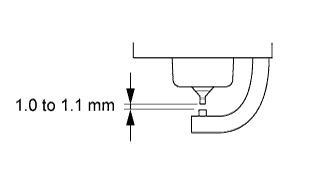
- Electrode gap for a new spark plug (for reference):
- 1.0 to 1.1 mm (0.039 to 0.043 in.)
- Maximum electrode gap for a used spark plug:
- 1.4 mm (0.055 in.)
Clean the spark plugs.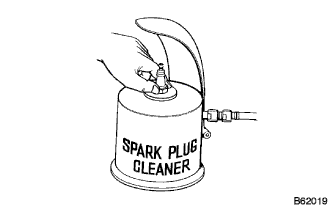
If the electrode has traces of wet carbon, clean the electrode with a spark plug cleaner and then dry it.- Standard air pressure:
- 588 kPa (6 kgf/cm2, 85 psi)
- Standard duration:
- 20 seconds or less
- HINT:
- Only use the spark plug cleaner when the electrode is free of oil. If the electrode has traces of oil, use gasoline to clean off the oil before using the spark plug cleaner.
Install the ignition coil assembly and spark plug. (Click here).