INSTALLATION
Removal / installation · Vehicles built May 2007 – Jun 2010
Versions by build date: May 2007 – Jun 2010 from Jul 2010
- HINT:
- When installing a new name plate and emblem, heat the vehicle body, name plate and emblem using a heat light.
- Heating temperature:
Item
Temperature
Vehicle Body
40 to 60°C (104 to 140°F)
Name Plate, Emblem
20 to 30°C (68 to 86°F)
- NOTICE:
- Do not heat the vehicle body, name plate or emblem excessively.
| 1. INSTALL SYMBOL EMBLEM |

Clean the vehicle body surface.
Using a heat light, heat the vehicle body surface.
Remove any double-sided tape from the vehicle body.
Wipe off any tape adhesive residue with cleaner.
Install a new symbol emblem.
Using a heat light, heat the vehicle body and a new symbol emblem.
Remove the release paper from the symbol emblem.
- HINT:
- After removing the release paper, keep the exposed adhesive free from foreign matter.
Install the symbol emblem as shown in the illustration.
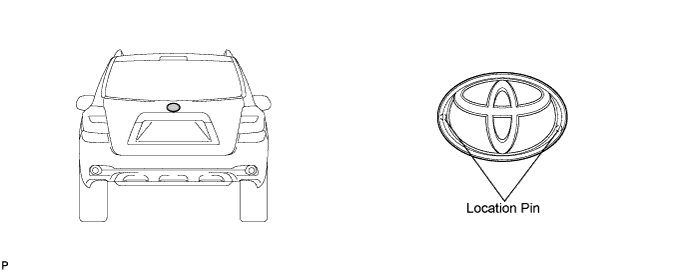

| 2. INSTALL NO. 2 BACK DOOR NAME PLATE |
Clean the vehicle body surface.
Using a heat light, heat the vehicle body surface.
Remove any double-sided tape from the vehicle body.
Wipe off any tape adhesive residue with cleaner.
Install a new name plate.
Using a heat light, heat the vehicle body and a new name plate.
Remove the release paper from the name plate.
- HINT:
- After removing the release paper, keep the exposed adhesive free from foreign matter.
Install the name plate as shown in the illustration.
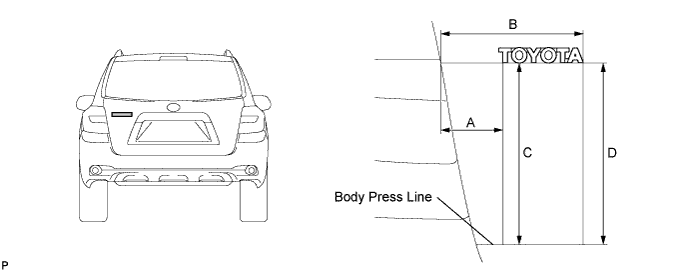
- Standard measurement:
Dimension
Measurement
A
96.9 mm (3.815 in.)
B
218.9 mm (8.618 in.)
C
277.8 mm (10.937 in.)
D
277.0 mm (10.905 in.)
| 3. INSTALL NO. 4 BACK DOOR NAME PLATE |
Clean the vehicle body surface.
Using a heat light, heat the vehicle body surface.
Remove any double-sided tape from the vehicle body.
Wipe off any tape adhesive residue with cleaner.
Install a new name plate.
Using a heat light, heat the vehicle body and a new name plate.
Remove the release paper from the name plate.
- HINT:
- After removing the release paper, keep the exposed adhesive free from foreign matter.
Install the name plate as shown in the illustration.
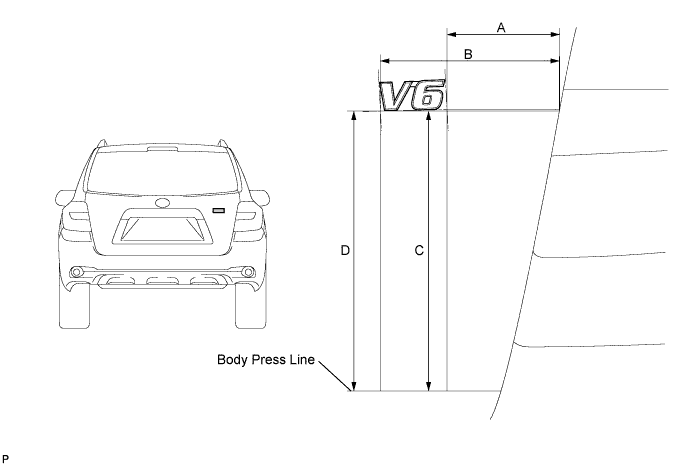
- Standard measurement:
Dimension
Measurement
A
105.1 mm (4.138 in.)
B
166.0 mm (6.535 in.)
C
264.5 mm (10.413 in.)
D
262.3 mm (10.327 in.)
| 4. INSTALL BACK DOOR NAME PLATE |
Clean the vehicle body surface.
Using a heat light, heat the vehicle body surface.
Remove any double-sided tape from the vehicle body.
Wipe off any tape adhesive residue with cleaner.
Install a new name plate.
Using a heat light, heat the vehicle body and a new name plate.
Remove the release paper from the name plate.
- HINT:
- After removing the release paper, keep the exposed adhesive free from foreign matter.
Install the name plate as shown in the illustration.
for AWD plate: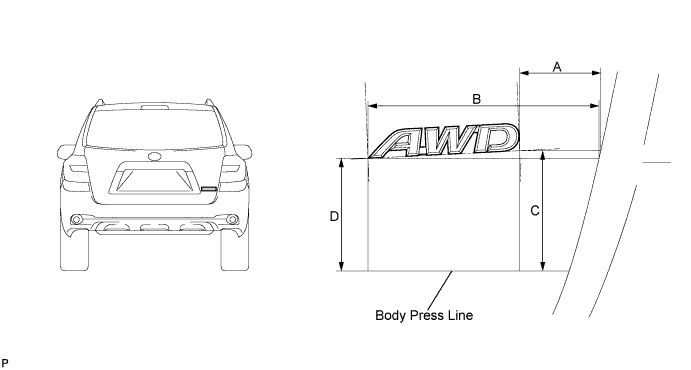
- Standard measurement:
Dimension
Measurement
A
46.0 mm (1.811 in.)
B
133.0 mm (5.236 in.)
C
68.5 mm (2.697 in.)
D
65.3 mm (2.571 in.)
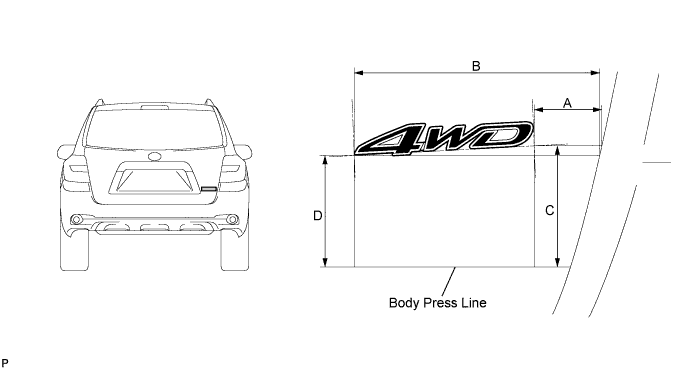
- Standard measurement:
Dimension
Measurement
A
37.5 mm (1.476 in.)
B
141.3 mm (5.563 in.)
C
69.5 mm (2.736 in.)
D
65.4 mm (2.575 in.)
| 5. INSTALL FRONT DOOR NAME PLATE |
Clean the vehicle body surface.
Using a heat light, heat the vehicle body surface.
Remove any double-sided tape from the vehicle body.
Wipe off any tape adhesive residue with cleaner.
Install a new name plate.
Using a heat light, heat the vehicle body and a new name plate.
Remove the release paper from the name plate.
- HINT:
- After removing the release paper, keep the exposed adhesive free from foreign matter.
Install the name plate as shown in the illustration.
for SPORT plate on LH side: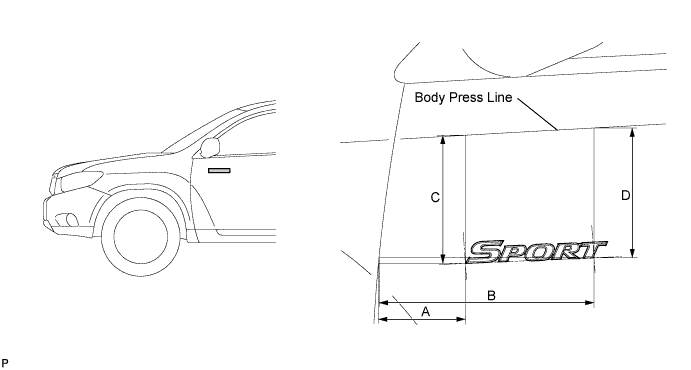
- Standard measurement:
Dimension
Measurement
A
103.9 mm (4.091 in.)
B
255.9 mm (10.075 in.)
C
173.3 mm (6.823 in.)
D
174.7 mm (6.878 in.)
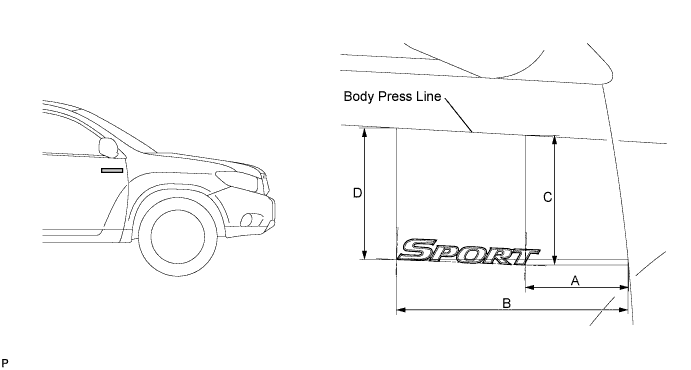
- Standard measurement:
Dimension
Measurement
A
121.1 mm (4.768 in.)
B
273.0 mm (10.748 in.)
C
173.4 mm (6.827 in.)
D
174.9 mm (6.886 in.)
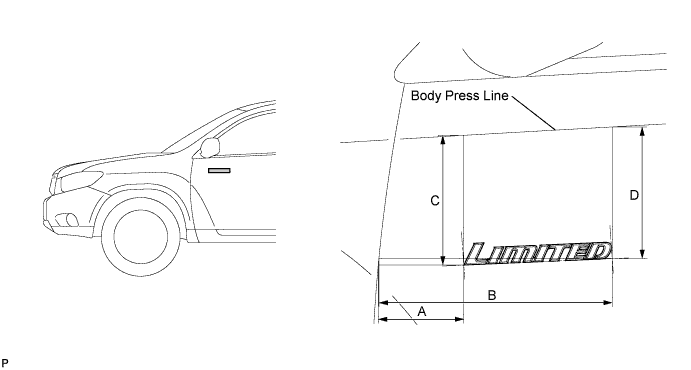
- Standard measurement:
Dimension
Measurement
A
100.6 mm (3.961 in.)
B
276.3 mm (10.878 in.)
C
173.3 mm (6.823 in.)
D
174.9 mm (6.886 in.)
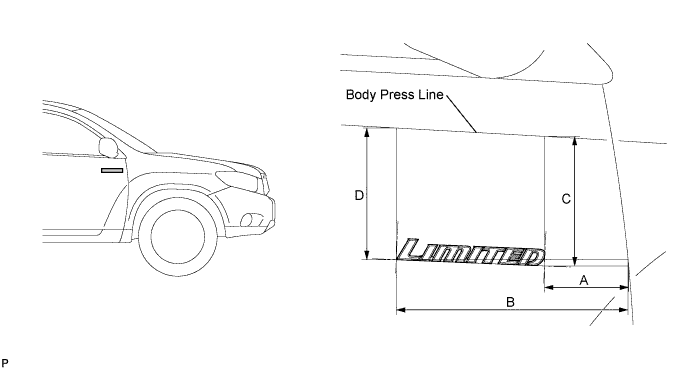
- Standard measurement:
Dimension
Measurement
A
100.9 mm (3.972 in.)
B
276.3 mm (10.878 in.)
C
173.3 mm (6.823 in.)
D
174.9 mm (6.886 in.)
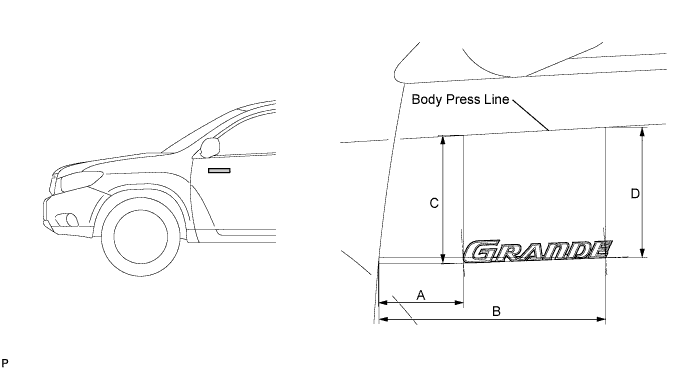
- Standard measurement:
Dimension
Measurement
A
99.8 mm (3.929 in.)
B
268.8 mm (10.583 in.)
C
173.3 mm (6.823 in.)
D
174.8 mm (6.882 in.)
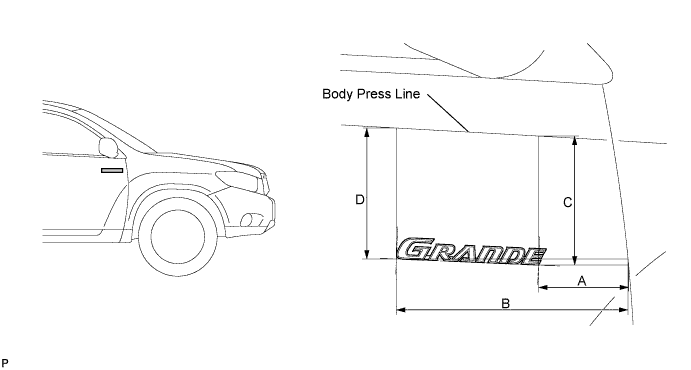
- Standard measurement:
Dimension
Measurement
A
108.1 mm (4.256 in.)
B
277.1 mm (10.909 in.)
C
178.4 mm (7.024 in.)
D
174.9 mm (6.886 in.)