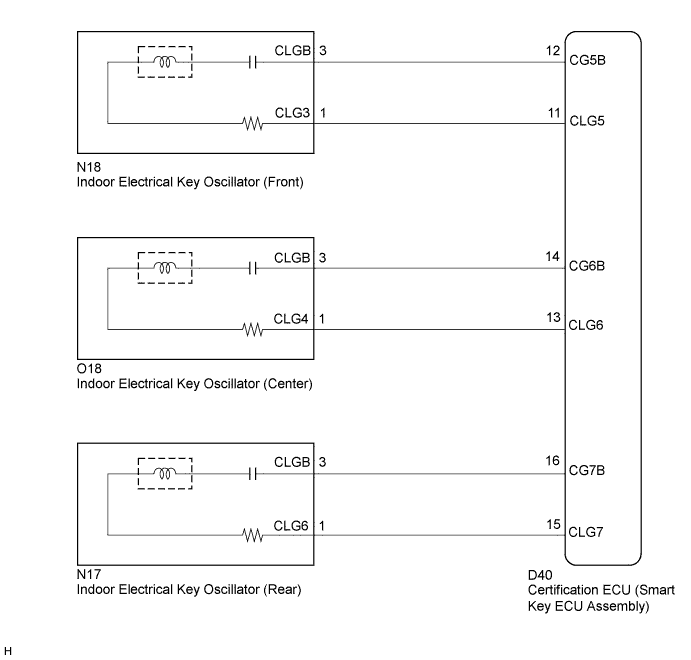
SMART KEY SYSTEM > Room Oscillator does not Recognize Key |
| 1.CHECK SMART KEY SYSTEM (ENTRY FUNCTION) |
Check that entry lock and unlock functions can be operated at each door.
|
| ||||
| OK | |
 |
| 2.CHECK SMART KEY SYSTEM (START FUNCTION) |
Remove the battery of the electrical key transmitter (Click here).
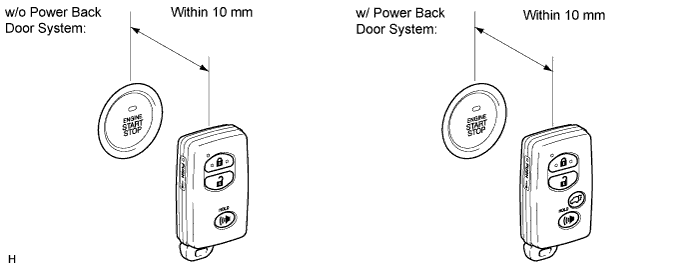
With the brake pedal depressed, face the logo side of the key to the engine switch.
When operating the engine switch, check whether the power source mode changes.
|
| ||||
| OK | |
|
| 3.CHECK WAVE ENVIRONMENT |
Install the battery to the electrical key transmitter.
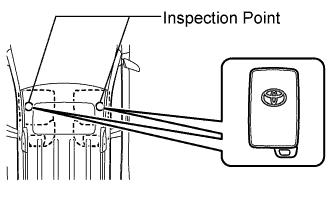 |
Bring the electrical key transmitter near the indoor electrical key oscillator (front), and perform an engine start check.
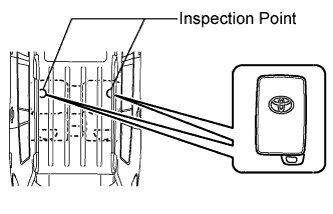 |
Bring the electrical key transmitter near the indoor electrical key oscillator (center), and perform an engine start check.
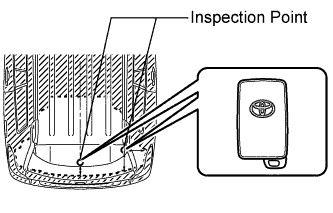 |
Bring the electrical key transmitter near the indoor electrical key oscillator (rear), and perform an engine start check.
|
| ||||
| OK | ||
 | ||
| ||
| 4.PERFORM KEY DIAGNOSTIC MODE INSPECTION |
|
Diagnostic mode inspection (indoor electrical key oscillator (front))
Connect Techstream to the DLC3.
Turn the engine switch on (IG).
Turn the tester on.
Enter the following menus:
Body Electrical / Smart Key / Utility / Communication Check (Key Diag Mode) / Overhead + Front Room.
When the electrical key transmitter is placed on the driver seat or front passenger seat cushion, check that the wireless door lock buzzer sounds.
|
Diagnostic mode inspection (indoor electrical key oscillator (center))
Connect Techstream to the DLC3.
Turn the engine switch on (IG).
Turn the tester on.
Enter the following menus:
Body Electrical / Smart Key / Utility / Communication Check (Key Diag Mode) / Overhead + Rear Room.
When the electrical key transmitter is placed on the rear seat cushion, check that the wireless door lock buzzer sounds.
|
Diagnostic mode inspection (indoor electrical key oscillator (rear))
Connect Techstream to the DLC3.
Turn the engine switch on (IG).
Turn the tester on.
Enter the following menus:
Body Electrical / Smart Key / Utility / Communication Check (Key Diag Mode) / Overhead + Back Door (inside).
When the electrical key transmitter is held at the same height as the rear bumper upper surface and aligned with the center of the rear of the vehicle, check that the wireless door lock buzzer sounds.
| Result | Proceed to |
| Front, center and rear operation checks are normal or fail | A |
| Center operation check is normal | B |
| Rear operation check is normal | C |
| Front operation check is normal | D |
|
| ||||
|
| ||||
|
| ||||
| D | |
|
| 5.CHECK HARNESS AND CONNECTOR (CERTIFICATION ECU - INDOOR ELECTRICAL KEY OSCILLATOR) |
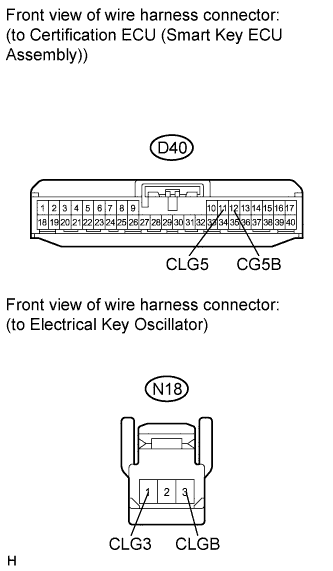 |
Disconnect the certification ECU (smart key ECU assembly) and indoor electrical key oscillator front connectors.
Measure the resistance according to the value(s) in the table below.
| Tester Connection | Condition | Specified Condition |
| D40-11 (CLG5) - N18-1 (CLG3) | Always | Below 1 Ω |
| D40-12 (CG5B) - N18-3 (CLGB) | Always | Below 1 Ω |
| D40-11 (CLG5) - Body ground | Always | 10 kΩ or higher |
| D40-12 (CG5B) - Body ground | Always | 10 kΩ or higher |
|
| ||||
| OK | |
|
| 6.INSPECT INDOOR ELECTRICAL KEY OSCILLATOR (FRONT) |
Measure the voltage according to the value(s) in the table below.
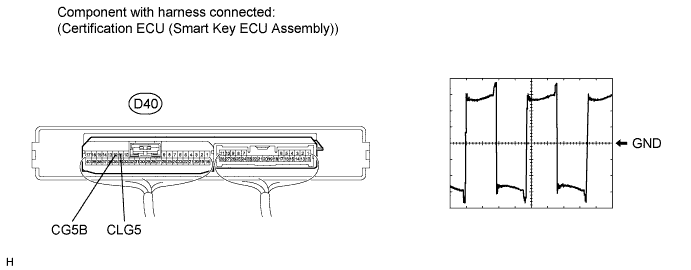
| Tester Connection | Tool Setting | Condition | Specified Condition |
| D40-11 (CLG5) - D40-12 (CG5B) | 2 V/DIV, 2 μs/DIV. (Reference) | Engine switch on (IG) | Pulse generation |
|
| ||||
| OK | ||
| ||
| ||
| 7.CHECK HARNESS AND CONNECTOR (CERTIFICATION ECU - INDOOR ELECTRICAL KEY OSCILLATOR) |
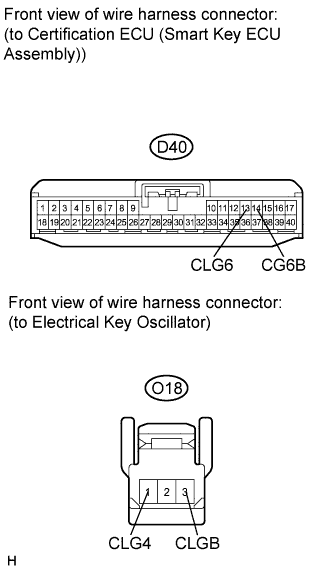 |
Disconnect the certification ECU (smart key ECU assembly) and indoor electrical key oscillator center connectors.
Measure the resistance according to the value(s) in the table below.
| Tester Connection | Condition | Specified Condition |
| D40-13 (CLG6) - O18-1 (CLG4) | Always | Below 1 Ω |
| D40-14 (CG6B) - O18-3 (CLGB) | Always | Below 1 Ω |
| D40-13 (CLG6) - Body ground | Always | 10 kΩ or higher |
| D40-14 (CG6B) - Body ground | Always | 10 kΩ or higher |
|
| ||||
| OK | |
|
| 8.INSPECT INDOOR ELECTRICAL KEY OSCILLATOR (CENTER) |
Measure the voltage according to the value(s) in the table below.
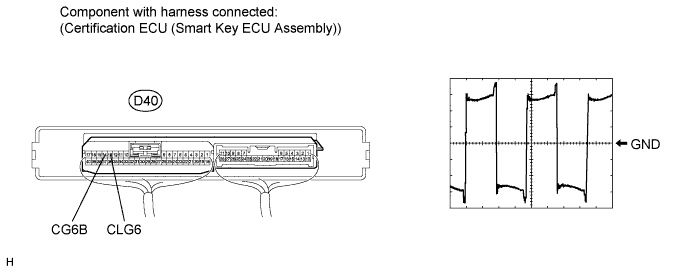
| Tester Connection | Tool Setting | Condition | Specified Condition |
| D40-13 (CLG6) - D40-14 (CG6B) | 2 V/DIV, 2 μs/DIV. (Reference) | Engine switch on (IG) | Pulse generation |
|
| ||||
| OK | ||
| ||
| ||
| 9.CHECK HARNESS AND CONNECTOR (CERTIFICATION ECU - INDOOR ELECTRICAL KEY OSCILLATOR) |
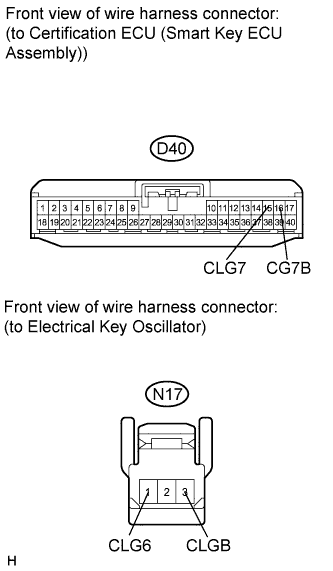 |
Disconnect the certification ECU (smart key ECU assembly) and indoor electrical key oscillator rear connectors.
Measure the resistance according to the value(s) in the table below.
| Tester Connection | Condition | Specified Condition |
| D40-15 (CLG7) - N17-1 (CLG6) | Always | Below 1 Ω |
| D40-16 (CG7B) - N17-3 (CLGB) | Always | Below 1 Ω |
| D40-15 (CLG7) - Body ground | Always | 10 kΩ or higher |
| D40-16 (CG7B) - Body ground | Always | 10 kΩ or higher |
|
| ||||
| OK | |
|
| 10.INSPECT INDOOR ELECTRICAL KEY OSCILLATOR (REAR) |
Measure the voltage according to the value(s) in the table below.
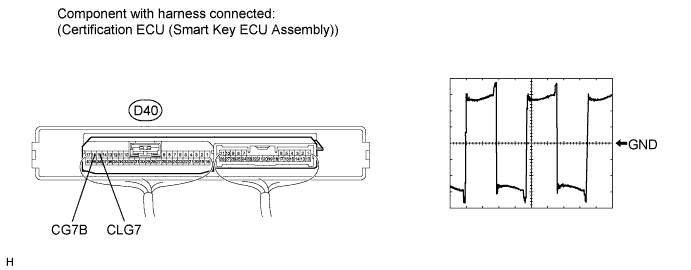
| Tester Connection | Tool Setting | Condition | Specified Condition |
| D40-15 (CLG7) - D40-16 (CG7B) | 2 V/DIV, 2 μs/DIV. (Reference) | Engine switch on (IG) | Pulse generation |
|
| ||||
| OK | ||
| ||
| ||

