Home › DRIVE LINE › DRIVE SHAFT › FRONT DRIVE SHAFT

FRONT DRIVE SHAFT > INSTALLATION

for Preparation Click here


1. INSTALL FRONT DRIVE SHAFT ASSEMBLY LH


    C165536
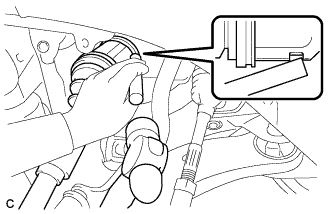
  1. Align the shaft splines and install the drive shaft assembly LH with a brass bar and hammer.

    NOTICE:
    1. Set the shaft snap ring with the opening facing down.
    2. Be careful not to damage the drive shaft dust cover, boot, or oil seal.
    3. Move the drive shaft assembly while keeping it level.


2. INSTALL FRONT DRIVE SHAFT ASSEMBLY RH (for 2WD)
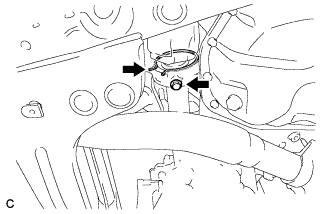
  1. Install the front drive shaft assembly RH.


    C167529
  1. Install a new bearing bracket hole snap ring and bolt.

    Torque:
    32 N*m{ 326 kgf*cm , 24 ft.*lbf }

    NOTICE:
    1. Do not damage the boot or oil seal.
    2. Move the drive shaft assembly while keeping it level.


3. INSTALL FRONT DRIVE SHAFT ASSEMBLY RH (for 4WD)

HINT:
Perform the same procedure as for the LH side.


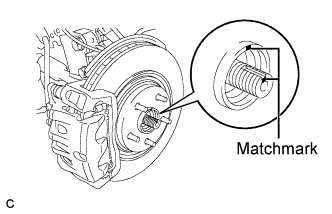
4. INSTALL FRONT AXLE ASSEMBLY LH


    C165537E05
  1. Align the matchmarks and install the front drive shaft assembly to the front axle hub sub-assembly.


5. INSTALL NO. 1 FRONT SUSPENSION LOWER ARM LH


    C165929
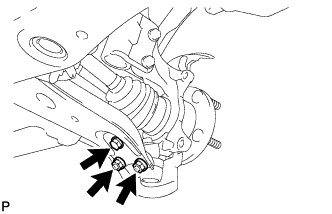
  1. Install the front lower suspension arm to the front lower ball joint with the bolt and 2 nuts.

    Torque:
    92 N*m{ 938 kgf*cm , 68 ft.*lbf }


6. INSTALL TIE ROD ASSEMBLY LH
  1. Connect the tie rod assembly LH to the steering knuckle with the nut.

    Torque:
    49 N*m{ 500 kgf*cm , 36 ft.*lbf }

  1. Install a new cotter pin.

    NOTICE:
    Further tighten the nut up to 60° if the holes for the cotter pin are not aligned.


7. INSTALL FRONT SPEED SENSOR LH


    C165818E03
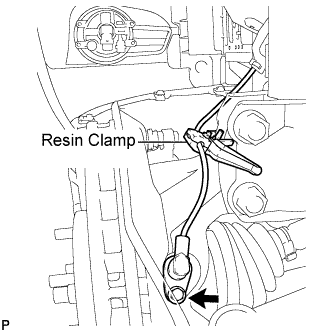
  1. Install the resin clamp and front speed sensor with the bolt.

    Torque:
    8.0 N*m{ 82 kgf*cm , 71 in.*lbf }

    NOTICE:
    1. Prevent foreign matter from attaching to the sensor tip.
    2. Firmly insert the sensor body into the knuckle before tightening the bolt.
    3. After installing the sensor to the knuckle, make sure that there is no clearance between the sensor stay and knuckle. Also make sure that no foreign matter is stuck between the parts.
    4. To prevent interference between the sensor and magnetic rotor, do not rotate the sensor body during or after the insertion of the sensor body to the knuckle.


8. INSTALL FRONT STABILIZER LINK ASSEMBLY LH


    C165915
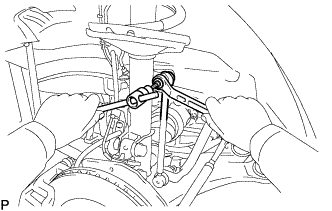
  1. Install the front stabilizer link assembly to the front shock absorber with the nut.

    Torque:
    74 N*m{ 755 kgf*cm , 55 ft.*lbf }

    NOTICE:
    If the ball joint turns together with the nut, use a hexagon wrench (6 mm) to hold the stud bolt.


9. INSTALL FRONT AXLE HUB NUT LH
  1. Clean the threaded parts on the drive shaft and axle hub nut using a non-residue solvent.

    HINT:
    1. Be sure to perform this work for a new drive shaft.
    2. Keep the threaded parts free of oil and foreign objects.


    C165538
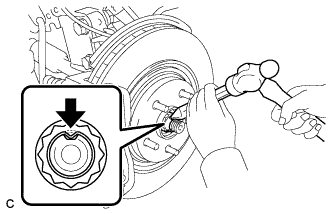
  1. Using a socket wrench (30 mm), install a new axle hub nut.

    Torque:
    294 N*m{ 2996 kgf*cm , 216 ft.*lbf }

  1. Using a chisel and hammer, stake the front axle hub nut.


10. INSTALL FRONT WHEELS

Torque:
103 N*m{ 1050 kgf*cm , 76 ft.*lbf }


11. ADD AUTOMATIC TRANSAXLE FLUID


12. CHECK AUTOMATIC TRANSAXLE FLUID

HINT:
Drive the vehicle so that the engine and transaxle are at normal operating temperature.

Fluid temperature:
70 to 80°C (158 to 176°F)

  1. Park the vehicle on a level surface and set the parking brake.


    D025120E05
  1. With the engine idling and the brake pedal depressed, move the shift lever to all positions from P to S1 and return to the P position.

  1. Take out the dipstick and wipe it clean.

  1. Put the dipstick back all the way.

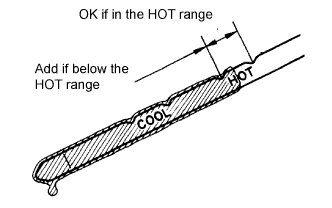
  1. Take out the dipstick again and check that the fluid level is within the HOT range.
    If the fluid level is below the HOT range, add new fluid and recheck the fluid level.
    If the fluid level exceeds the HOT range, drain the fluid once, add the proper amount of new fluid and recheck the fluid level.
    If there are leaks, it is necessary to repair or replace O-rings, FIPGs, oil seals, plugs and/or other parts.


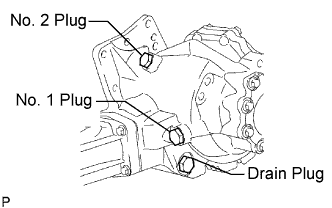
13. INSTALL TRANSFER DRAIN PLUG (for 4WD)


    C082977E05
  1. Install the transfer drain plug with a new drain gasket.

    Torque:
    49 N*m{ 500 kgf*cm , 36 ft.*lbf }


14. INSTALL NO. 1 TRANSFER CASE PLUG (for 4WD)
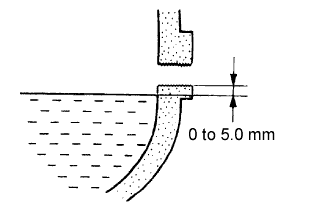
  1. Add oil up to 0 to 5 mm below the lower side of the plug hole.

    Oil quantity:
    0.9 liters (0.95 US qts, 0.79 lmp.qts)

    HINT:
    When adding oil, pour it slowly.

  1. Install the No. 1 transfer case plug with a new No. 1 gasket.

    Torque:
    49 N*m{ 500 kgf*cm , 36 ft.*lbf }


15. CHECK TRANSFER OIL (for 4WD)


    C083746E03
  1. Remove the No. 1 transfer case plug and gasket.

  1. Check the oil level is within 0 to 5 mm (0 to 0.20 in.) below the lowest end of the hole for the No. 1 transfer case plug.

    NOTICE:
    1. When changing oil, recheck the oil level after driving.
    2. Excessively large or small quantity of oil may cause some trouble.

  1. When the oil level is too low, check for oil leakage.

  1. Tighten the No. 1 transfer case plug with a new gasket.

    Torque:
    49 N*m{ 500 kgf*cm , 36 ft.*lbf }


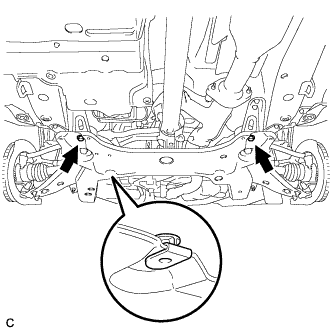
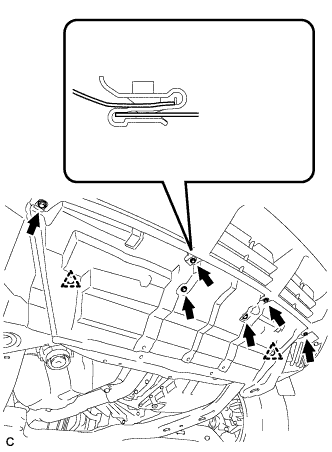
16. INSTALL NO. 2 ENGINE UNDER COVER


    A171854
  1. Install the No. 2 engine under cover with the 2 bolts.


17. INSTALL NO. 1 ENGINE UNDER COVER


    A171855
  1. Install the No. 1 engine under cover with the 6 bolts and 2 clips.


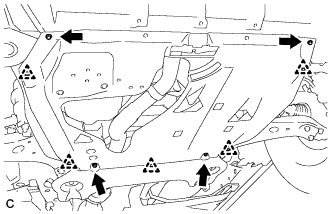
18. INSTALL ENGINE UNDER COVER ASSEMBLY


    A171850
  1. Install the engine under cover assembly with the 4 bolts and 5 clips.


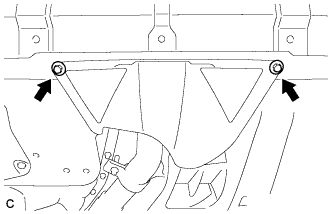
    A171849
  1. Install the engine under cover assembly RR with the 2 bolts.


19. ADJUST FRONT WHEEL ALIGNMENT

HINT:
(Click here)


20. CHECK ABS SPEED SENSOR SIGNAL

HINT:
(Click here)