Home › SUSPENSION & AXLE › SUSPENSION › REAR SUSPENSION MEMBER (for 4WD)

REAR SUSPENSION MEMBER (for 4WD) > INSTALLATION

for Preparation Click here


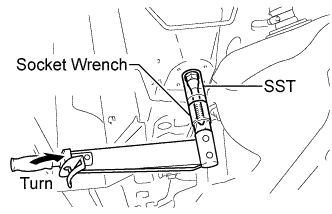
1. INSTALL STUD BOLT (for LH Side)


    C166227E01
  1. Using SST and a socket wrench (21 mm), install the stud bolt.

    SST
    09817-33190  

    Torque:
    180 N*m{ 1840 kgf*cm , 133 ft.*lbf }


2. INSTALL STUD BOLT (for RH Side)

HINT:
Perform the same procedure as the LH side.


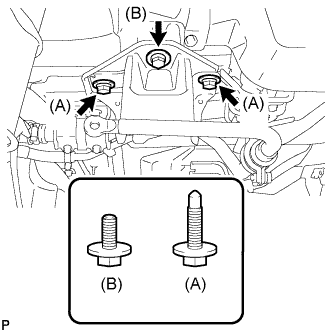
3. TEMPORARILY INSTALL REAR NO. 2 BODY MOUNTING BRACKET SUB-ASSEMBLY LH


    C166229E01
  1. Temporarily install the rear No. 2 body mounting bracket sub-assembly LH with the 2 bolts (A) and bolt (B).

    NOTICE:
    Two types of bolts are used. Install each bolt to the correct position.


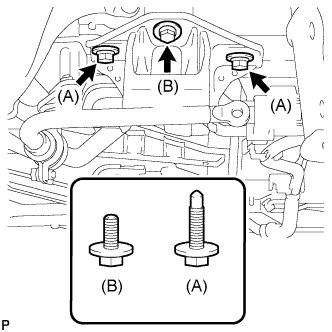
4. TEMPORARILY INSTALL REAR NO. 2 BODY MOUNTING BRACKET SUB-ASSEMBLY RH


    C166231E01
  1. Temporarily install the rear No. 2 body mounting bracket sub-assembly RH with the 2 bolts (A) and bolt (B).

    NOTICE:
    Two types of bolts are used. Install each bolt to the correct position.


5. INSTALL HOLE PLUG


    C168184
  1. Install the 2 hole plugs.


6. INSTALL REAR SUSPENSION MEMBER BODY MOUNTING FRONT CUSHION (for LH Side)


    C168192
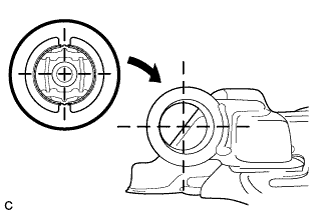
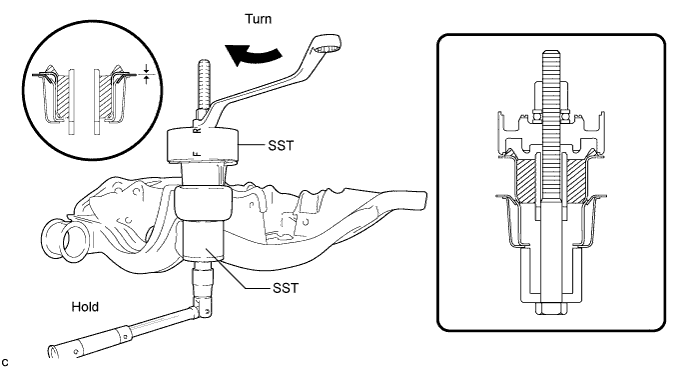
  1. Temporarily install a new rear suspension member body mounting front cushion while confirming the installation direction.


  1. Using SST, install the rear suspension member body mounting front cushion until there is no clearance between the suspension member sub- assembly and the rear suspension member body mounting front cushion.

    C168191E01

    SST
    09830-10010   (09830-01010, 09830-01020, 09830-01030, 09830-01060)

    NOTICE:
    1. Tighten SST slowly and evenly.
    2. Apply a small amount of grease to the threads of SST (center bolt) before use.
    3. Install the side marked "F" of SST to the body mounting cushion.


7. INSTALL REAR SUSPENSION MEMBER BODY MOUNTING FRONT CUSHION (for RH Side)

HINT:
Perform the same procedure as the LH side.


8. INSTALL REAR SUSPENSION MEMBER BODY MOUNTING REAR CUSHION (for LH Side)


    C168194
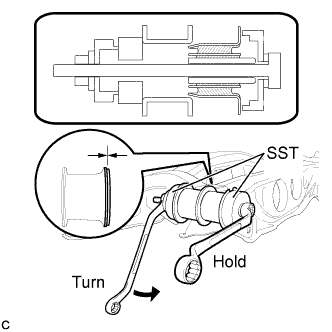
  1. Temporarily install a new rear suspension member body mounting rear cushion while confirming the installation direction


    C168193E01
  1. Using SST, install the rear suspension member rear body mounting cushion until there is no clearance between the suspension member sub- assembly and the rear suspension member body mounting rear cushion.

    SST
    09830-36010  
    09515-21010  

    NOTICE:
    1. Tighten SST slowly and evenly.
    2. Apply a small amount of grease to the threads of SST (center bolt) before use.


9. INSTALL REAR SUSPENSION MEMBER BODY MOUNTING REAR CUSHION (for RH Side)

HINT:
Perform the same procedure as the LH side.


10. INSTALL REAR NO. 1 DIFFERENTIAL MOUNT CUSHION


  1. Using SST, install a new rear No. 1 differential mount cushion.
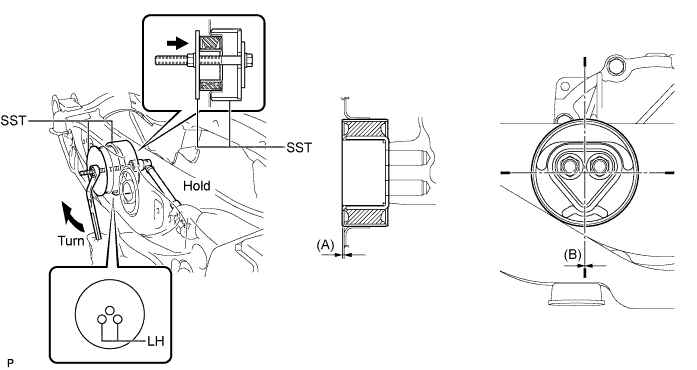
    SST
    09570-24011  

    (A):
    2.2 +/- 0.5 mm (0.09 +/- 0.02 in.)

    (B):
    0° +/- 3°


    C167113E01

    NOTICE:
    Do not set SST in the wrong direction.

    HINT:
    Perform this operation only when the No. 1 rear differential mount cushion is replaced.


11. INSTALL REAR NO. 2 DIFFERENTIAL MOUNT CUSHION


  1. Using SST, install a new rear No. 2 differential mount cushion.
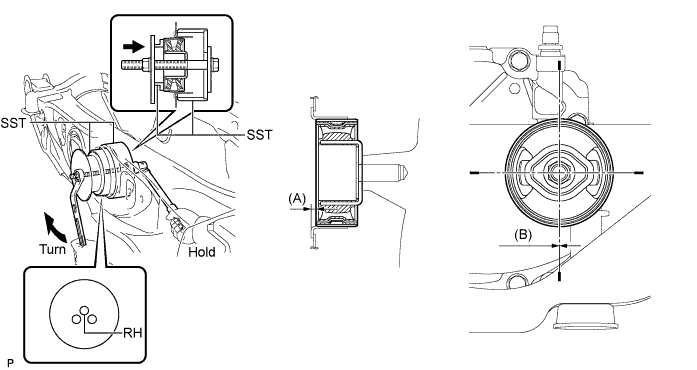
    SST
    09570-24011  
    09316-12010  

    (A):
    4.7 +/- 0.5 mm (0.19 +/- 0.02 in.)

    (B):
    0° +/- 3°


    C167114E02

    NOTICE:
    Do not set SST in the wrong direction.

    HINT:
    Perform this operation only when the No. 2 rear differential mount cushion is replaced.


12. INSTALL REAR DIFFERENTIAL CARRIER ASSEMBLY


    C167088
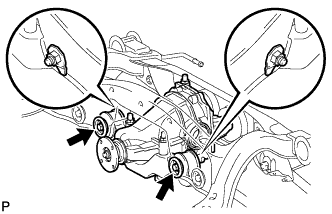
  1. Jack up the rear differential carrier assembly and rear suspension member sub-assembly with a jack.

  1. Connect the No. 1 rear differential support to the rear suspension member sub-assembly with the 2 bolts and 2 lock nuts.
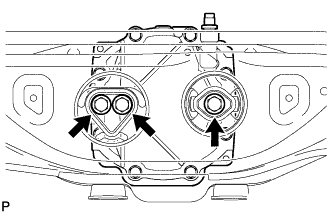
    Torque:
    137 N*m{ 1400 kgf*cm , 101 ft.*lbf }


    C167089
  1. Install the rear differential carrier assembly to the rear suspension member sub-assembly with the 3 bolts.

    Torque:
    95 N*m{ 970 kgf*cm , 70 ft.*lbf }


13. TEMPORARILY INSTALL REAR NO. 1 SUSPENSION ARM ASSEMBLY LH


    C166220E01
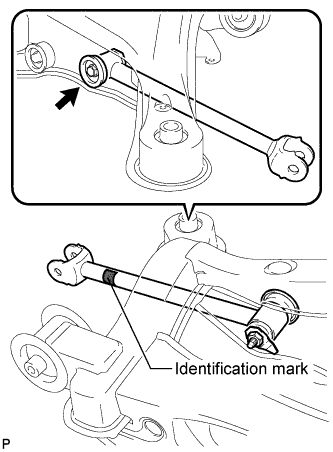
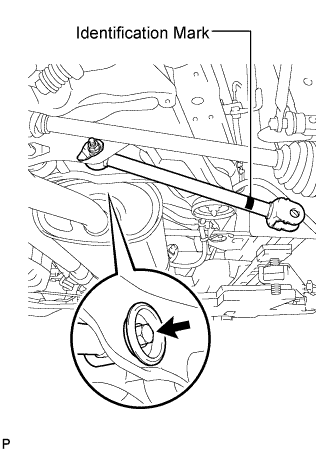
  1. Temporarily install the rear No. 1 suspension arm assembly LH to the rear suspension member sub-assembly with the bolt and the nut.
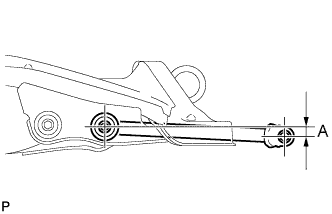
    NOTICE:
    1. Ensure that the identification mark faces the rear side of the vehicle.
    2. Since a stopper nut is used, temporarily tighten the bolt.


    C166221E01
  1. Set the rear No. 1 suspension arm LH in the position shown in the illustration.

    Length A:
    20 mm (0.787 in.)

  1. Fully tighten the bolt.

    Torque:
    80 N*m{ 815 kgf*cm , 59 ft.*lbf }

    NOTICE:
    Since a stopper nut is used, temporarily tighten the bolt.


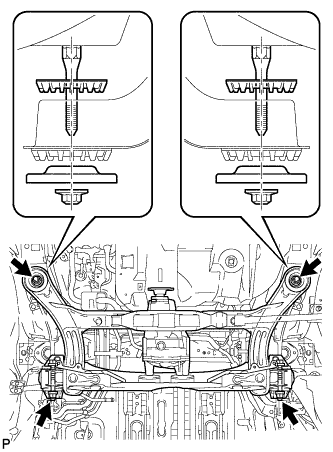
14. TEMPORARILY INSTALL REAR SUSPENSION MEMBER


    C166233E01
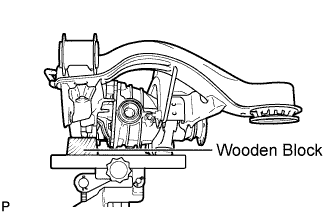
  1. Support the rear suspension member with a jack using a wooden block.
    HINT:
    1. Use a properly sized wooden block to keep the jack and suspension member level.
    2. Support the rear suspension member until retightening of the suspension member is complete.


    C166255
  1. Raise the rear suspension member with a jack.

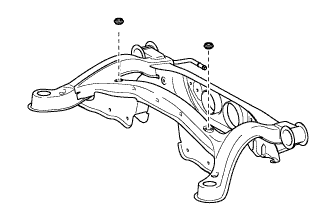
  1. Temporarily install the rear suspension member, the 2 rear upper suspension member stoppers and rear lower suspension member stopper retainers with the 4 nuts and the 2 bolts.
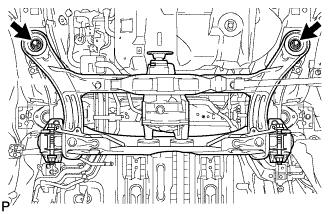


    C166224E02
  1. Fully tighten the 2 nuts.

    Torque:
    115 N*m{ 1170 kgf*cm , 85 ft.*lbf }


15. FULLY TIGHTEN REAR NO. 2 BODY MOUNTING BRACKET SUB-ASSEMBLY LH
  1. Lightly shake the rear suspension member to settle the body mounting cushion in the rear No. 2 body mounting bracket sub-assembly.
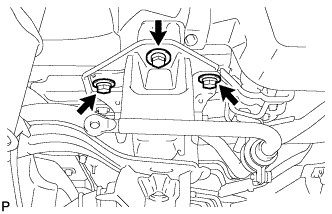


    C166228
  1. Fully tighten the 3 bolts.

    Torque:
    90 N*m{ 920 kgf*cm , 66 ft.*lbf }


16. FULLY TIGHTEN REAR NO. 2 BODY MOUNTING BRACKET SUB-ASSEMBLY RH
  1. Lightly shake the rear suspension member to settle the body mounting cushion in the rear No. 2 body mounting bracket sub-assembly.
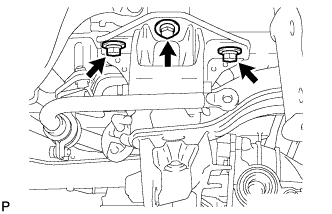


    C166230
  1. Fully tighten the 3 bolts.

    Torque:
    90 N*m{ 920 kgf*cm , 66 ft.*lbf }


17. FULLY TIGHTEN REAR SUSPENSION MEMBER


    C167779E01
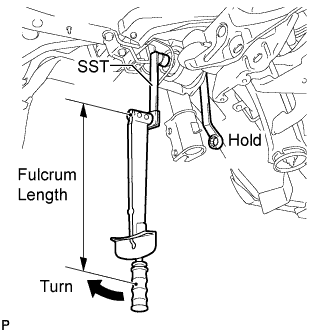
  1. Using SST and a socket wrench (19 mm), fully tighten the nut (LH side).
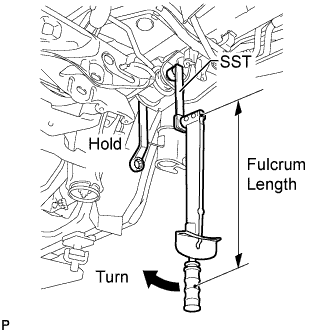
    Torque:
    without SST:
    181 N*m{ 1850 kgf*cm , 133 ft.*lbf }
    with SST:
    134 N*m{ 1366 kgf*cm , 98 ft.*lbf }

    SST
    09961-00950  

    NOTICE:
    1. Use a torque wrench with a fulcrum length of 425 mm (16.73 in.).
    2. This torque value is effective when SST is parallel to the torque wrench.


    C166256E01
  1. Using SST and a socket wrench (19 mm), fully tighten the nut (RH side).

    Torque:
    without SST:
    181 N*m{ 1850 kgf*cm , 133 ft.*lbf }
    with SST:
    134 N*m{ 1366 kgf*cm , 98 ft.*lbf }

    SST
    09961-00950  

    NOTICE:
    1. Use a torque wrench with a fulcrum length of 425 mm (16.73 in.).
    2. This torque value is effective when SST is parallel to the torque wrench.


18. INSTALL REAR DRIVE SHAFT SNAP RING LH
  1. Install a new rear drive shaft snap ring.


19. INSTALL REAR DRIVE SHAFT ASSEMBLY LH


    C166347
  1. Align the shaft splines and install the rear drive shaft assembly with a brass bar and hammer.

    NOTICE:
    1. Set the snap ring with the opening facing downward.
    2. Be careful not to damage the oil seal, boot, or dust cover.
    3. Install the drive shaft assembly while keeping it level.


20. INSTALL REAR DRIVE SHAFT SNAP RING RH

HINT:
Perform the same procedure as the LH side.


21. INSTALL REAR DRIVE SHAFT ASSEMBLY RH

HINT:
Perform the same procedure as the LH side.


22. INSTALL REAR DIFFERENTIAL DRAIN PLUG


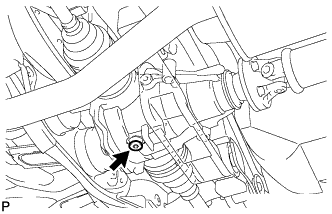
    C166707
  1. Using a hexagon wrench (10 mm), install the filler plug with a new gasket.

    Torque:
    49 N*m{ 500 kgf*cm , 36 ft.*lbf }


23. ADD DIFFERENTIAL OIL
  1. Fill the rear differential carrier assembly with hypoid gear oil.


24. INSPECT DIFFERENTIAL OIL
  1. Stop the vehicle on a level place.

  1. Remove the differential filler plug and gasket.
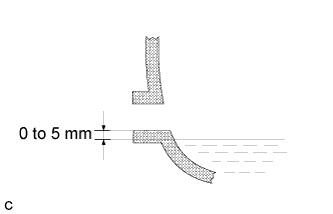


    C165855E01
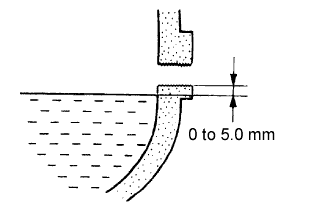
  1. Check that the oil surface is within 5 mm (0.20 in.) of the lowest position of the inner surface of the differential filler plug opening.

    NOTICE:
    1. Excessively large or small amounts of oil may cause trouble.
    2. After replacing oil, drive the vehicle and check the oil level.

    HINT:
    If necessary, fill the rear differential carrier with hypoid gear oil.

    Oil grade:
    Hypoid gear oil API GL-5
    Recommended oil viscosity:
    Above -18°C (0°F) : SAE 90
    Below -18°C (0°F) : SAE 80W or 80W-90
    Capacity:
    0.9 +/- 0.05 liters (0.95 +/- 0.05 US qts, 0.79 +/- 0.04 lmp. qts)

  1. Check for oil leakage when the oil level is low.

  1. Install the differential filler plug and a new gasket.

    Torque:
    49 N*m{ 500 kgf*cm , 36 ft.*lbf }


25. INSTALL REAR DIFFERENTIAL FILLER PLUG


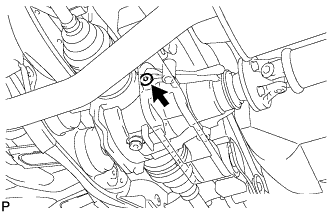
    C166706
  1. Using a hexagon wrench (10 mm), install the filler plug with a new gasket.

    Torque:
    49 N*m{ 500 kgf*cm , 36 ft.*lbf }


26. TEMPORARILY INSTALL REAR NO. 1 SUSPENSION ARM ASSEMBLY RH


C166223E01
  1. Temporarily install the rear No. 1 suspension arm assembly RH to the rear suspension member sub-assembly with the bolt and the nut.

    NOTICE:
    1. Ensure that the identification mark faces the rear side of the vehicle.
    2. Since a stopper nut is used, temporarily tighten the bolt.


27. TEMPORARILY INSTALL REAR NO. 2 SUSPENSION ARM ASSEMBLY LH


C166222E02
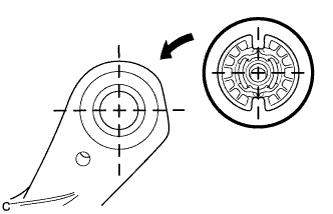
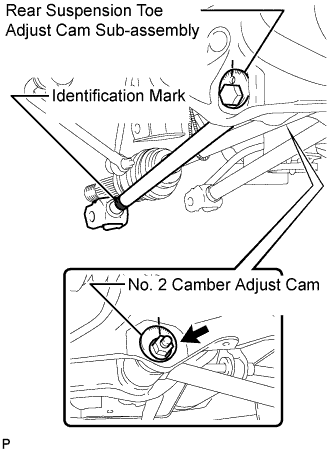
  1. Temporarily install the rear No. 2 suspension arm assembly LH to the rear suspension member sub-assembly with the rear suspension toe adjust cam sub-assembly, the No. 2 camber adjust cam and the nut.

    NOTICE:
    Ensure that the identification mark faces the rear side of the vehicle.

    HINT:
    When temporarily tightening the nut, keep the rear suspension toe adjust cam sub-assembly from rotating.


28. TEMPORARILY INSTALL REAR NO. 2 SUSPENSION ARM ASSEMBLY RH

HINT:
Perform the same procedure as the LH side.


29. INSTALL REAR AXLE CARRIER SUB-ASSEMBLY LH


    C166002
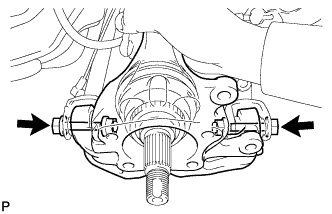
  1. Temporarily install the the rear axle carrier sub-assembly with the 2 bolts and the 2 nuts.
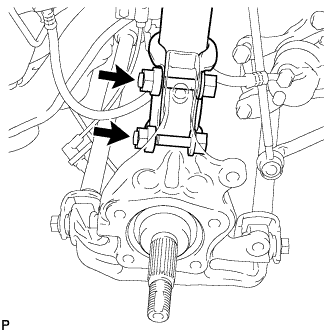
    NOTICE:
    1. Be careful not to damage the outboard joint boot.
    2. Be careful not to damage the speed sensor rotor.
    3. Prevent foreign matter from adhering to the speed sensor rotor.


    C166001
  1. Install the rear axle carrier sub-assembly with the 2 bolts and the 2 nuts.

    Torque:
    290 N*m{ 2956 kgf*cm , 213 ft.*lbf }

    NOTICE:
    1. Be careful not to damage the outboard joint boot.
    2. Be careful not to damage the speed sensor rotor.
    3. Prevent foreign matter from adhering to the speed sensor rotor.
    4. Do not rotate the drive shaft with the rear axle hub and bearing assembly removed.

    HINT:
    Insert the bolts from the rear side.


30. INSTALL REAR AXLE CARRIER SUB-ASSEMBLY RH

HINT:
Perform the same procedure as the LH side.


31. TEMPORARILY INSTALL REAR STRUT ROD ASSEMBLY LH


    C165999E01
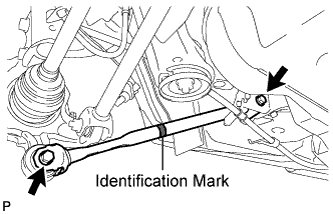
  1. Check that the identification mark of the rear strut rod assembly is positioned on the inner side of the vehicle.

  1. Temporarily install the rear strut rod assembly with the 2 bolts and the 2 nuts.

    NOTICE:
    Since stopper nuts are used, temporarily tighten the bolts.


32. TEMPORARILY INSTALL REAR STRUT ROD ASSEMBLY RH

HINT:
Perform the same procedure as the LH side.


33. INSTALL REAR AXLE HUB AND BEARING ASSEMBLY LH


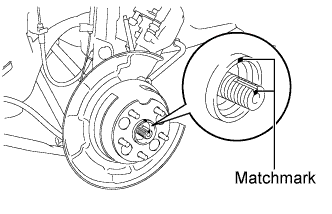
    C166348E01
  1. Align the matchmarks on the drive shaft and rear axle hub.
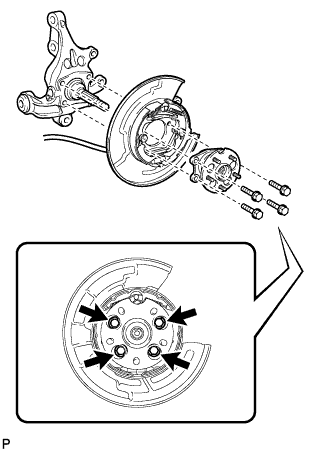
    NOTICE:
    Do not rotate the drive shaft.


    C165997
  1. Install the parking brake assembly and the rear axle hub and bearing assembly with the 4 bolts.

    Torque:
    75 N*m{ 764 kgf*cm , 55 ft.*lbf }

    NOTICE:
    Do not twist the No. 3 parking brake cable assembly when installing it.


34. INSTALL REAR AXLE HUB AND BEARING ASSEMBLY RH

HINT:
Perform the same procedure as the LH side.


35. INSTALL REAR DISC (for LH Side)


    C166438E01
  1. Align the matchmarks and install the rear disc.

    NOTICE:
    When replacing the rear disc with a new one, select the installation position where the rear disc has minimal runout.


36. INSTALL REAR DISC (for RH Side)

HINT:
Perform the same procedure as the LH side.


37. INSTALL REAR DISC BRAKE CALIPER ASSEMBLY LH


    C165996
  1. Install the rear disc brake caliper assembly with the 2 bolts.

    Torque:
    78 N*m{ 795 kgf*cm , 57 ft.*lbf }


38. INSTALL REAR DISC BRAKE CALIPER ASSEMBLY RH

HINT:
Perform the same procedure as the LH side.


39. TEMPORARILY INSTALL REAR AXLE SHAFT NUT LH


    C167784
  1. Clean the threaded parts on the rear drive shaft assembly and rear axle shaft nut using a non-residue solvent.

    NOTICE:
    1. Be sure to perform this work for a new rear drive shaft assembly.
    2. Keep the threaded parts free of oil and foreign objects.

  1. While applying the brakes, temporarily install a new rear axle shaft nut.

    Torque:
    294 N*m{ 2996 kgf*cm , 216 ft.*lbf }

    NOTICE:
    Stake the nut after inspecting for looseness and runout in the following steps.


40. TEMPORARILY INSTALL REAR AXLE SHAFT NUT RH

HINT:
Perform the same procedure as the LH side.


41. INSTALL REAR SPEED SENSOR LH


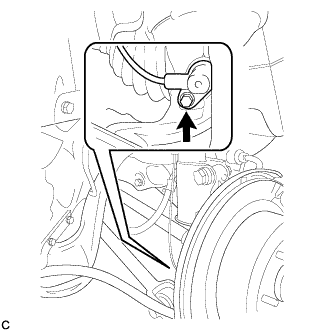
    C165809
  1. Install the rear speed sensor to the rear axle carrier sub-assembly with the bolt .

    Torque:
    8.0 N*m{ 82 kgf*cm , 71 in.*lbf }

    NOTICE:
    1. Keep the rear speed sensor tip and sensor installation hole free from foreign matter.
    2. Do not twist the rear speed sensor wire when installing.


42. INSTALL REAR SPEED SENSOR RH

HINT:
Perform the same procedure as the LH side.


43. STABILIZE SUSPENSION


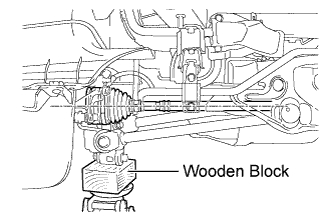
    C166003E01
  1. Jack up the rear axle carrier sub-assembly, placing a wooden block underneath to avoid damage. Apply load to the suspension so that the rear drive shaft assembly is positioned horizontally.

    CAUTION:
    Do not jack up the rear axle carrier sub-assembly too high as the vehicle may fall.

    NOTICE:
    Do not bend the brake dust cover.

    HINT:
    1. If the rear drive shaft assembly cannot be positioned horizontally as shown in the illustration even when the rear axle carrier sub-assembly is jacked up, apply additional load to the vehicle such as by having a person sit in the rear seat.
    2. Use the same procedures for the RH side and LH side.


44. FULLY TIGHTEN REAR NO. 1 SUSPENSION ARM ASSEMBLY LH


    C166007
  1. Fully tighten the rear No. 1 suspension arm assembly with the bolt and nut.

    Torque:
    112 N*m{ 1141 kgf*cm , 82 ft.*lbf }

    NOTICE:
    1. Since a stopper nut is used, tighten the bolt.
    2. The final torque must be applied under standard vehicle height conditions.


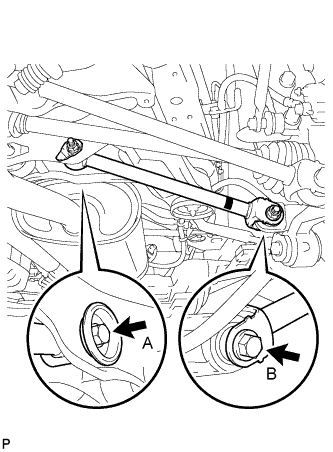
45. FULLY TIGHTEN REAR NO. 1 SUSPENSION ARM ASSEMBLY RH


C166219E01
  1. Fully tighten the 2 bolts.

    Torque:
    Bolt (A):
    80 N*m{ 815 kgf*cm , 59 ft.*lbf }
    Bolt (B):
    112 N*m{ 1141 kgf*cm , 82 ft.*lbf }

    NOTICE:
    1. Since a stopper nut is used, temporarily tighten the bolt.
    2. The final torque must be applied under standard vehicle height conditions.


46. FULLY TIGHTEN REAR NO. 2 SUSPENSION ARM ASSEMBLY LH


C166217E01
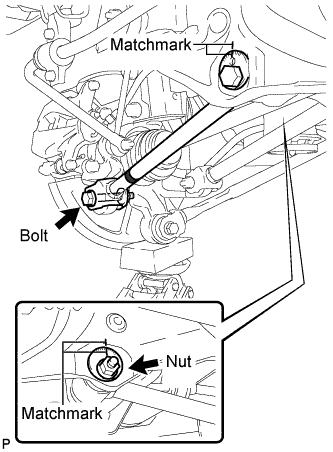
  1. Align the matchmarks on the adjust cams and rear suspension member sub-assembly.

  1. Fully tighten the nut.

    Torque:
    100 N*m{ 1019 kgf*cm , 74 ft.*lbf }

    NOTICE:
    The final torque must be applied under standard vehicle height conditions.

    HINT:
    When fully tightening the nut, keep the rear suspension toe adjust cam sub-assembly from rotating.

  1. Fully tighten the bolt.

    Torque:
    112 N*m{ 1141 kgf*cm , 82 ft.*lbf }

    NOTICE:
    1. Since a stopper nut is used, fully tighten the bolt.
    2. The final torque must be applied under standard vehicle height conditions.


47. FULLY TIGHTEN REAR NO. 2 SUSPENSION ARM ASSEMBLY RH

HINT:
Perform the same procedure as the LH side.


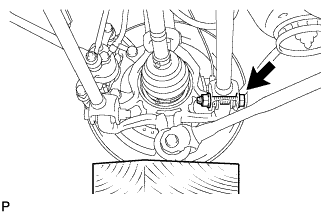
48. FULLY TIGHTEN REAR STRUT ROD ASSEMBLY LH


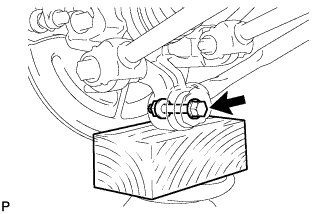
    C166006
  1. Fully tighten the bolt.

    Torque:
    80 N*m{ 815 kgf*cm , 59 ft.*lbf }

    NOTICE:
    1. Since a stopper nut is used, fully tighten the bolt.
    2. The final torque must be applied under standard vehicle height conditions.


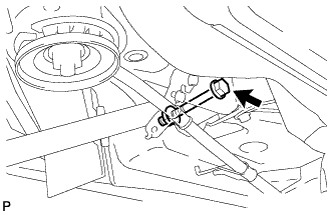
    C166005
  1. Fully tighten the bolt.

    Torque:
    80 N*m{ 815 kgf*cm , 59 ft.*lbf }

    NOTICE:
    1. Since a stopper nut is used, fully tighten the bolt.
    2. The final torque must be applied under standard vehicle height conditions.


49. FULLY TIGHTEN REAR STRUT ROD ASSEMBLY RH

HINT:
Perform the same procedure as the LH side.


50. INSTALL NO. 3 PARKING BRAKE CABLE ASSEMBLY


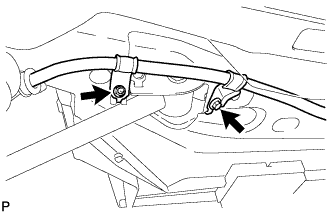
    C165998
  1. Install the No. 3 parking brake cable assembly with the bolt and the nut.

    Torque:
    Bolt:
    39 N*m{ 397 kgf*cm , 29 ft.*lbf }
    Nut:
    6.0 N*m{ 61 kgf*cm , 53 in.*lbf }

    NOTICE:
    Do not twist the No. 3 parking brake cable assembly when installing it.


51. INSTALL NO. 2 PARKING BRAKE CABLE ASSEMBLY

HINT:
Perform the same procedure as the No. 3 parking brake cable assembly.


52. SEPARATE REAR DISC BRAKE CALIPER ASSEMBLY LH


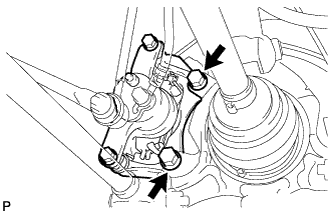
    C165996
  1. Remove the 2 bolts and separate the rear disc brake caliper assembly.

    NOTICE:
    Use wire or an equivalent tool to keep the brake caliper from hanging down by the flexible hose.


53. SEPARATE REAR DISC BRAKE CALIPER ASSEMBLY RH

HINT:
Perform the same procedure as the LH side.


54. REMOVE REAR DISC (for LH Side)


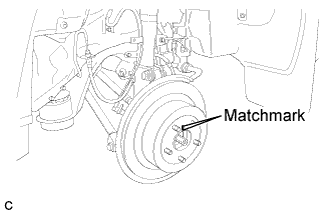
    C166438E01
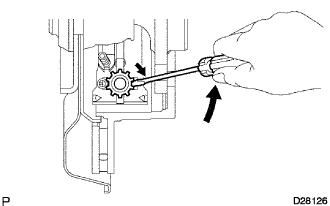
  1. Put matchmarks on the rear disc and the axle hub.


    D028126
  1. Release the parking brake and remove the rear disc.

    HINT:
    If the disc cannot be removed easily, turn and press firmly the shoe adjuster until the wheel comes free.


55. REMOVE REAR DISC (for RH Side)

HINT:
Perform the same procedure as the LH side.


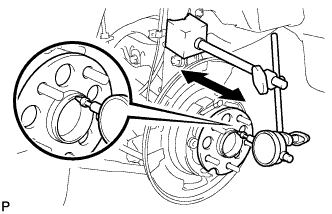
56. INSPECT REAR AXLE HUB BEARING LOOSENESS (for LH Side)


    C165994
  1. Using a dial indicator, check for looseness near the center of the rear axle hub and bearing assembly.

    Maximum looseness:
    0 mm (0 in.)

    NOTICE:
    Ensure that the dial indicator is set perpendicular to the measurement surface.

    HINT:
    If the looseness exceeds the maximum, replace the rear axle hub and bearing assembly.


57. INSPECT REAR AXLE HUB BEARING LOOSENESS (for RH Side)

HINT:
Perform the same procedure as the LH side.


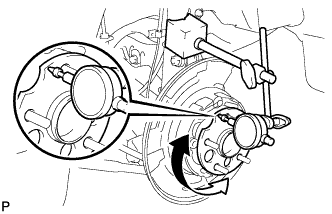
58. INSPECT REAR AXLE HUB RUNOUT (for LH Side)


    C165995
  1. Using a dial indicator, check for runout on the surface of the rear axle hub and bearing assembly outside the rear axle hub bolt.

    Maximum runout:
    0.08 mm (0.0031 in.)

    NOTICE:
    Ensure that the dial indicator is set perpendicular to the measurement surface.

    HINT:
    If the runout exceeds the maximum, replace the rear axle hub and bearing assembly.


59. INSPECT REAR AXLE HUB RUNOUT (for RH Side)

HINT:
Perform the same procedure as the LH side.


60. INSTALL REAR DISC (for LH Side)


    C166438E01
  1. Align the matchmarks and install the rear disc.

    NOTICE:
    When replacing the rear disc with a new one, select the installation position where the rear disc has minimal runout.


61. INSTALL REAR DISC (for RH Side)

HINT:
Perform the same procedure as the LH side.


62. INSTALL REAR DISC BRAKE CALIPER ASSEMBLY LH


    C165996
  1. Install the rear disc brake caliper assembly with the 2 bolts.

    Torque:
    78 N*m{ 795 kgf*cm , 57 ft.*lbf }


63. INSTALL REAR DISC BRAKE CALIPER ASSEMBLY RH

HINT:
Perform the same procedure as the LH side.


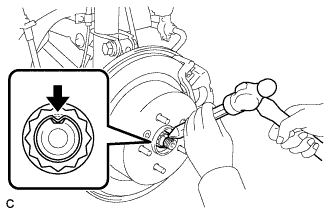
64. INSTALL REAR AXLE SHAFT NUT LH


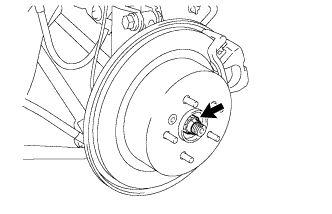
    C165541
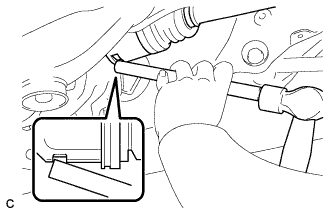
  1. Using a chisel and a hammer, stake the rear axle shaft nut.


65. INSTALL REAR AXLE SHAFT NUT RH

HINT:
Perform the same procedure as the LH side.


66. INSTALL CENTER EXHAUST PIPE ASSEMBLY


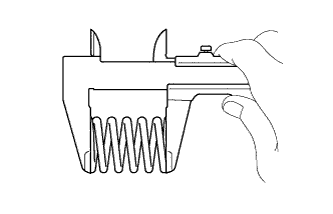
    A160224
  1. Using vernier calipers, measure the free length of the compression spring.
    Minimum
    41.5 mm (1.63 in.)

    HINT:
    If the length is less than the minimum, replace the compression spring.


    A138040E01
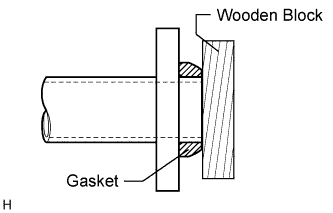
  1. Using a plastic-faced hammer and wooden block, tap in a new gasket until its surface is flush with the front No. 3 exhaust pipe sub-assembly.

    NOTICE:
    1. Tap in the gasket in the correct direction.
    2. Do not reuse the removed gasket.
    3. Do not push in the gasket while installing the center exhaust pipe assembly.

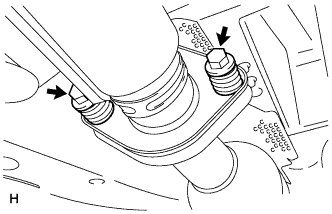
  1. Connect the 3 exhaust pipe supports, and install the center exhaust pipe assembly.


    A170125
  1. Install the 2 compression springs and 2 bolts.

    Torque:
    48 N*m{ 489 kgf*cm , 35 ft.*lbf }


67. INSTALL TAIL EXHAUST PIPE ASSEMBLY


    A160224
  1. Using vernier calipers, measure the free length of the compression spring.
    Minimum
    40.5 mm (1.59 in.)

    HINT:
    If the length is less than the minimum, replace the compression spring.


    A138040E01
  1. Using a plastic-faced hammer and wooden block, tap in a new gasket until its surface is flush with the center exhaust pipe assembly.

    NOTICE:
    1. Tap in the gasket in the correct direction.
    2. Do not reuse the removed gasket.
    3. Do not push in the gasket while installing the tail exhaust pipe assembly.

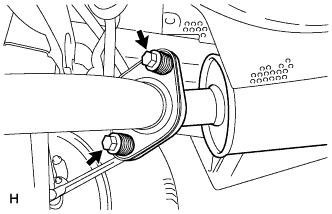
  1. Connect the exhaust pipe support, and install the tail exhaust pipe assembly.


    A170139
  1. Install the 2 compression springs and 2 bolts.

    Torque:
    48 N*m{ 489 kgf*cm , 35 ft.*lbf }


68. TEMPORARILY TIGHTEN PROPELLER WITH CENTER BEARING SHAFT ASSEMBLY


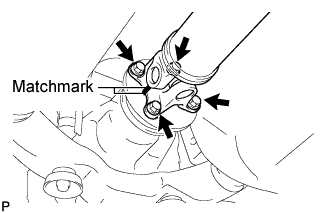
    C166040E01
  1. Align the matchmarks on the propeller shaft flange and differential companion flange, and connect the shaft with the 4 bolts, 4 washers and 4 nuts.


    C166042E01
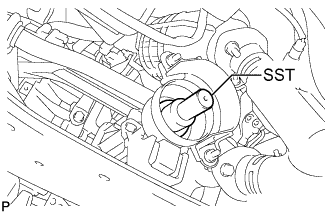
  1. Remove SST from the transaxle.

  1. Insert the yoke into the transaxle.


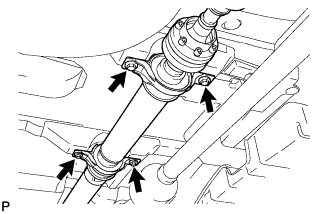
    C166041
  1. Install the 4 adjusting shims and propeller shaft with center bearing, and temporarily tighten the 4 bolts.


    C166040E01
  1. Tighten the 4 bolts.

    Torque:
    74 N*m{ 750 kgf*cm , 54 ft.*lbf }


69. FULLY TIGHTEN PROPELLER WITH CENTER BEARING SHAFT ASSEMBLY


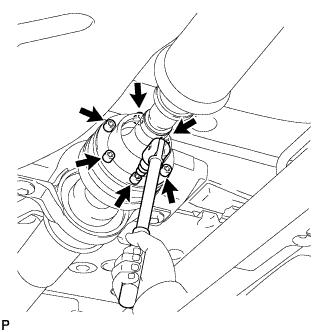
    C167196
  1. Remove the piece of cloth from the joint.

  1. Using a hexagon wrench (6 mm), tighten the 6 bolts.
    Torque:
    26 N*m{ 265 kgf*cm , 19 ft.*lbf }


    C166068E01
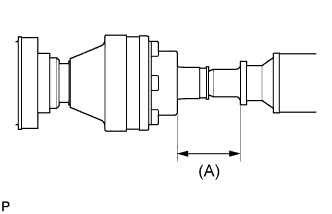
  1. With the vehicle unloaded, adjust the dimension between the rear side of the cover and shaft as shown in the illustration.

    (A):
    58.0 +/- 0.5 mm (2.283 +/- 0.02 in.)


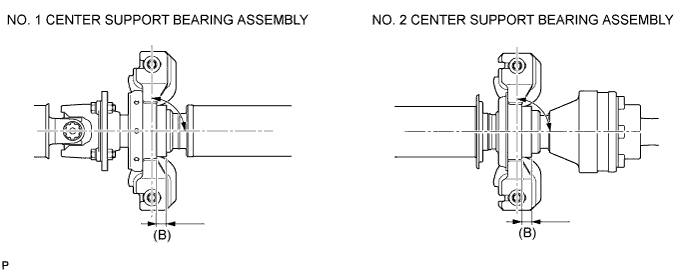
  1. Under the same condition as above, adjust the front and rear dimensions between the edge surface of the center support bearing and the edge surface of the cushion respectively as shown, and then tighten the bolts.

    C166069E01

    Torque:
    37 N*m{ 375 kgf*cm , 27 ft.*lbf }

    (B):
    12.5 +/- 1.0 mm (0.492 +/- 0.039 in.)

  1. Check that the center line of the bracket is at the right angle in the shaft axial direction.


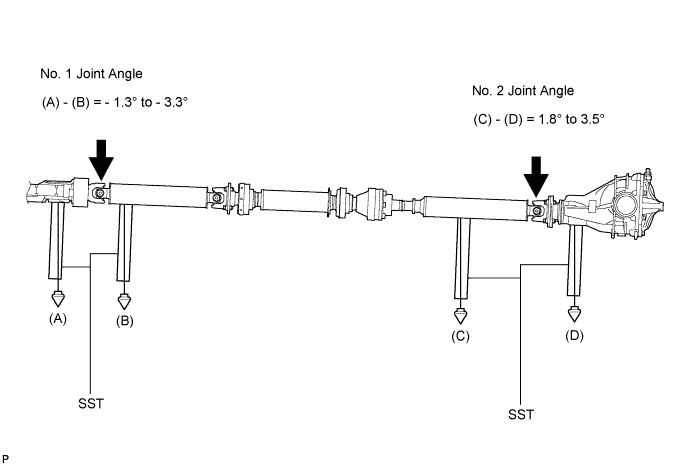
  1. If any vibration or noise occurs, perform joint angle check as follows and replace the adjusting shim with a proper one.

    1. Turn the propeller shaft several times by hand to stabilize the center support bearings.

    2. Using a jack, raise and lower the differential to stabilize the differential mounting cushion.

    3. Remove the transfer dynamic damper.

    4. Using SST, measure the transfer installation angle (A) and front propeller shaft installation angle (B).

      SST
      09370-50010  

      No. 1 joint angle:
      (A) - (B) = -1.3° to -3.3°


    5. Using SST, measure the rear propeller shaft installation angle (C) and rear differential shaft installation angle (D).
      SST
      09370-50010  

      No. 2 joint angle:
      (C) - (D) = 1.8° to 3.5°


      C166070E01

      HINT:
      If the measured angle is not within the specification, adjust it with the center support bearing adjusting shim.

      Center support bearing adjusting shim thickness:
      Thickness mm (in.)
      Thickness mm (in.)
      3.2 (0.126)
      11.0 (0.433)
      4.5 (0.177)
      13.5 (0.531)
      6.5 (0.256)
      15.5 (0.610)
      9.0 (0.354)
      17.5 (0.689)

    6. Install the transfer dynamic damper.

      Torque:
      26 N*m{ 265 kgf*cm , 19 ft.*lbf }


70. INSPECT AND ADJUST TRANSFER OIL


    C083746E03
  1. Remove the No. 1 transfer case plug and gasket.

  1. Check the oil level is within 0 to 5 mm (0 to 0.20 in.) below the lowest end of the hole for the No. 1 transfer case plug.

    NOTICE:
    1. When changing oil, recheck the oil level after driving.
    2. Excessively large or small quantity of oil may cause some trouble.

  1. When the oil level is too low, check for oil leakage.

  1. Tighten the No. 1 transfer case plug with a new gasket.

    Torque:
    49 N*m{ 500 kgf*cm , 36 ft.*lbf }


71. INSPECT FOR EXHAUST GAS LEAK
If exhaust gas is leaking, repair the leak. Replace damaged or worn parts as necessary.


72. INSTALL REAR WHEELS

Torque:
103 N*m{ 1050 kgf*cm , 76 ft.*lbf }


73. INSPECT REAR WHEEL ALIGNMENT

HINT:
Click here


74. CHECK FOR SPEED SENSOR SIGNAL

HINT:
Click here