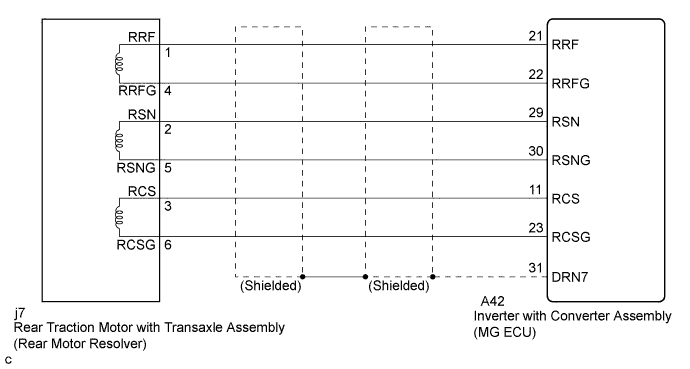
DTC P0A1C-715 Drive Motor "B" Control Module |
DTC P0A1C-798 Drive Motor "B" Control Module |
DTC P0A1C-799 Drive Motor "B" Control Module |
| DTC No. | INF Code | DTC Detection Condition | Trouble Area |
| P0A1C | 715 | R/D resolver angle error |
|
| 798 | REF frequency error | ||
| 799 | REF signal stop error |
| Related DTCs | P0A1C (INF 715): RD converter resolver angle abnormality P0A1C (INF 798): REF malfunction (REF frequency abnormality) P0A1C (INF 799) REF malfunction (REF signal abnormality) |
| Required sensors / components | Motor Generator control ECU (MG ECU) |
| Frequency of operation | Continuous |
| Duration | TMC's intellectual property |
| MIL operation | 1 driving cycle |
| Sequence of operation | None |
| The monitor will run whenever the DTCs listed are not present | TMC's intellectual property |
| Other conditions belong to TMC's intellectual property | - |
| Motor Generator control ECU (MG ECU) | Internal error |
| Motor Generator control ECU (MG ECU) | DTC P0A1C (INF 715/798/799) is not detected |
| 1.CHECK DTC OUTPUT (HV) |
Connect the Techstream to the DLC3.
Turn the power switch on (IG).
Select the following menu items: Powertrain / Hybrid Control / Trouble Codes.
Check if DTCs are output.
| Result | Proceed to |
| P0A1C-715, 798 or 799 only is output. | A |
| Any of the following DTCs are also output. | B |
| DTC No. | Relevant Diagnosis |
| P0A45-669 | Drive Motor "B" Position Sensor Circuit |
| P0A46-671 | Drive Motor "B" Position Sensor Circuit Range / Performance |
| P0A47-670 | Drive Motor "B" Position Sensor Circuit Low |
|
| ||||
| A | |
 |
| 2.CHECK CONNECTOR CONNECTION CONDITION (MG ECU CONNECTOR) |
Turn the power switch off.
Remove the service plug grip (Click here).
Remove the inverter cover (Click here).
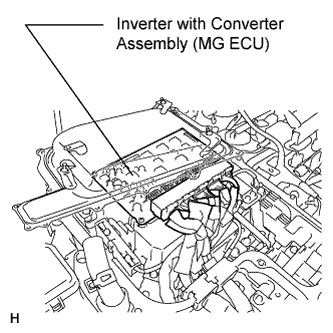 |
Check the connections of the MG ECU connectors.
|
| ||||
| OK | |
|
| 3.CHECK HARNESS AND CONNECTOR (MG ECU - BODY GROUND) |
Turn the power switch off.
Remove the service plug grip (Click here).
Remove the inverter cover (Click here).
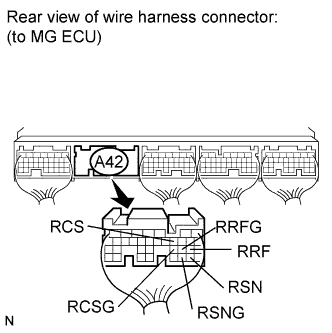 |
Disconnect the A42 connector from the MG ECU.
Turn the power switch on (IG).
Measure the voltage according to the value(s) in the table below.
| Tester Connection | Switch Condition | Specified Condition |
| A42-21 (RRF) - Body ground | Power switch on (IG) | Below 1 V |
| A42-22 (RRFG) - Body ground | Power switch on (IG) | Below 1 V |
| A42-29 (RSN) - Body ground | Power switch on (IG) | Below 1 V |
| A42-30 (RSNG) - Body ground | Power switch on (IG) | Below 1 V |
| A42-11 (RCS) - Body ground | Power switch on (IG) | Below 1 V |
| A42-23 (RCSG) - Body ground | Power switch on (IG) | Below 1 V |
Turn the power switch off.
Measure the resistance according to the value(s) in the table below.
| Tester Connection | Switch Condition | Specified Condition |
| A42-21 (RRF) - A42-22 (RRFG) | Power switch off | 7.65 to 10.2 Ω |
| A42-29 (RSN) - A42-30 (RSNG) | Power switch off | 12.6 to 16.8 Ω |
| A42-11 (RCS) - A42-23 (RCSG) | Power switch off | 12.6 to 16.8 Ω |
Measure the resistance according to the value(s) in the table below.
| Tester Connection | Switch Condition | Specified Condition |
| A42-21 (RRF) or A42-22 (RRFG) - Body ground and other terminals | Power switch off | 10 kΩ or higher |
| A42-29 (RSN) or A42-30 (RSNG) - Body ground and other terminals | Power switch off | 10 kΩ or higher |
| A42-11 (RCS) or A42-23 (RCSG) - Body ground and other terminals | Power switch off | 10 kΩ or higher |
|
| ||||
| OK | |
|
| 4.CHECK CONNECTOR CONNECTION CONDITION (REAR MOTOR RESOLVER CONNECTOR) |
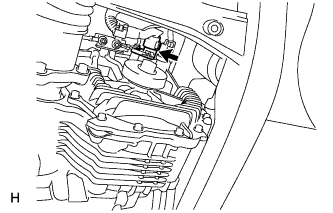 |
Check the connection of the rear motor resolver connector.
|
| ||||
| OK | ||
 | ||
| ||
| 5.CHECK CONNECTOR CONNECTION CONDITION (REAR MOTOR RESOLVER CONNECTOR) |
|
Check the connection of the rear motor resolver connector.
|
| ||||
| OK | |
|
| 6.CHECK REAR TRACTION MOTOR WITH TRANSAXLE ASSEMBLY (REAR MOTOR RESOLVER) |
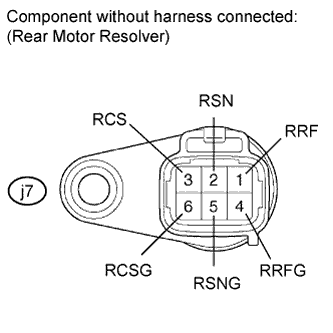 |
Disconnect the j7 rear motor resolver connector.
Measure the resistance according to the value(s) in the table below.
| Tester Connection | Switch Condition | Specified Condition |
| j7-1 (RRF) - j7-4 (RRFG) | Power switch off | 7.65 to 10.2 Ω |
| j7-2 (RSN) - j7-5 (RSNG) | Power switch off | 12.6 to 16.8 Ω |
| j7-3 (RCS) - j7-6 (RCSG) | Power switch off | 12.6 to 16.8 Ω |
Using a megohmmeter set to 500 V, measure the insulation resistance according to the value(s) in the table below.
| Tester Connection | Switch Condition | Specified Condition |
| j7-1 (RRF) - j7-2 (RSN) | Power switch off | 10 MΩ or higher |
| j7-1 (RRF) - j7-3 (RCS) | Power switch off | 10 MΩ or higher |
| j7-2 (RSN) - j7-3 (RCS) | Power switch off | 10 MΩ or higher |
| j7-4 (RRFG) - j7-5 (RSNG) | Power switch off | 10 MΩ or higher |
| j7-4 (RRFG) - j7-6 (RCSG) | Power switch off | 10 MΩ or higher |
| j7-5 (RSNG) - j7-6 (RCSG) | Power switch off | 10 MΩ or higher |
| Each terminal listed above - Transaxle housing | Power switch off | 10 MΩ or higher |
|
| ||||
| OK | ||
| ||
| ||

