 |
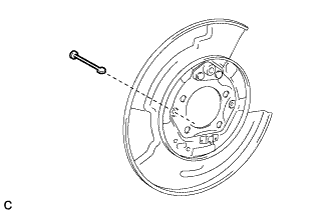
Install the No. 1 parking brake shoe hold down spring pin.
PARKING BRAKE ASSEMBLY > REASSEMBLY |
| 1. INSTALL NO. 1 PARKING BRAKE SHOE HOLD DOWN SPRING PIN |
|
Install the No. 1 parking brake shoe hold down spring pin.
| 2. INSTALL REAR AXLE HUB AND BEARING ASSEMBLY |
| 3. INSTALL NO. 2 PARKING BRAKE SHOE HOLD DOWN SPRING PIN |
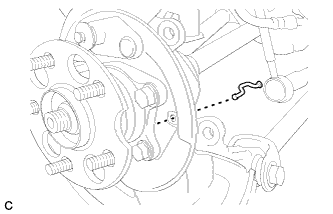 |
Install the No. 2 parking brake shoe hold down spring pin.
| 4. APPLY HIGH TEMPERATURE GREASE |
Apply high temperature grease to the backing plate which makes contact with the shoe.
| 5. INSTALL PARKING BRAKE SHOE GUIDE PLATE SET BOLT |
Apply adhesive to the threads of the parking brake shoe guide plate set bolt.
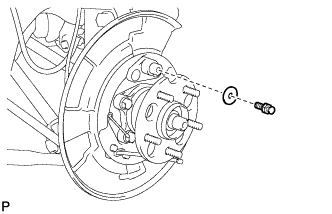 |
Install the parking brake shoe guide plate and the parking brake shoe guide plate set bolt.
| 6. INSTALL PARKING BRAKE SHOE LEVER |
Apply high temperature grease to the parking brake shoe lever which makes contact with the No. 2 parking brake shoe assembly.
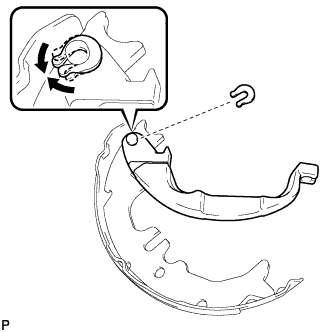 |
Install the parking brake shoe lever and shim to the No. 2 parking brake shoe assembly with a new C-washer.
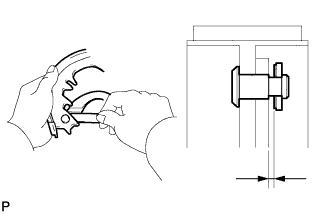 |
Using a feeler gauge, measure the clearance between the No. 2 parking brake shoe assembly and parking brake shoe lever.
| Part No. | Shim Thickness |
| 90564-09184 | 0.3 mm (0.012 in.) |
| 90564-09185 | 0.6 mm (0.024 in.) |
| 90564-09186 | 0.9 mm (0.035 in.) |
| 7. INSTALL NO. 2 PARKING BRAKE SHOE ASSEMBLY WITH PARKING BRAKE SHOE LEVER |
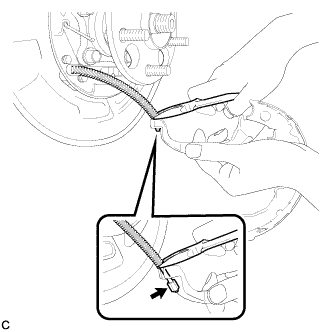 |
Using needle-nose pliers, connect the No. 3 parking brake cable assembly to the parking brake shoe lever as shown in the illustration.
| 8. INSTALL NO. 2 PARKING BRAKE SHOE RETURN TENSION SPRING |
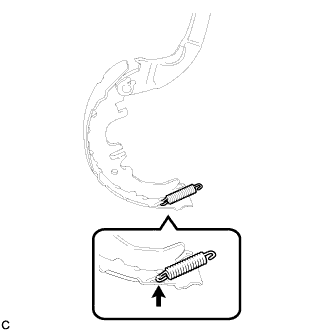 |
Install the No. 2 parking brake shoe return tension spring to the No. 2 parking brake shoe assembly.
| 9. INSTALL NO. 1 PARKING BRAKE SHOE ASSEMBLY |
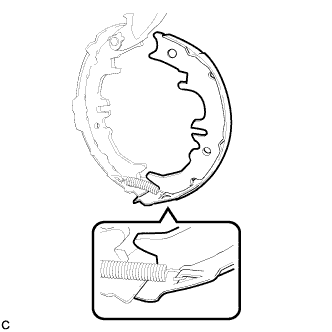 |
Connect the No. 2 parking brake shoe return tension spring to install the No. 1 parking brake shoe assembly.
| 10. INSTALL PARKING BRAKE SHOE ADJUSTING SCREW SET |
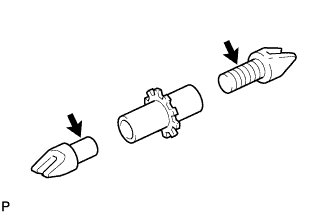 |
Apply high temperature grease to the parking brake shoe adjusting screw set as shown in the illustration.
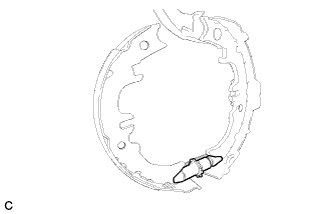 |
Install the parking brake shoe adjusting screw set.
| 11. INSTALL NO. 2 PARKING BRAKE SHOE ASSEMBLY |
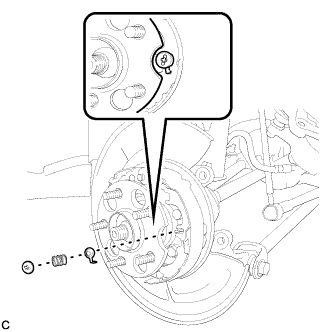 |
Install the No. 2 parking brake shoe assembly to the backing plate with the No. 1 parking brake shoe hold down spring cup, parking brake shoe hold down spring, and No. 2 parking brake shoe hold down spring cup.
| 12. INSTALL PARKING BRAKE SHOE STRUT |
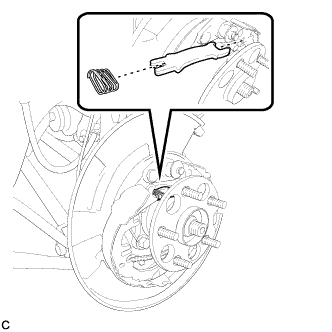 |
Install the parking brake shoe strut and the parking brake shoe strut compression spring.
| 13. INSTALL NO. 1 PARKING BRAKE SHOE ASSEMBLY |
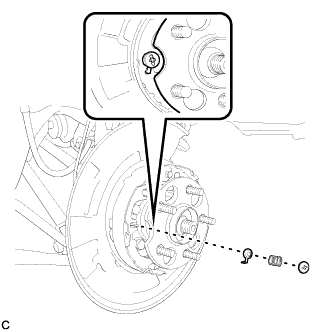 |
Install the No. 1 parking brake shoe assembly to the backing plate with the No. 1 parking brake shoe hold down spring cup, parking brake shoe hold down spring, and No. 2 parking brake shoe hold down spring cup.
| 14. INSTALL NO. 1 PARKING BRAKE SHOE RETURN TENSION SPRING |
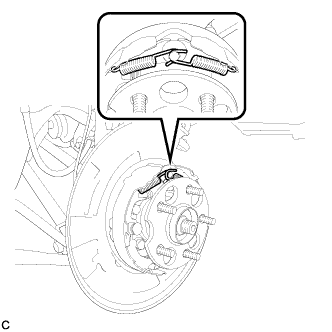 |
Install the 2 No. 1 parking brake shoe return tension springs.
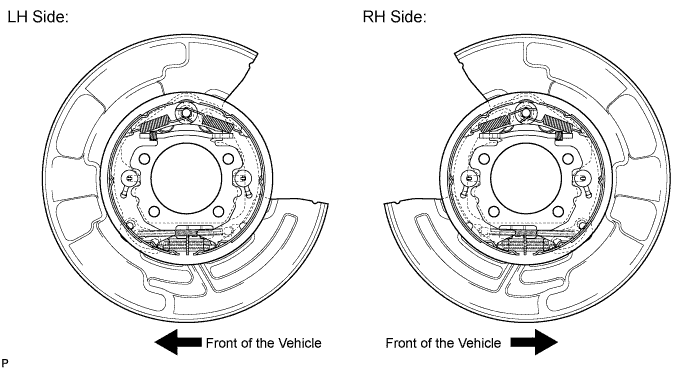
| 15. CHECK PARKING BRAKE INSTALLATION |
Check that each part is installed properly.
| 16. INSTALL REAR DISC |
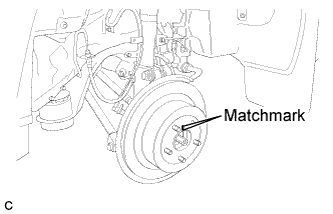 |
Align the matchmarks and install the rear disc.
| 17. INSTALL REAR DISC BRAKE CALIPER ASSEMBLY |
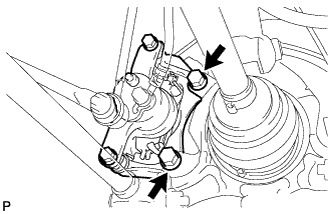 |
Install the rear disc brake caliper assembly with the 2 bolts.
| 18. INSTALL REAR AXLE SHAFT NUT |
| 19. BED IN PARKING BRAKE SHOES TO DISCS |
Drive the vehicle at about 50 km/h (31 mph) on a safe, level and dry road.
Depress the parking brake pedal with 150 N (15 kgf, 34 lbf) of force.
Drive the vehicle for about 0.4 km (0.25 mile) in this condition.
Repeat this procedure 3 times.
| 20. ADJUST PARKING BRAKE SHOE CLEARANCE AND PARKING BRAKE PEDAL TRAVEL |
Remove the driver side knee airbag (Click here).
Completely release the parking brake pedal.
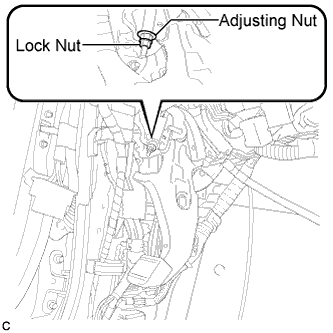 |
Loosen the lock nut and the adjusting nut to completely release the parking brake cable.
Remove the rear wheel.
Temporarily install the hub nuts.
Remove the shoe adjusting hole plug.
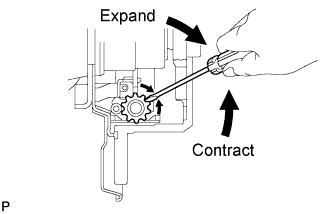 |
Turn the shoe adjuster and expand the shoe until the disc locks.
Turn and contract the shoe adjuster until the disc can rotate smoothly.
Check that there is no brake drag against the shoe.
Install the shoe adjusting hole plug.
Turn the adjusting nut until the parking brake pedal travel is corrected to be within the specified range.
Using a wrench or an equivalent tool, hold the adjusting nut and tighten the lock nut.
Operate the parking brake pedal 3 to 4 times, and check the parking brake pedal travel.
Check that there is no brake drag against the shoe.
Remove the hub nuts.
Install the rear wheel.
Install the driver side knee airbag (Click here).
| 21. INSTALL REAR WHEEL |