 |
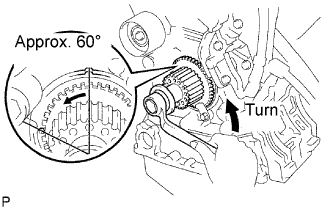
Turn the crankshaft counterclockwise by approximately 60°.
- NOTICE:
- To prevent contacting the piston head and the valve head, set the crankshaft pulley at 60° BTDC/compression position.
TIMING BELT > INSTALLATION |
| 1. INSTALL TIMING BELT |
Remove any oil or water on the pulleys, and keep them clean.
Inspect the idler pulleys.
Check that the idler pulley turns smoothly.
Visually check the seal portion of the idler pulley for oil leakage.
Inspect the water pump.
Turn the pulley, and check that the water pump bearing moves smoothly and does not make any noise.
Visually check the drain hole for coolant leakage.
Temporarily install the crankshaft pulley bolt and washer to the crankshaft.
|
Turn the crankshaft counterclockwise by approximately 60°.
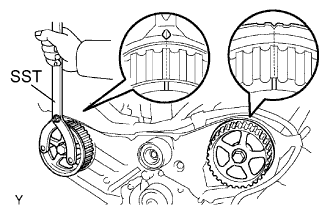 |
Using SST, turn the timing pulleys, and align the timing marks of the timing pulleys with the No. 3 timing belt cover.
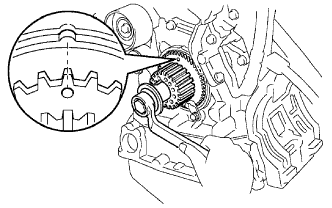 |
Turn the crankshaft, and align the timing mark of the crankshaft timing pulley with the oil pump body.
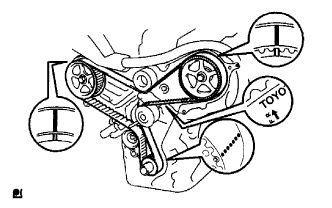 |
Face the front mark on the timing belt forward.
Align the installation mark on the timing belt with the timing mark of the crankshaft timing pulley.
Align the installation marks on the timing belt with the timing marks of the camshaft timing pulleys.
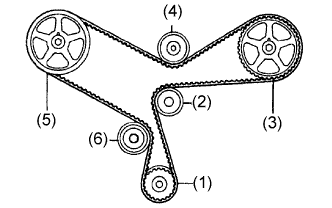 |
Install the timing belt in the following order.
| 1st | Crankshaft timing pulley |
| 2nd | Water pump pulley |
| 3rd | LH camshaft timing pulley |
| 4th | No. 2 idler pulley |
| 5th | RH camshaft timing pulley |
| 6th | No. 1 idler pulley |
| 2. INSTALL NO. 1 CHAIN TENSIONER ASSEMBLY |
Set the timing belt tensioner upright on the press.
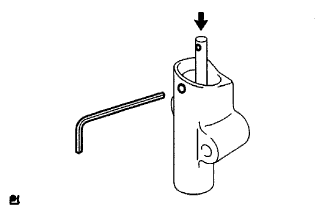 |
Slowly press in the push rod.
Align the holes of the push rod and housing, and pass a 1.5 mm hexagon wrench through the holes to keep the setting position of the push rod.
Release the press.
Install the tensioner with the 2 bolts. Alternately tighten the 2 bolts.
Remove the 1.5 mm hexagon wrench from the tensioner.
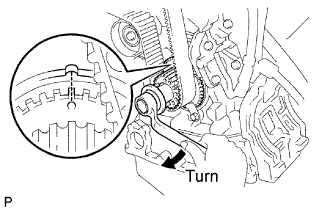 |
Turn the crankshaft 2 revolutions slowly and align the timing mark of the crankshaft timing pulley with the oil pump body.
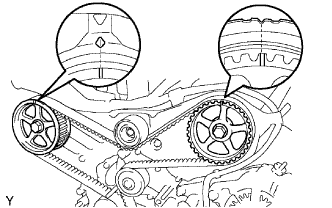 |
Check the timing marks of the RH and LH timing pulleys are aligned with the timing marks of the No. 3 timing belt cover as shown in the illustration.
If the marks do not align, remove the timing belt and reinstall it.
Remove the crankshaft pulley bolt.
| 3. INSTALL NO. 2 TIMING BELT GUIDE |
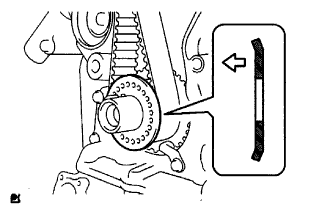 |
Install the timing belt guide with the cup side facing toward the engine front.
| 4. INSTALL ENGINE MOUNTING BRACKET RH |
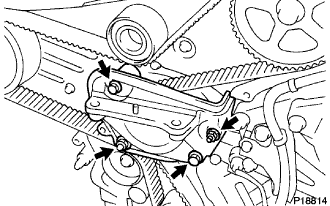 |
Install the engine mounting bracket RH with the 2 bolts and 2 nuts.
| 5. INSTALL NO. 2 TIMING BELT COVER |
Visually check for cracks and breaks on the gasket of the timing belt cover.
If a trace of water is found in the visual check, replace the timing belt cover.
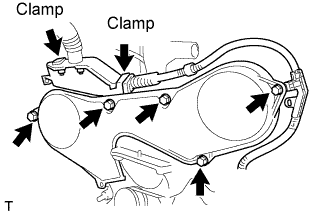 |
Install the timing belt cover with the 5 bolts.
Connect the 2 clamps.
| 6. INSTALL NO. 1 TIMING BELT COVER |
Visually check for cracks and breaks on the gasket of the timing belt cover.
If a trace of water is found in the visual check, replace the timing belt cover.
Install the timing belt cover with the 4 bolts.
| 7. INSTALL CRANKSHAFT PULLEY |
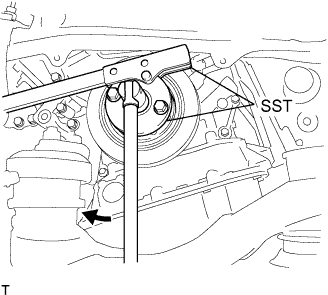 |
Align the keyway of the pulley with the key located on the crankshaft and slide the pulley into place.
Using SST, install the pulley bolt.
| 8. INSTALL NO. 2 ENGINE MOUNTING STAY RH |
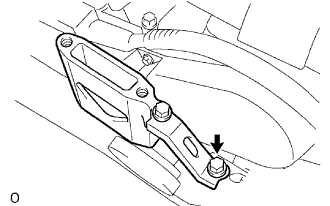 |
Install the No. 2 engine mounting stay and the No. 2 engine mounting bracket with the bolt.
| 9. INSTALL ENGINE MOVING CONTROL ROD |
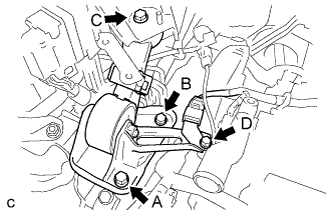 |
Temporarily install the engine moving control rod and bracket with the 4 bolts.
First tighten bolt A, bolt B, then bolt C in this order.
Tighten bolt D.
| 10. INSTALL AIR CLEANER BRACKET |
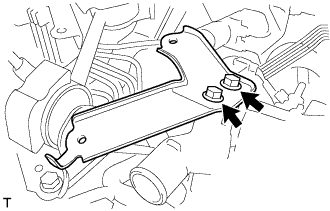 |
Install the 2 bolts and air cleaner bracket.
| 11. INSTALL BRAKE MASTER CYLINDER RESERVOIR SUB-ASSEMBLY |
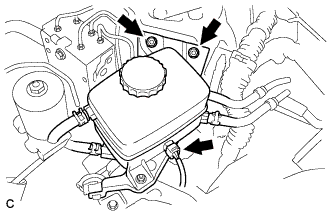 |
Install the 2 nuts and brake master cylinder reservoir.
Connect the connector.
| 12. INSTALL AIR CLEANER CASE SUB-ASSEMBLY |
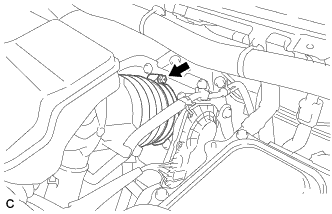 |
Align the tab on the throttle body with the groove on the air cleaner hose and tighten the hose clamp.
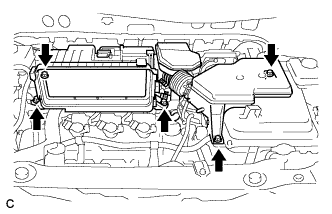 |
Install the air cleaner case sub-assembly with the 5 bolts.
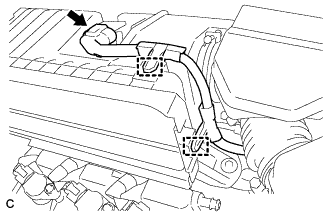 |
Connect the intake air flow meter connector.
Connect the 2 wire harness clamps to the air cleaner case.
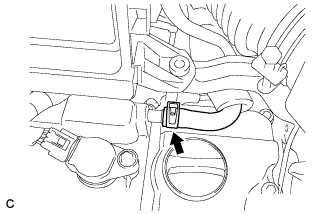 |
Connect the No. 1 ventilation hose.
| 13. INSTALL AIR CLEANER CAP SUB-ASSEMBLY |
Install the air cleaner filter element to the air cleaner case.
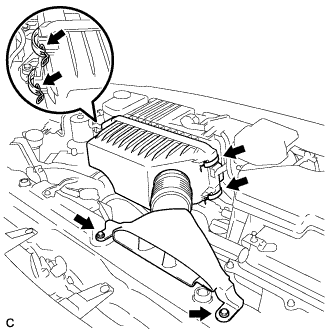 |
Install the 2 bolts, 4 clamps and air cleaner cap sub-assembly.
| 14. INSTALL BATTERY CARRIER SUB-ASSEMBLY |
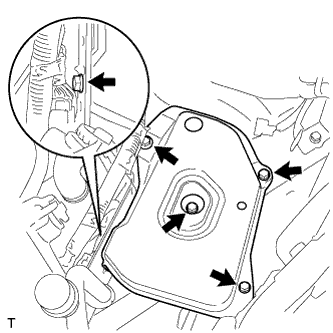 |
Install the 5 bolts and battery carrier.
| 15. INSTALL BATTERY |
Install the battery clamp and battery.
Connect the cable to the battery terminal.
| 16. INSTALL FRONT FENDER APRON SEAL RH |
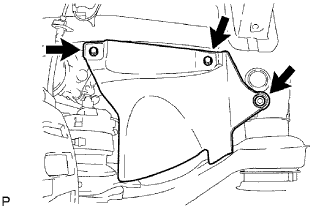 |
Install the fender apron seal RH with the 2 bolts and clip.
| 17. INSTALL FRONT FENDER LINER RH |
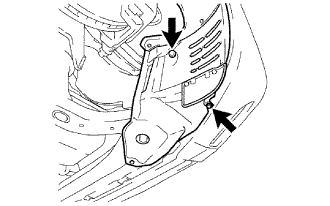 |
Install the front fender liner with the screw and clip.
| 18. INSTALL NO. 1 ENGINE UNDER COVER |
Install the 6 bolts, 2 screws, 2 clips and No. 1 engine under cover.
| 19. INSTALL FRONT WHEEL RH |
| 20. INSPECT IGNITION TIMING |
Set the vehicle to inspection mode (Click here).
Warm up the engine.
When using the Techstream:
Connect the Techstream to the DLC3.
Enter DATA LIST MODE on the Techstream.
Check that the ignition timing advances immediately when the engine speed is increased.
When not using the Techstream:
Using SST, connect terminals 13 (TC) and 4 (CG) of the DLC3.
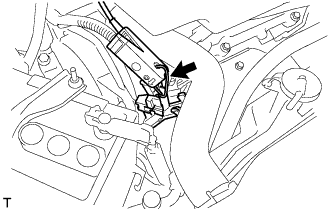 |
Pull out the red-colored wire harness as shown in the illustration.
Connect the tester terminal of the timing light to the red-colored wire.
Inspect ignition timing at idle.
Disconnect SST from terminals 13 (TC) and 4 (CG) of the DLC3.
Inspect ignition timing at idle.
Confirm that the ignition timing advances when the engine rpm is increased.
Remove the timing light.
| 21. INSTALL NO. 2 ENGINE ROOM SIDE COVER LH |
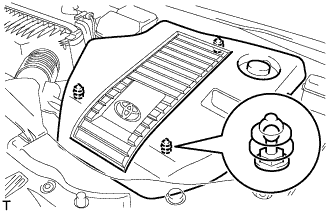 |
Fit the clips and install the No. 2 engine room side cover LH.
| 22. INSTALL OUTER COWL TOP PANEL SUB-ASSEMBLY |
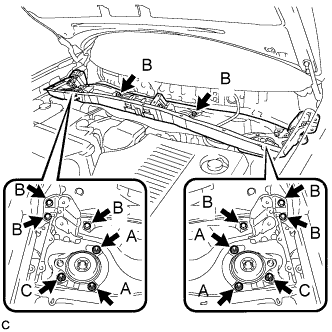 |
Install the outer cowl top panel sub-assembly with the 8 bolts and 6 nuts.
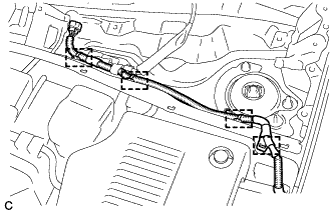 |
Engage the 4 clamps.
| 23. INSTALL WINDSHIELD WIPER MOTOR AND LINK ASSEMBLY |
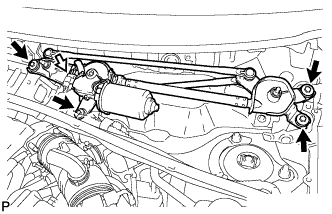 |
Install the windshield wiper motor and link assembly with the 4 bolts.
Connect the connector.
| 24. INSTALL COWL TOP VENTILATOR LOUVER SUB-ASSEMBLY |
Engage the 20 claws.
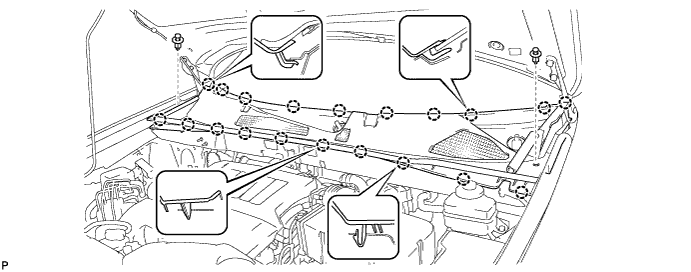
Install the cowl top ventilator louver sub-assembly with the 2 clips.
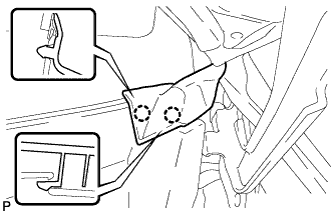 |
Engage the 2 claws and connect the front fender to cowl side seal LH.
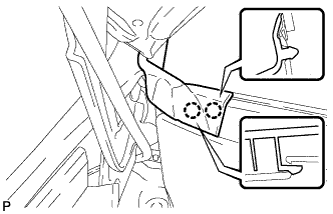 |
Engage the 2 claws and connect the front fender to cowl side seal RH.
| 25. INSTALL HOOD TO COWL TOP SEAL |
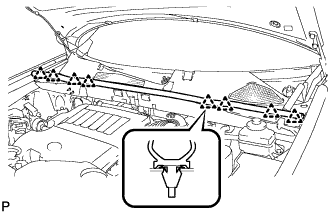 |
Engage the 8 clips and install the hood to cowl top seal.
| 26. INSTALL FRONT WIPER ARM AND BLADE ASSEMBLY RH |
Operate the wiper and stop the windshield wiper motor at the automatic stop position.
When reinstalling:
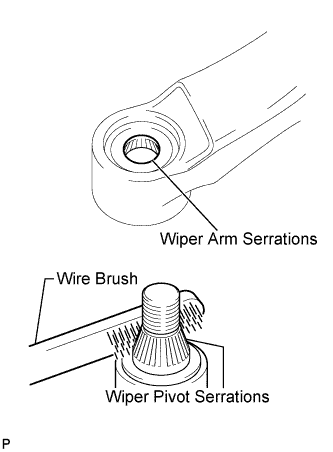 |
Clean the wiper arm serrations.
Clean the wiper pivot serrations with a wire brush.
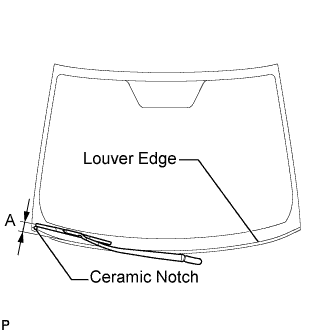 |
Install the front wiper arm and blade assembly RH with the nut to the position shown in the illustration.
| Area | Measurement |
| A | 25.6 mm (1.00 in.) |
| 27. INSTALL FRONT WIPER ARM AND BLADE ASSEMBLY LH |
Operate the wiper and stop the windshield wiper motor at the automatic stop position.
When reinstalling:
|
Clean the wiper arm serrations.
Clean the wiper pivot serrations with a wire brush.
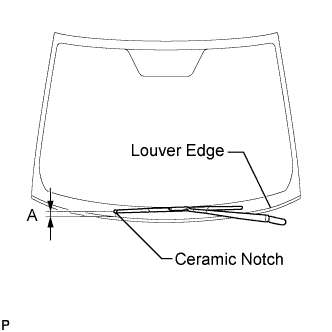 |
Install the front wiper arm and blade assembly LH with the nut to the position shown in the illustration.
| Area | Measurement |
| A | 31.9 mm (1.26 in.) |
Operate the front wipers while spraying washer fluid onto the windshield glass. Make sure that the front wipers function properly and the wipers do not come into contact with the vehicle body.