 |
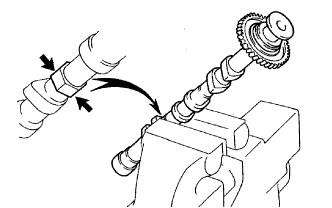
Clamp the camshaft in a vise on the hexagonal lobe.
- NOTICE:
- Do not damage the camshaft.
CAMSHAFT (for Bank 2) > INSTALLATION |
| 1. INSTALL CAMSHAFT SUB GEAR |
|
Clamp the camshaft in a vise on the hexagonal lobe.
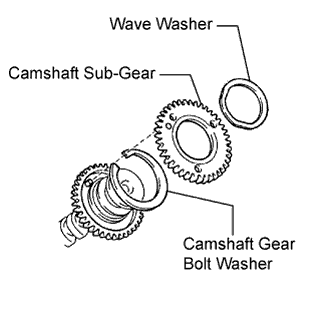 |
Install the camshaft gear bolt washer and the camshaft sub-gear.
Install the wave washer.
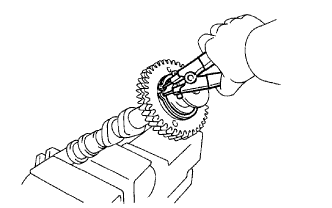 |
Using snap ring pliers, install the snap ring.
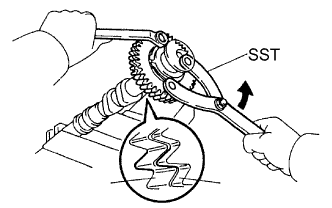 |
Using SST, align the holes of the camshaft main gear and sub-gear by turning the camshaft sub-gear counterclockwise, and temporarily install a service bolt.
Align the gear teeth of the main gear and sub-gear, and tighten the service bolt.
| 2. INSTALL CAMSHAFT TIMING GEAR ASSEMBLY |
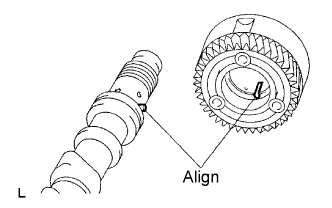 |
Align the alignment pin with the groove and install the camshaft timing gear on the camshaft.
Apply engine oil to the nut, the mounting surface of the camshaft timing gear and the screw threads.
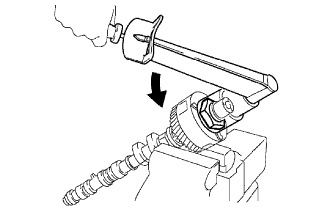 |
Using a 46 mm socket wrench, install and tighten a lock nut by turning it counterclockwise.
| 3. INSTALL NO. 4 CAMSHAFT SUB-ASSEMBLY |
Apply new engine oil to the thrust portion and journal of the camshaft.
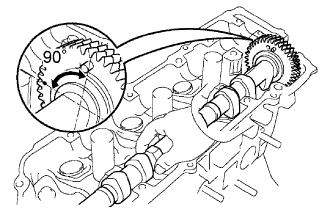 |
Place the No. 4 camshaft at 90° angle of the timing mark (1-dot mark) on the cylinder head.
Apply MP grease to a new oil seal lip.
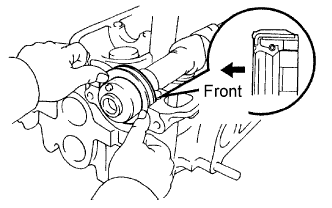 |
Install the oil seal to the camshaft.
Remove any old packing material from the contact surface.
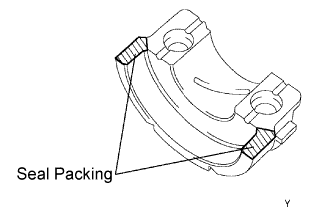 |
Apply seal packing to the No. 1 bearing cap as shown in the illustration.
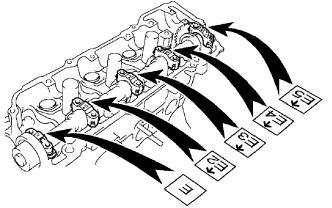 |
Install the 5 bearing caps in their proper locations.
Apply a light coat of engine oil to the threads of the bearing cap bolts.
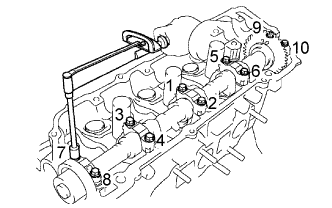 |
Using several steps, install and tighten the 10 bearing cap bolts uniformly in the sequence shown in the illustration.
| 4. INSTALL NO. 3 CAMSHAFT SUB-ASSEMBLY |
Apply new engine oil to the thrust portion and journal of the camshaft.
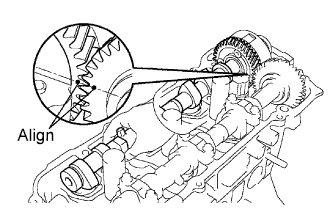 |
Align the timing marks (1-dot mark) of the camshaft drive gear with the mark on the driven gear.
Place the camshaft on the cylinder head.
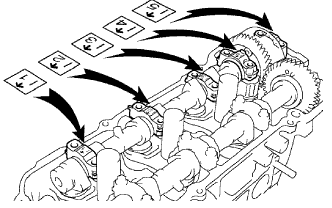 |
Install the 5 bearing caps in their proper locations.
Apply a light coat of engine oil to the threads of the bearing cap bolts.
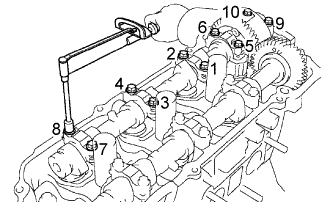 |
Using several steps, install and tighten the 10 bearing cap bolts uniformly in the sequence shown in the illustration.
Remove the service bolt.
| 5. INSTALL NO. 3 TIMING BELT COVER |
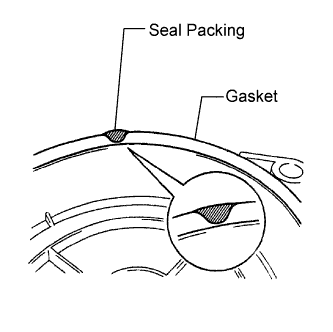
Visually check for cracks and breaks on the gasket of the timing belt cover.
 |
If the timing belt cover gasket is needed to repair, follow the procedure below.
Repair the cracks and breaks by applying the seal packing to the damaged area.
If the timing belt cover gasket is needed to replace, follow the procedure below.
Using a screwdriver and gasket scraper, remove the remaining gasket.
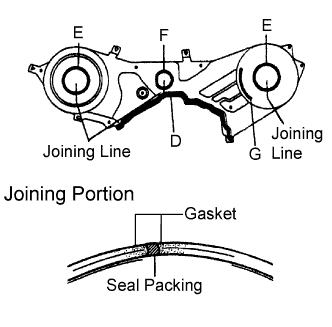 |
Remove the backing paper from a new gasket, and affix the gasket along the groove of the timing belt cover as shown in the illustration.
| Gasket | D | E | F | G |
| Length | 335 mm (13.19 in.) | 180 mm (7.09 in.) | 133 mm (5.24 in.) | 72 mm (2.83 in.) |
If there is a gap on the joint of the gasket, apply seal packing to close the gap.
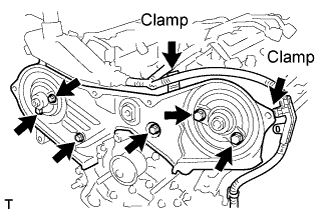 |
Install the timing belt cover No. 3 with the 6 bolts.
| 6. INSTALL CAMSHAFT TIMING PULLEY |
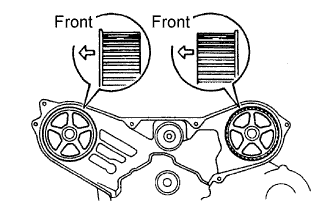 |
Paying attention to the direction of the belt guide, install the camshaft timing pulley and tighten the bolt temporarily.
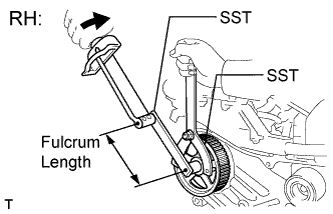 |
Using SST, tighten the RH pulley bolt.
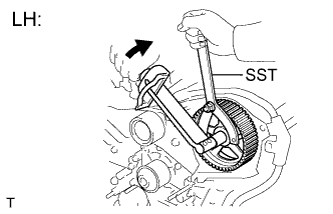 |
Using SST, tighten the LH pulley bolt.
| 7. INSTALL NO. 2 TIMING BELT IDLER SUB-ASSEMBLY |
Install the No. 2 timing belt idler sub-assembly with the bolt.
| 8. INSPECT TIMING BELT |
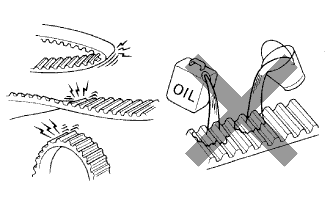 |
If there is premature parting:
If the belt teeth are cracked or damaged, check if either camshaft is locked.
If there is noticeable wear or cracks on the belt face, check if there are nicks on the side of the idler pulley lock and water pump.
If there is wear or damage to only one side of the belt, check the belt guide and the alignment of each pulley.
If there is noticeable wear on the belt teeth:
| 9. INSTALL TIMING BELT |
Remove any oil or water on the pulleys, and keep them clean.
Inspect the idler pulleys.
Check that the idler pulley turns smoothly.
Visually check the seal portion of the idler pulley for oil leakage.
Inspect the water pump.
Turn the pulley, and check that the water pump bearing moves smoothly and does not make any noise.
Visually check the drain hole for coolant leakage.
Temporarily install the crankshaft pulley bolt and washer to the crankshaft.
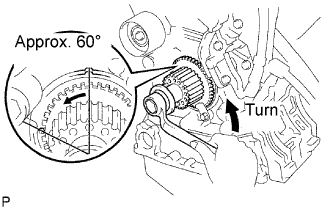 |
Turn the crankshaft counterclockwise by approximately 60°.
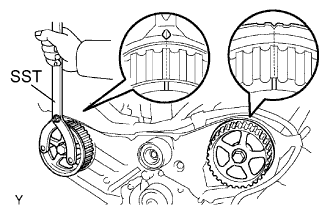 |
Using SST, turn the timing pulleys, and align the timing marks of the timing pulleys with the No. 3 timing belt cover.
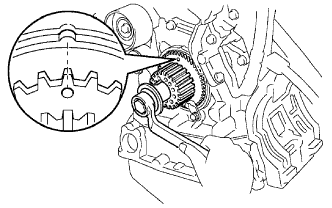 |
Turn the crankshaft, and align the timing mark of the crankshaft timing pulley with the oil pump body.
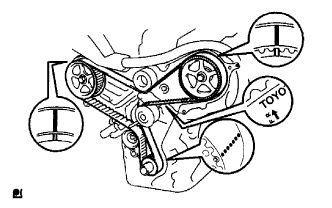 |
Face the front mark on the timing belt forward.
Align the installation mark on the timing belt with the timing mark of the crankshaft timing pulley.
Align the installation marks on the timing belt with the timing marks of the camshaft timing pulleys.
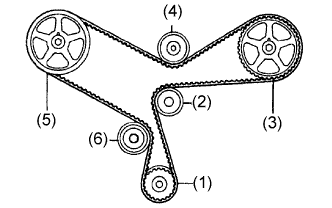 |
Install the timing belt in the following order.
| 1st | Crankshaft timing pulley |
| 2nd | Water pump pulley |
| 3rd | LH camshaft timing pulley |
| 4th | No. 2 idler pulley |
| 5th | RH camshaft timing pulley |
| 6th | No. 1 idler pulley |
| 10. INSTALL NO. 1 CHAIN TENSIONER ASSEMBLY |
Set the timing belt tensioner upright on the press.
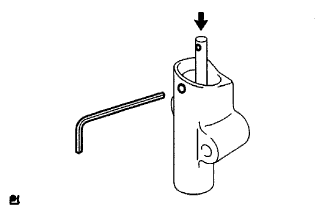 |
Slowly press in the push rod.
Align the holes of the push rod and housing, and pass a 1.5 mm hexagon wrench through the holes to keep the setting position of the push rod.
Release the press.
Install the tensioner with the 2 bolts. Alternately tighten the 2 bolts.
Remove the 1.5 mm hexagon wrench from the tensioner.
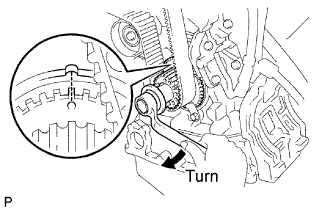 |
Turn the crankshaft 2 revolutions slowly and align the timing mark of the crankshaft timing pulley with the oil pump body.
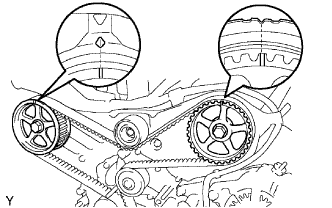 |
Check the timing marks of the RH and LH timing pulleys are aligned with the timing marks of the No. 3 timing belt cover as shown in the illustration.
If the marks do not align, remove the timing belt and reinstall it.
Remove the crankshaft pulley bolt.
| 11. INSTALL NO. 2 TIMING BELT GUIDE |
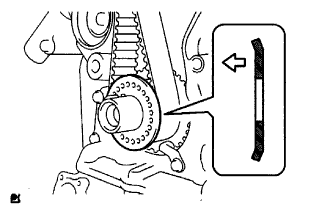 |
Install the timing belt guide with the cup side facing toward the engine front.
| 12. INSTALL ENGINE MOUNTING BRACKET RH |
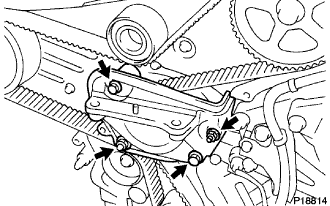 |
Install the engine mounting bracket RH with the 2 bolts and 2 nuts.
| 13. INSTALL NO. 2 TIMING BELT COVER |
Visually check for cracks and breaks on the gasket of the timing belt cover.
If a trace of water is found in the visual check, replace the timing belt cover.
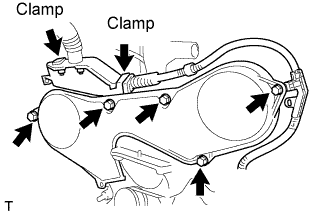 |
Install the timing belt cover with the 5 bolts.
Connect the 2 clamps.
| 14. INSTALL NO. 1 TIMING BELT COVER |
Visually check for cracks and breaks on the gasket of the timing belt cover.
If a trace of water is found in the visual check, replace the timing belt cover.
Install the timing belt cover with the 4 bolts.
| 15. INSTALL CRANKSHAFT PULLEY |
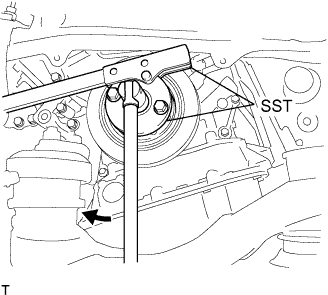 |
Align the keyway of the pulley with the key located on the crankshaft and slide the pulley into place.
Using SST, install the pulley bolt.
| 16. INSTALL NO. 2 ENGINE MOUNTING STAY |
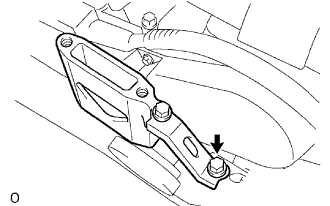 |
Install the No. 2 engine mounting stay and the No. 2 engine mounting bracket with the bolt.
| 17. INSTALL ENGINE MOVING CONTROL ROD |
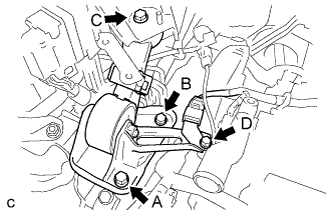 |
Temporarily install the engine moving control rod and bracket with the 4 bolts.
First tighten bolt A, bolt B, then bolt C in this order.
Tighten bolt D.
| 18. INSTALL BRAKE MASTER CYLINDER RESERVOIR SUB-ASSEMBLY |
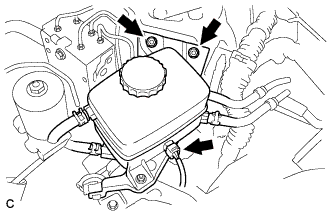 |
Install the 2 nuts and brake master cylinder reservoir.
Connect the connector.
| 19. INSTALL AIR CLEANER BRACKET |
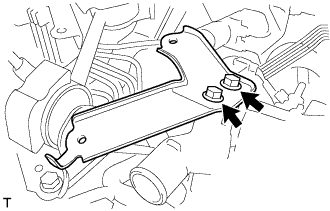 |
Install the 2 bolts and air cleaner bracket.
| 20. INSTALL CYLINDER HEAD COVER SUB-ASSEMBLY LH |
Install the a No. 2 cylinder head cover gasket to the cylinder head cover sub-assembly LH.
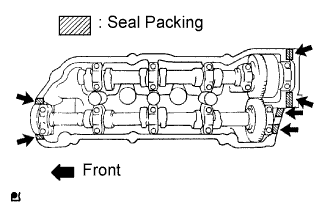 |
Apply seal packing to the cylinder head as shown in the illustration.
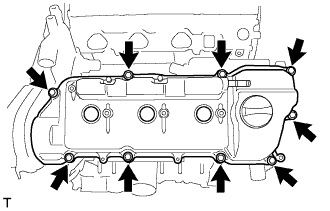 |
Install the cylinder head cover with the 9 bolts. Tighten the bolts uniformly in several steps.
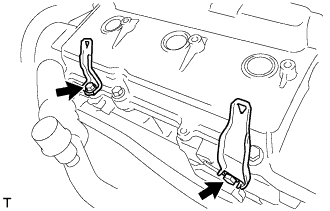 |
Install the 2 brackets with the 2 bolts.
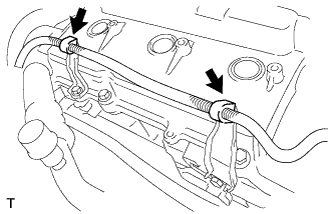 |
Install the 2 engine wire harness clamps.
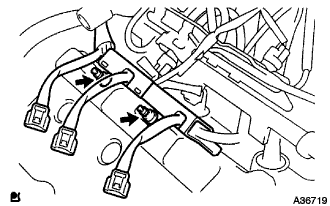 |
Using an E6 "TORX" socket wrench, install the engine wire harness protector with the 2 bolts.
| 21. INSTALL IGNITION COIL ASSEMBLY |
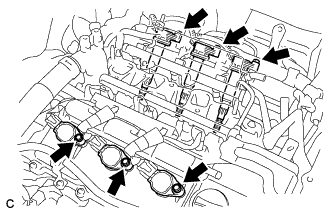 |
Install the 6 ignition coils with the 6 bolts.
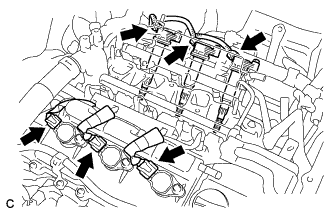 |
Connect the 6 ignition coil connectors.
| 22. INSTALL INTAKE AIR SURGE TANK |
Install a new gasket to the intake air surge tank.
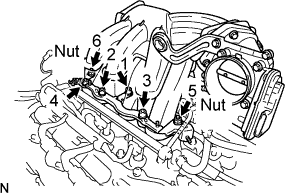 |
Using a socket hexagon wrench 8 mm, install the intake air surge tank with the 4 bolts and 2 nuts. Using several steps, tighten the bolts and nuts uniformly in the sequence shown in the illustration.
Connect the ground cable connector.
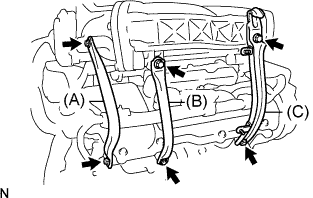 |
Install the No. 2 surge tank stay (A) with the 2 bolts.
Install the No. 1 surge tank stay (B) with the 2 bolts.
Install the No. 1 engine hunger (C) with the 2 bolts.
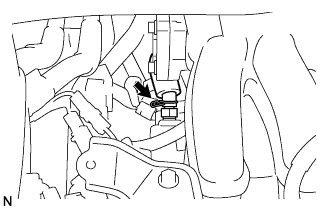 |
Connect the ventilation hose.
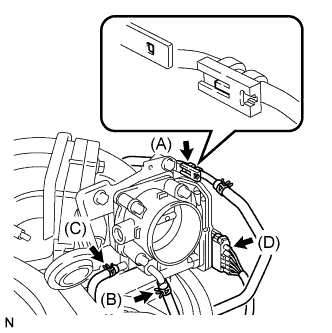 |
Connect the fuel vapor feed hose (A).
Connect the No. 3 water by-pass hose (B).
Connect the No. 2 water by-pass hose (C).
Connect the throttle motor connector (D).
| 23. INSTALL EMISSION CONTROL VALVE SET |
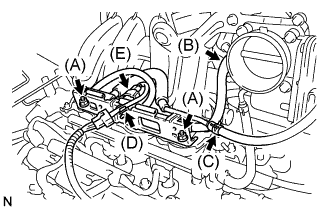 |
Install the emission control valve set with the 2 nuts (A).
Connect the No. 2 fuel vapor feed hose (B).
Connect the No. 1 fuel vapor feed hose (C).
Connect the wire harness clamp (D).
Connect the VSV connector (E).
| 24. INSTALL AIR CLEANER CASE SUB-ASSEMBLY |
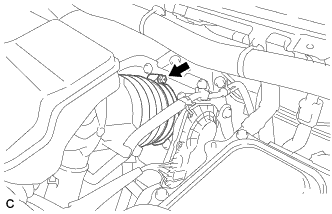 |
Align the tab on the throttle body with the groove on the air cleaner hose and tighten the hose clamp.
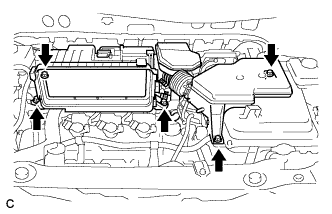 |
Install the air cleaner case sub-assembly with the 5 bolts.
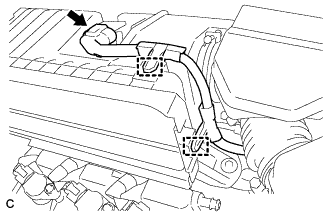 |
Connect the intake air flow meter connector.
Connect the 2 wire harness clamps to the air cleaner case.
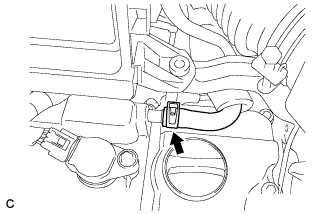 |
Connect the No. 1 ventilation hose.
| 25. INSTALL AIR CLEANER CAP SUB-ASSEMBLY |
Install the air cleaner filter element to the air cleaner case.
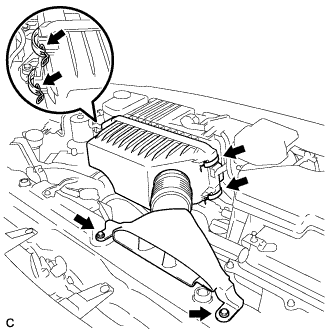 |
Install the 2 bolts, 4 clamps and air cleaner cap sub-assembly.
| 26. INSTALL BATTERY CARRIER SUB-ASSEMBLY |
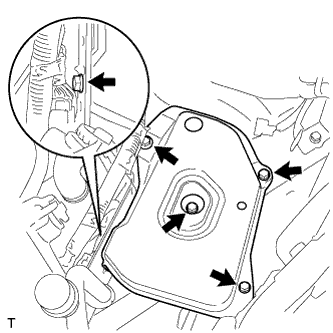 |
Install the 5 bolts and battery carrier.
| 27. INSTALL BATTERY |
Install the battery clamp and battery.
Connect the cable to the battery terminal.
| 28. INSTALL FRONT FENDER APRON SEAL RH |
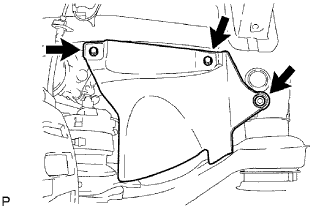 |
Install the fender apron seal RH with the 2 bolts and clip.
| 29. INSTALL FRONT FENDER LINER RH |
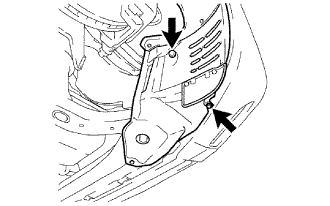 |
Install the front fender liner with the screw and clip.
| 30. INSTALL NO. 1 ENGINE UNDER COVER |
Install the 6 bolts, 2 screws, 2 clips and No. 1 engine under cover.
| 31. INSTALL FRONT WHEEL RH |
| 32. ADD ENGINE OIL |
Add new oil.
| Oil Grade | Oil Viscosity (SAE) |
| ILSAC multigrade engine oil |
|
| Item | Capacity | |
| Drain and refill | with oil filter change | 4.7 liters (5.0 US qts, 4.1 lmp. qts) |
| Drain and refill | without oil filter change | 4.5 liters (4.8 US qts, 4.0 lmp. qts) |
| Dry fill | 5.5 liters (5.8 US qts, 4.8 lmp. qts) | |
| 33. ADD COOLANT (for Engine) |
Tighten the radiator drain cock plug.
Tighten the cylinder block drain cock plugs.
Loosen the air drain plug.
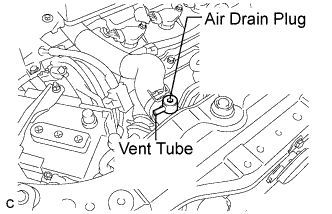 |
Install a vinyl tube to the vent tube located on the air drain plug.
Fill the radiator with engine coolant until the vinyl tube is filled with the coolant.
Tighten the air drain plug.
| Condition | Capacity |
| w/ rear heater | 12.8 liters (13.5 US qts, 11.2 lmp.qts) |
| w/o rear heater | 10.6 liters (11.2 US qts, 9.3 lmp.qts) |
Install the radiator cap securely.
Fill the radiator reservoir tank with coolant.
Warm up the engine until the thermostat opens. While the thermostat is open, allow the coolant to circulate for several minutes.
Stop the engine and wait until the coolant cools down.
Remove the radiator cap and check the coolant level inside the radiator.
If the coolant level is below the full level, perform the steps from (C) through (K) and repeat the operation until the coolant level stays at the full level.
Recheck the coolant level inside the radiator reservoir tank. If it is below the full level, add the coolant.
| 34. INSPECT FOR COOLANT LEAK (for Engine) |
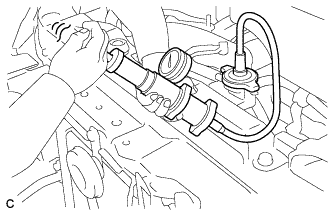 |
Fill the radiator with coolant and attach a radiator cap tester.
Pump the tester to 118 kPa (1.2 kgf/cm2, 17.1 psi), then check that the pressure does not drop.
If the pressure drops, check the hoses, radiator assembly and water pump assembly for leakage. If there are no signs or traces of external engine coolant leakage, check the heater core, cylinder block and cylinder head.
| 35. INSPECT FOR OIL LEAK |
| 36. INSPECT IGNITION TIMING |
Set the vehicle to inspection mode (Click here).
Warm up the engine.
When using the Techstream:
Connect the Techstream to the DLC3.
Enter DATA LIST MODE on the Techstream.
Check that the ignition timing advances immediately when the engine speed is increased.
When not using the Techstream:
Using SST, connect terminals 13 (TC) and 4 (CG) of the DLC3.
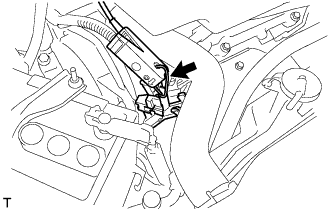 |
Pull out the red-colored wire harness as shown in the illustration.
Connect the tester terminal of the timing light to the red-colored wire.
Inspect ignition timing at idle.
Disconnect SST from terminals 13 (TC) and 4 (CG) of the DLC3.
Inspect ignition timing at idle.
Confirm that the ignition timing advances when the engine rpm is increased.
Remove the timing light.
| 37. INSPECT IDLE SPEED |
Set the vehicle to inspection mode (Click here).
Warm up the engine.
Connect the Techstream to the DLC3.
Enter DATA LIST MODE on the Techstream.
| 38. INSTALL NO. 2 ENGINE ROOM SIDE COVER LH |
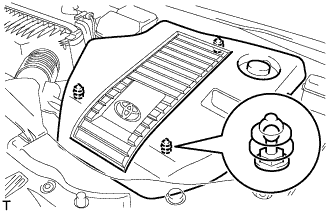 |
Fit the clips and install the No. 2 engine room side cover LH.
| 39. INSTALL OUTER COWL TOP PANEL SUB-ASSEMBLY |
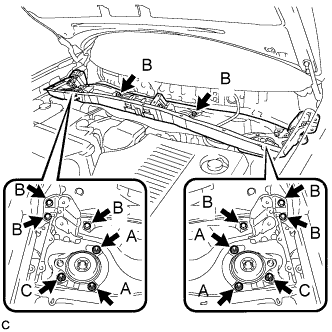 |
Install the outer cowl top panel sub-assembly with the 8 bolts and 6 nuts.
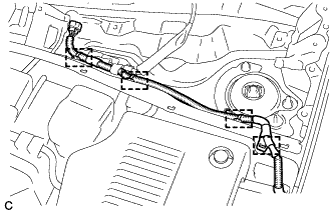 |
Engage the 4 clamps.
| 40. INSTALL WINDSHIELD WIPER MOTOR AND LINK ASSEMBLY |
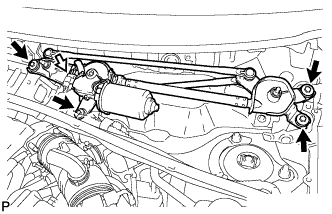 |
Install the windshield wiper motor and link assembly with the 4 bolts.
Connect the connector.
| 41. INSTALL COWL TOP VENTILATOR LOUVER SUB-ASSEMBLY |
Engage the 20 claws.
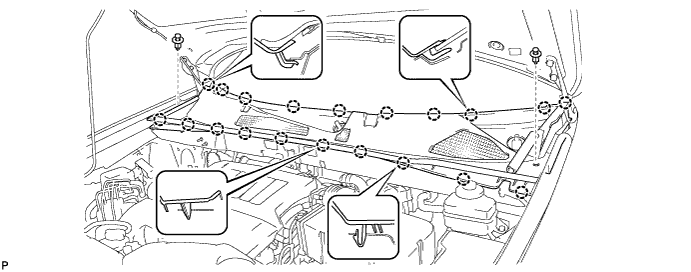
Install the cowl top ventilator louver sub-assembly with the 2 clips.
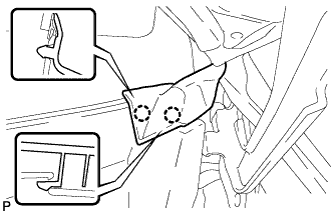 |
Engage the 2 claws and connect the front fender to cowl side seal LH.
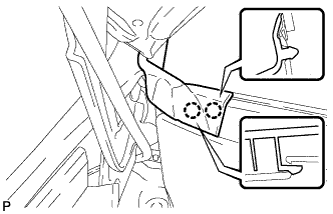 |
Engage the 2 claws and connect the front fender to cowl side seal RH.
| 42. INSTALL HOOD TO COWL TOP SEAL |
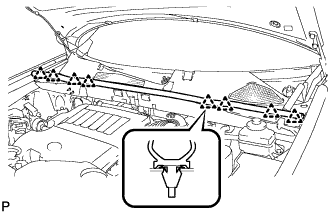 |
Engage the 8 clips and install the hood to cowl top seal.
| 43. INSTALL FRONT WIPER ARM AND BLADE ASSEMBLY RH |
Operate the wiper and stop the windshield wiper motor at the automatic stop position.
When reinstalling:
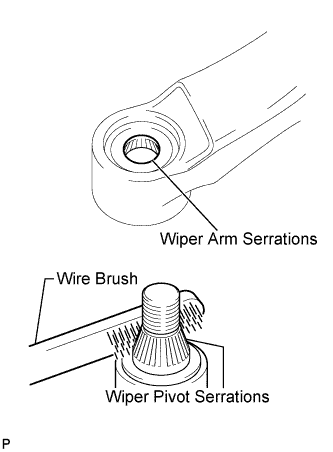 |
Clean the wiper arm serrations.
Clean the wiper pivot serrations with a wire brush.
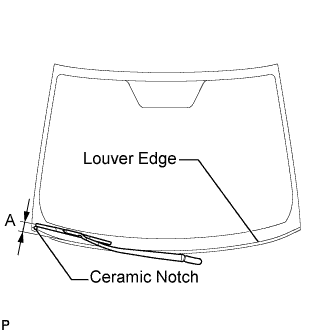 |
Install the front wiper arm and blade assembly RH with the nut to the position shown in the illustration.
| Area | Measurement |
| A | 25.6 mm (1.00 in.) |
| 44. INSTALL FRONT WIPER ARM AND BLADE ASSEMBLY LH |
Operate the wiper and stop the windshield wiper motor at the automatic stop position.
When reinstalling:
|
Clean the wiper arm serrations.
Clean the wiper pivot serrations with a wire brush.
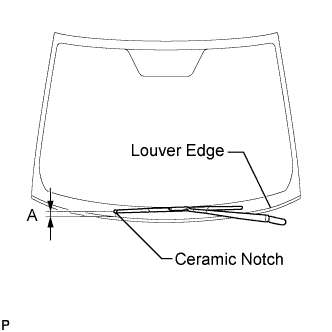 |
Install the front wiper arm and blade assembly LH with the nut to the position shown in the illustration.
| Area | Measurement |
| A | 31.9 mm (1.26 in.) |
Operate the front wipers while spraying washer fluid onto the windshield glass. Make sure that the front wipers function properly and the wipers do not come into contact with the vehicle body.