Home › HYBRID SYSTEM ยท P310 › HYBRID BATTERY CONTROL › HYBRID BATTERY SYSTEM

DTC    P0AC0-123    Hybrid Battery Pack Current Sensor Circuit Range / Performance

for Preparation Click here


DESCRIPTION


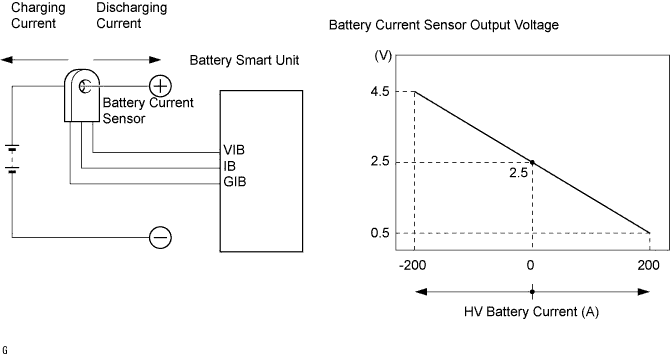
  1. The battery current sensor, which is mounted on the positive cable side of the HV battery assembly, detects the amperage that flows into the HV battery. The battery smart unit inputs a voltage, which varies between 0 and 5 V in proportion to the amperage, into the IB terminal from the battery current sensor. An output voltage of the battery current sensor below 2.5 V indicates that the HV battery is being charged, and above 2.5 V indicates that the HV battery is being discharged. The hybrid vehicle control ECU determines the charging and discharging amperage of the HV battery based on the signals that are input to its IB terminal from the battery smart unit, and calculates the SOC (state of charge) of the HV battery through the accumulated amperage.


    A108798E06


DTC No.
DTC Detection Condition
Trouble Area
P0AC0-123
When the battery current sensor is abnormal (1 or 2 trip detection)
  1. HV relay assembly
  2. Battery smart unit

MONITOR DESCRIPTION

If the battery smart unit detects a malfunction in the battery current sensor, the hybrid vehicle control ECU illuminates the MIL and sets a DTC.

MONITOR STRATEGY


Related DTCs
P0AC0-123
Required sensors / components
Battery current sensor
Frequency of operation
Continuous
Duration
TOYOTA's intellectual property
MIL operation
Immediately
Sequence of operation
None

TYPICAL ENABLING CONDITIONS


The monitor will run whenever the DTCs listed are not present
TOYOTA's intellectual property

TYPICAL MALFUNCTION THRESHOLDS


TOYOTA's intellectual property
-

COMPONENT OPERATING RANGE


Battery smart unit
P0AC0-123 is not detected

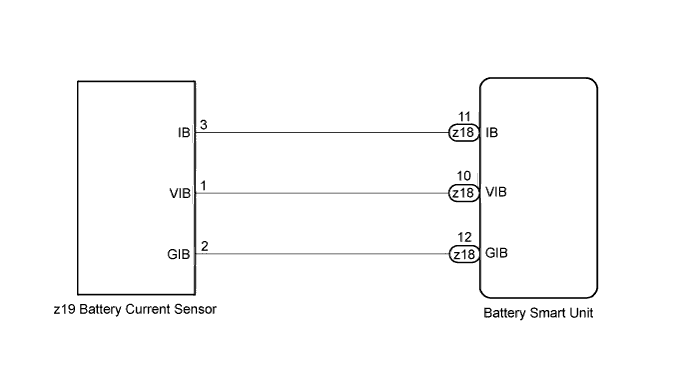
WIRING DIAGRAM


A176200E01


INSPECTION PROCEDURE

CAUTION:
  1. Before inspecting the high-voltage system, take safety precautions to prevent electrical shocks, such as wearing insulated gloves and removing the service plug grip. After removing the service plug grip, put it in your pocket to prevent other technicians from accidentally reconnecting it while you are working on the high-voltage system.
  2. After disconnecting the service plug grip, wait for at least 5 minutes before touching any of the high-voltage connectors or terminals.

HINT:
At least 5 minutes is required to discharge the high-voltage capacitor inside the inverter with converter assembly.

1.CHECK DTC OUTPUT (DTC P0A1F-123 IS OUTPUT)
  1. Connect the Techstream to the DLC3.

  1. Turn the power switch on (IG).

  1. Select the following menu items: Powertrain / Hybrid Control / Trouble Codes.

  1. Read output DTCs (Click here).

    Result:
    Result
    Proceed to
    P0A1F-123 is not output.
    A
    P0A1F-123 is also output.
    B


B
GO TO DTC CHART (P0A1F-123) (Click here)
A


2.REPLACE HV RELAY ASSEMBLY
  1. Replace the HV relay assembly (Click here).


NEXT


3.CLEAR DTC
  1. Install the battery cover.

  1. Connect the Techstream to the DLC3.

  1. Turn the power switch on (IG).

  1. Select the following menu items: Powertrain / Hybrid Control / Trouble Codes.

  1. Clear DTCs and freeze frame data (Click here).

  1. Perform a road test to charge and discharge the HV battery assembly.

    HINT:
    Two trip detection logic is used. After the first road test, turn the power switch off and perform a road test again.


NEXT


4.CHECK DTC OUTPUT (DTC IS NOT OUTPUT AGAIN)
  1. Connect the Techstream to the DLC3.

  1. Turn the power switch on (IG).

  1. Select the following menu items: Powertrain / Hybrid Control / Trouble Codes.

  1. Read output DTCs.

    Result:
    Result
    Proceed to
    One or several of DTCs P0AC0-123, P0ABF-123, P0AC1-123 and P0AC2-123 are not output.
    A
    One or several of DTCs P0AC0-123, P0ABF-123, P0AC1-123 and P0AC2-123 are output.
    B


B
REPLACE BATTERY SMART UNIT (Click here)
A

COMPLETED