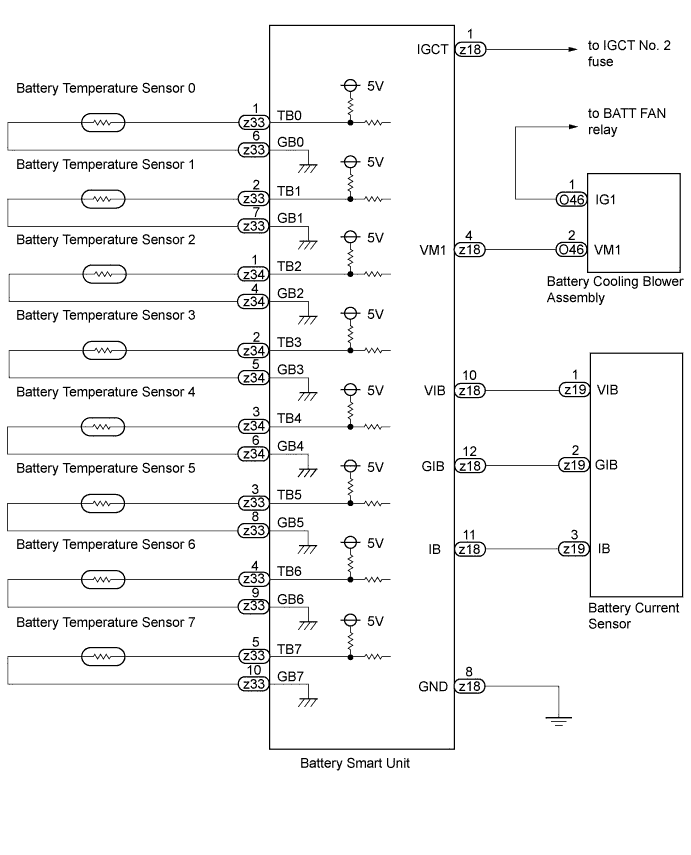
DTC P0A9A-123 Hybrid Battery Pack Cooling Fan 2 Control Circuit High |
| DTC No. | DTC Detection Condition | Trouble Area |
| P0A9A-123 | Voltage at each battery assembly (V1) is out of the predetermined range in proportion to the target control voltage (1 trip detection). |
|
| 1.CHECK DTC OUTPUT (DTC P0A1F-123 IS OUTPUT) |
Connect the Techstream to the DLC3.
Turn the power switch on (IG).
Select the following menu items: Powertrain / Hybrid Control / Trouble Codes.
Read output DTCs (Click here).
| Result | Proceed to |
| P0A1F-123 is not out put. | A |
| P0A1F-123 is also output. | B |
|
| ||||
| A | |
 |
| 2.CHECK HARNESS AND CONNECTOR (VM0 VOLTAGE) |
Remove the service plug grip (Click here).
Remove the battery cover (Click here).
Connect the Techstream to the DLC3.
Turn the power switch on (IG) and the Techstream on.
Select the following menu items: Powertrain / Hybrid Control / Active Test / Driving the Battery Cooling Fan.
Select each air volume mode (1 to 6) in the "Driving the Battery Cooling Fan" active test to operate the battery cooling blower assembly.
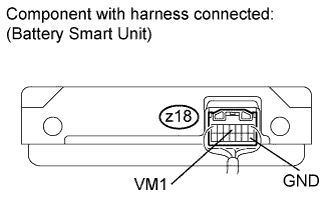 |
Measure the voltage according to the value(s) in the table below while the cooling fan is operating.
| Tester Connection | Switch Condition | Specified Condition |
| z18-4 (VM1) - z18-8 (GND) | Power switch on (IG) | 10V or less |
|
| ||||
| OK | |
|
| 3.CHECK HV BATTERY (BATTERY TEMPERATURE SENSOR) |
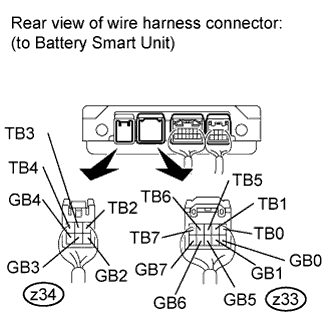 |
Disconnect the z33 and z34 connectors from the battery smart unit (Click here).
Measure the resistance according to the conditions and value(s) in the tables below.
| Tester Connection | Thermistor No. |
| z33-1 (TB0) - z33-6 (GB0) | 0 |
| z33-2 (TB1) - z33-7 (GB1) | 1 |
| z34-1 (TB2) - z34-4 (GB2) | 2 |
| z34-2 (TB3) - z34-5 (GB3) | 3 |
| z34-3 (TB4) - z34-6 (GB4) | 4 |
| z33-3 (TB5) - z33-8 (GB5) | 5 |
| z33-4 (TB6) - z33-9 (GB6) | 6 |
| z33-5 (TB7) - z33-10 (GB7) | 7 |
| Thermistor Temperature | Switch Condition | Specified Condition (kΩ) |
| 32°F (0°C) | Power switch off | 27.0 to 27.6 |
| 77°F (25°C) | Power switch off | 9.9 to 10.1 |
| 104°F (40°C) | Power switch off | 5.77 to 5.89 |
Disconnect the z18 connector from the battery smart unit.
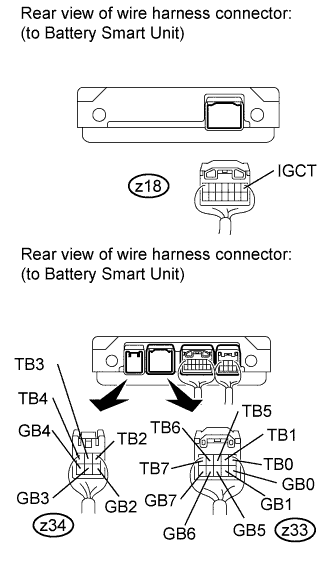 |
Measure the resistance according to the conditions and value(s) in the tables below.
| Tester Connection | Switch Condition | Standard resistance |
| z33-1 (TB0) - z18-1 (IGCT) | Power switch off | 10 kΩ or more |
| z33-2 (TB1) - z18-1 (IGCT) | Power switch off | 10 kΩ or more |
| z34-1 (TB2) - z18-1 (IGCT) | Power switch off | 10 kΩ or more |
| z34-2 (TB3) - z18-1 (IGCT) | Power switch off | 10 kΩ or more |
| z34-3 (TB4) - z18-1 (IGCT) | Power switch off | 10 kΩ or more |
| z33-3 (TB5) - z18-1 (IGCT) | Power switch off | 10 kΩ or more |
| z33-4 (TB6) - z18-1 (IGCT) | Power switch off | 10 kΩ or more |
| z33-5 (TB7) - z18-1 (IGCT) | Power switch off | 10 kΩ or more |
| z33-6 (GB0) - z18-1 (IGCT) | Power switch off | 10 kΩ or more |
| z33-7 (GB1) - z18-1 (IGCT) | Power switch off | 10 kΩ or more |
| z34-4 (GB2) - z18-1 (IGCT) | Power switch off | 10 kΩ or more |
| z34-5 (GB3) - z18-1 (IGCT) | Power switch off | 10 kΩ or more |
| z34-6 (GB4) - z18-1 (IGCT) | Power switch off | 10 kΩ or more |
| z33-8 (GB5) - z18-1 (IGCT) | Power switch off | 10 kΩ or more |
| z33-9 (GB6) - z18-1 (IGCT) | Power switch off | 10 kΩ or more |
| z33-10 (GB7) - z18-1 (IGCT) | Power switch off | 10 kΩ or more |
|
| ||||
| OK | |
|
| 4.INSPECT BATTERY SMART UNIT |
Connect the z18 battery smart unit connector.
Turn the power switch on (IG).
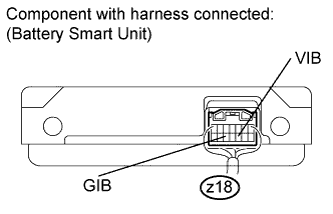 |
Measure the voltage according to the value(s) in the table below.
| Tester Connection | Switch Condition | Specified Condition |
| z18-10 (VIB) - z18-12 (GIB) | Power switch on (IG) | 4.6 to 5.4 V |
Reconnect the battery smart unit connector.
|
| ||||
| OK | |
|
| 5.INSPECT BATTERY SMART UNIT |
Disconnect the z19 battery current sensor connector from the HV relay assembly (Click here).
Turn the power switch on (IG).
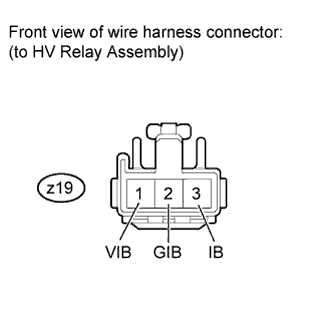 |
Measure the voltage according to the value(s) in the table below.
| Tester Connection | Switch Condition | Specified Condition |
| z19-1 (VIB) - z19-2 (GIB) | Power switch on (IG) | 4.6 to 5.4 V |
|
| ||||
| OK | ||
 | ||
| ||
| 6.CHECK BATTERY COOLING BLOWER ASSEMBLY |
Connect the Techstream to the DLC3.
Select the following menu items: Powertrain / Hybrid Control / Data List / VMF Fan Motor Voltage 1 to 3 and Temp of BATT TB 1 to 8.
Perform a road test and check that there is a malfunction in the VMF Fan Motor Volt 2 while the battery cooling blower assembly is operating. (*1)
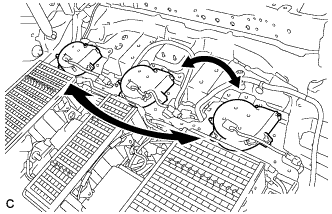 |
Remove the battery cover and replace the battery cooling blower assembly with another battery cooling blower assembly (Click here).
Install the battery cover.
Select the following menu items: Powertrain / Hybrid Control / Data List / VMF Fan Motor Volt 1 to 3 and Temp of BATT TB 1 to 8.
Perform a road test and check that a malfunction in (*1) is reproduced in another battery cooling blower assembly.
| Result | Proceed to |
| The malfunction is reproduced in the same battery cooling blower. | A |
| The malfunction is reproduced in another battery cooling blower. | B |
|
| ||||
| A | |
|
| 7.CHECK HARNESS AND CONNECTOR (BATTRY COOLING BLOWER ASSEMBLY - BATTERY SMART UNIT) |
Disconnect the z18 connector from the battery smart unit (Click here).
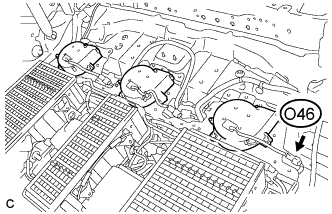 |
Disconnect the O46 battery cooling blower assembly connector.
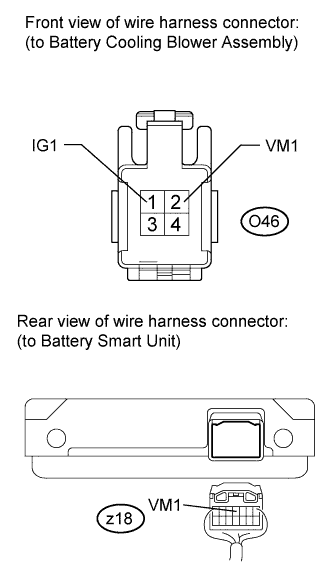 |
Measure the resistance according to the value(s) in the table below.
| Tester Connection | Switch Condition | Specified Condition |
| O46-2 (VM1) - z18-4 (VM1) | Power switch off | Below 1 Ω |
| Tester Connection | Switch Condition | Specified Condition |
| O46-2 (VM1) or z18-4 (VM1) - O46-1 (IG1) | Power switch off | 10 kΩ or more |
|
| ||||
| OK | ||
| ||
| ||
| 8.CHECK BATTERY PACK WIRE (BATTERY SMART UNIT - BATTERY CURRENT SENSOR) |
Remove the service plug grip.
Remove the battery cover.
Disconnect the z18 connector from the battery smart unit.
Disconnect the z19 HV relay assembly (battery current sensor) connector.
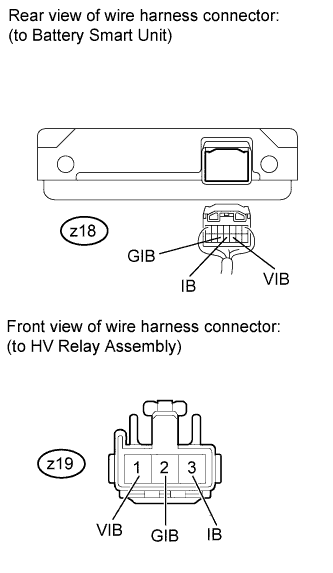 |
Measure the resistance according to the value(s) in the table below.
| Tester Connection | Switch Condition | Specified Condition |
| z18-11 (IB) - z19-3 (IB) | Power switch off | Below 1 Ω |
| z18-12 (GIB) - z19-2 (GIB) | Power switch off | Below 1 Ω |
| z18-10 (VIB) - z19-1 (VIB) | Power switch off | Below 1 Ω |
| Tester Connection | Switch Condition | Specified Condition |
| z18-11 (IB) or z19-3 (IB) - Body ground and other terminals | Power switch off | 10 kΩ or higher |
| z18-12 (GIB) or z19-2 (GIB) - Body ground and other terminals | Power switch off | 10 kΩ or higher |
| z18-10 (VIB) or z19-1 (VIB) - Body ground and other terminals | Power switch off | 10 kΩ or higher |
|
| ||||
| OK | ||
| ||
| ||

