SLIDING ROOF / CONVERTIBLE SLIDING ROOF HOUSING INSTALLATION
PROCEDURE

 1.INSTALL SLIDING ROOF HOUSING ASSEMBLY
Loosen the 8 bolts from the brackets of the sliding roof housing assembly.
Temporarily install the sliding roof housing assembly with the 8 nuts and 8 bolts.
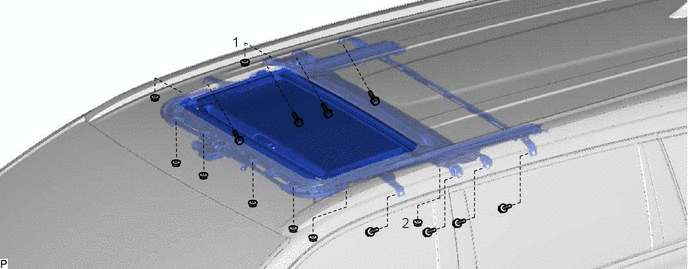
Tighten the 2 nuts.
- HINT:
-
Tighten the 2 nuts in the order shown in the illustration.
- Torque:
- 5.5 N*m (56 kgf*cm, 49 in.*lbf)
Tighten the 6 nuts.
- Torque:
- 5.5 N*m (56 kgf*cm, 49 in.*lbf)
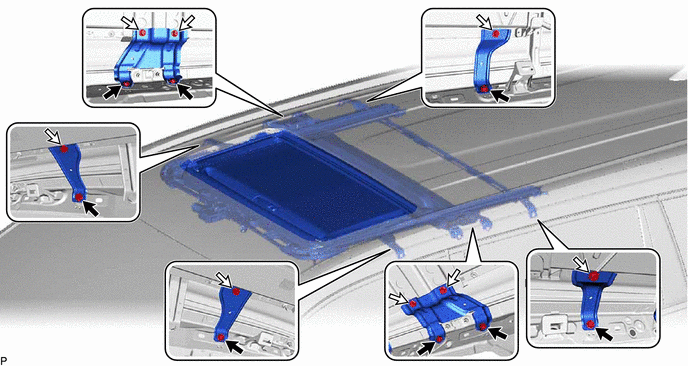
Tighten the 16 bolts to install the sliding roof housing assembly.

|
Bolt (A) | 
|
Bolt (B) |
- HINT:
-
The brackets can be installed in any order. The bolts must be tightened in the order of (A) then (B).
- Torque:
- Bolt (A) : 18.5 N*m (189 kgf*cm, 14 ft.*lbf)
- Bolt (B) : 8.0 N*m (82 kgf*cm, 71 in.*lbf)
86291
2.INSTALL TELEVISION BRACKET (w/ Rear Seat Entertainment System)
Engage the 2 guides and clip.
Install the television bracket with the 4 bolts.
62180A
3.INSTALL CURTAIN SHIELD AIRBAG ASSEMBLY LH
62170A
4.INSTALL CURTAIN SHIELD AIRBAG ASSEMBLY RH
- HINT:
-
Use the same procedure as for the LH side.
62972C
5.INSTALL NO. 1 ROOF SIDE AIR DUCT LH
62971B
6.INSTALL NO. 1 ROOF SIDE AIR DUCT RH
- HINT:
-
Use the same procedure as for the LH side.
7.CONNECT SLIDING ROOF DRAIN HOSE
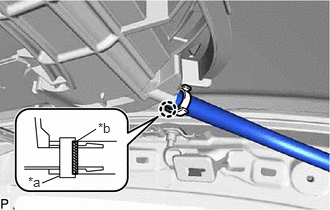
| *a | Clamp |
| *b | Marking |
for Clamp Type:
Connect the sliding roof drain hose.
- HINT:
-
Slide the hose to the base of the drain pipe.
Engage the claw to secure the sliding roof drain hose.
- HINT:
- ·
Make sure that the clamp is on the marking or between the marking and hose end.
·Use the same procedure for the other 3 sliding roof drain hoses.
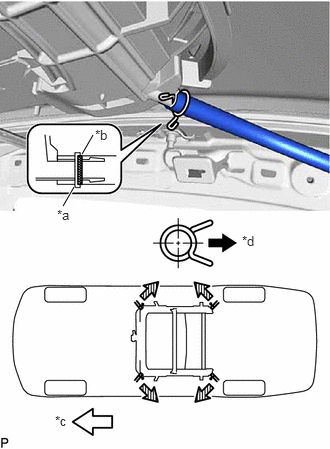
| *a | Clip |
| *b | Marking |
| *c | Front Side |
| *d | Outside |
for Clip Type:
Expand the clip and connect the sliding roof drain hose.
- HINT:
-
Slide the hose to the base of the drain pipe.
Release the clip to secure the sliding roof drain hose.
- NOTICE:
-
The clip must face toward the outside of the vehicle and also be above the lower surface of the sliding roof housing assembly when installing the sliding roof drain hoses.
- HINT:
- ·
Make sure that the clip is on the marking or between the marking and hose end.
·Use the same procedure for the other 3 sliding roof drain hoses.
8.CONNECT CABLE TO NEGATIVE BATTERY TERMINAL
- NOTICE:
-
When disconnecting the cable, some systems need to be initialized after the cable is reconnected.
-
Click hereGeneral>INTRODUCTION>REPAIR INSTRUCTION>INITIALIZATION
63251H
9.INSTALL SLIDING ROOF WEATHERSTRIP
Install the sliding roof weatherstrip:
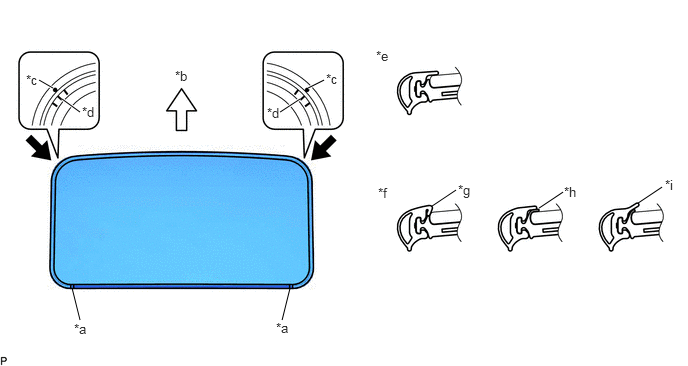
| *a | Joint | *b | Front Side |
| *c | Alignment Mark (Purple) | *d | Middle Mark |
| *e | Correct | *f | Incorrect |
| *g | Pinched | *h | Exposed |
| *i | Gap (raised, wavy, etc.) | - | - |
Position the 2 joints of the sliding roof weatherstrip an the rear side.
Align the alignment marks (purple) on the sliding roof weatherstrip with the middle marks an the corners of the sliding roof panel sub-assembly and install the sliding roof weatherstrip.
Install the lip of the sliding roof weatherstrip firmly.
63201G
10.INSTALL SLIDING ROOF GLASS SUB-ASSEMBLY
Using a T25 "TORX" socket wrench, temporarily install the sliding roof glass sub-assembly with the 4 screws.
Perform a level check.
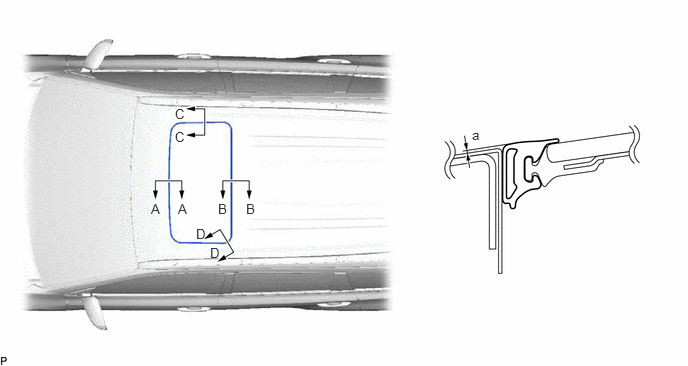
Check the difference in level "a" between the roof panel and the upper surface of the sliding roof weatherstrip when the sliding roof glass sub-assembly is fully closed.
- HINT:
-
"+" represents the condition that the glass is above the panel level. "-" represents the condition that the glass is below the panel level.
- Standard:
Area Measurement A - A 0 + 1.0 mm (0 + 0.0394 in.)
0 - 2.0 mm (0 - 0.0787 in.)B - B 0 + 2.0 mm (0 + 0.0787 in.)
0 - 1.0 mm (0 - 0.0394 in.)C - C 0 + 1.5 mm (0 + 0.0591 in.)
0 - 1.5 mm (0 - 0.0591 in.)D - D 0 + 1.5 mm (0 + 0.0591 in.)
0 - 1.0 mm (0 - 0.0394 in.)
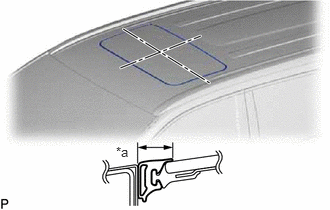
| *a | Even |
Perform a gap check.
Check the gap between the roof panel and sliding roof glass sub-assembly.
- NOTICE:
-
The gap must be even all around.
After adjusting the sliding roof glass sub-assembly, using a T25 "TORX" socket wrench, install the sliding roof glass sub-assembly with the 4 screws.
- Torque:
- 5.5 N*m (56 kgf*cm, 49 in.*lbf)
11.CHECK FOR WATER LEAK
After adjusting the sliding roof glass sub-assembly, check for water leakage into the vehicle interior.
If there are any leaks, readjust the sliding roof glass sub-assembly.
63218G
12.INSTALL SLIDING ROOF SIDE GARNISH LH
Turn the ignition switch on (IG).
Open the sliding roof glass sub-assembly.
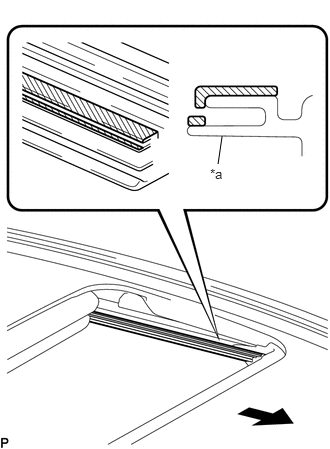
| *a | Sliding Roof Guide Rail LH |
|
|
Front |

|
Grease |
Remove any grease from the area shown in the illustration with a piece of cloth.
Close the sliding roof glass sub-assembly.
Turn the ignition switch off.
Engage the 2 claws to install a new sliding roof side garnish LH.
63217G
13.INSTALL SLIDING ROOF SIDE GARNISH RH
- HINT:
-
Use the same procedure as for the LH side.
14.INSTALL ROOF HEADLINING ASSEMBLY
63260A
15.RESET SLIDING ROOF DRIVE GEAR SUB-ASSEMBLY
16.CHECK SLIDING ROOF SYSTEM
17.INSPECT SRS WARNING LIGHT