2GR-FE FUEL FUEL SYSTEM PRECAUTION
IGNITION SWITCH EXPRESSIONS
The type of ignition switch used on this model differs depending on the specifications of the vehicle. The expressions listed in the table below are used in this section.
| Expression | Ignition Switch (Position) | Engine Switch (Condition) |
|---|---|---|
| Ignition Switch off | LOCK | Off (Lock) |
| Ignition Switch ACC | ACC | On (ACC) |
| Ignition Switch ON | ON | On (IG) |
| Engine Start | START | On (Start) |
PRECAUTIONS
Before inspecting and repairing the fuel system, disconnect the cable from the negative (-) battery terminal.
Do not smoke or work near fire when handling the fuel system.
Keep fuel away from rubber or leather parts.
DISCHARGE FUEL SYSTEM PRESSURE
- CAUTION:
- ·
Make sure the engine coolant temperature is 60°C (140°F) or less when performing this procedure.
·Perform the following procedure to prevent fuel from spraying before removing any fuel system parts.
·Pressure will still remain in the fuel lines even after performing the following procedure. When disconnecting a fuel line, cover it with a piece of cloth to prevent fuel from spraying or coming out.
Disconnect the fuel pump connector.
Click hereEngine / Hybrid System>2GR-FE FUEL>FUEL PUMP>REMOVAL
Start the engine. After the engine has stopped on its own, turn the ignition switch off.
- NOTICE:
-
Do not increase the engine speed or drive the vehicle while waiting for the engine to stop on its own.
Crank the engine again and make sure that the engine does not start.
- HINT:
-
DTC P0171/P0174 (System Too Lean), P1603 (Engine Stall History), P1604 (Startability Malfunction) or P1605 (Rough Idling) may be stored. Clear the DTCs before proceeding to the next step.
-
Click hereEngine / Hybrid System>2GR-FE ENGINE CONTROL>SFI SYSTEM>DTC CHECK / CLEAR
Remove the fuel tank cap assembly and discharge the pressure from the fuel tank assembly.
Disconnect the cable from the negative (-) battery terminal.
- NOTICE:
-
When disconnecting the cable, some systems need to be initialized after the cable is reconnected.
-
Click hereGeneral>INTRODUCTION>REPAIR INSTRUCTION>INITIALIZATION
Connect the fuel pump connector.
Click hereEngine / Hybrid System>2GR-FE FUEL>FUEL PUMP>INSTALLATION
FUEL LINE
When disconnecting a high-pressure fuel line, a large amount of fuel will spray. Perform the following procedure:
Discharge fuel system pressure.
Disconnect the fuel tube.
Drain the fuel remaining inside the fuel tube into a container.
Cover the disconnected fuel pipe and fuel tube connector with plastic bags to prevent damage and contamination.
Quick Type A:
Perform the following procedure when disconnecting a fuel tube connector.
- NOTICE:
-
Remove any dirt or foreign matter on the fuel tube connector and fuel pipe before performing this work.
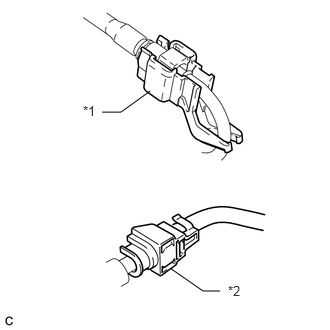
| *1 | No. 1 Fuel Pipe Clamp |
| *2 | No. 2 Fuel Pipe Clamp |
Clamp Type:
Remove the fuel pipe clamp from fuel tube connector.
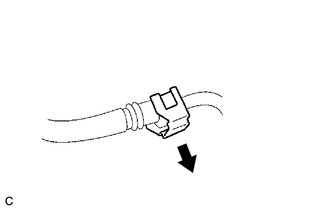

|
Pull Off |
Cover Type:
Pull off the fuel tube connector cover.
Check that there is no dirt or other foreign matter around the fuel tube connector before disconnecting it. Clean the joint if necessary.
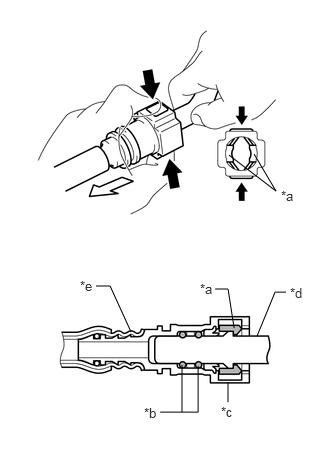
| *a | Retainer |
| *b | O-ring |
| *c | Fuel Tube Connector |
| *d | Fuel Pipe |
| *e | Nylon Tube |
|
|
Pinch |

|
Pull |
Pinch the retainer of the fuel tube connector, and then pull the fuel tube connector off of the fuel pipe.
- NOTICE:
-
Be sure to disconnect the fuel tube connector by hand.
If the fuel tube connector and fuel pipe are stuck, push and pull the fuel tube connector to release it. Pull the fuel tube connector off of the fuel pipe carefully.
- NOTICE:
- ·
Be sure to disconnect the fuel tube connector by hand.
·Do not allow any scratches or foreign matter to get on the parts when disconnecting them as the fuel tube connector has O-rings that seal the fuel pipe.
·Do not forcibly bend, twist or turn the nylon tube.
Check if there is any foreign matter on the sealing surfaces of the disconnected fuel lines. Clean them if necessary.
Cover the disconnected fuel pipe and fuel tube connector with plastic bags to prevent damage and contamination.
Quick Type A:
Perform the following procedure when connecting a fuel tube connector.
- NOTICE:
-
Check if there is any damage or foreign matter on the connecting parts of the fuel lines.
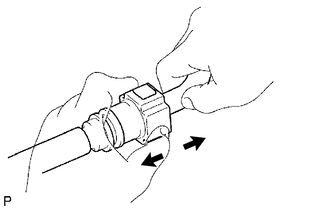
|
|
Pull |
Align the fuel tube connector with the fuel pipe, and push them together until the fuel tube connector makes a "click" sound. If it is difficult to push the fuel pipe into the fuel tube connector, apply a small amount of clean engine oil to the tip of the fuel pipe and reinsert it.
After connecting the fuel lines, check that the fuel pipe and fuel tube connector are securely connected by pulling on them.
Clamp Type:
Install the fuel pipe clamp to the fuel tube connector.
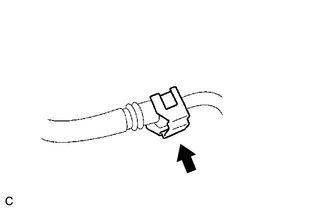
|
|
Push In |
Cover Type:
Push in the fuel tube connector cover.
Inspect for fuel leaks.
Click hereEngine / Hybrid System>2GR-FE FUEL>FUEL SYSTEM>ON-VEHICLE INSPECTION
Quick Type B:
Perform the following procedure when disconnecting a fuel tube connector.
- NOTICE:
-
Remove any dirt or foreign matter on the fuel tube connector and fuel pipe before performing this work.
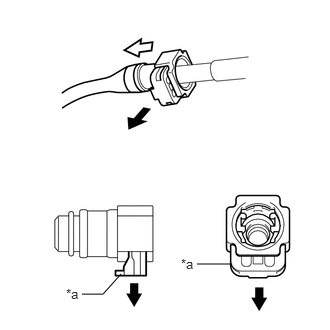
| *a | Retainer |
|
|
Pull Out |
|
|
Pull Off |
Pull out the retainer to disengage the lock claws and pull off the fuel tube connector.
- NOTICE:
-
Be sure to disconnect the fuel tube connector by hand.
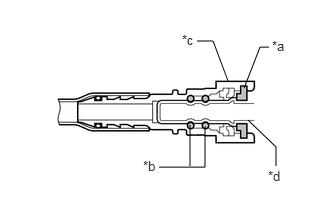
| *a | Retainer |
| *b | O-ring |
| *c | Fuel Tube Connector |
| *d | Fuel Pipe |
If the fuel tube connector and fuel pipe are stuck, push and pull the fuel tube connector to release it. Pull the fuel tube connector off of the fuel pipe carefully.
- NOTICE:
- ·
Be sure to disconnect the fuel tube connector by hand.
·Do not allow any scratches or foreign matter to get on the parts when disconnecting them as the fuel tube connector has O-rings that seal the fuel pipe.
Check if there is any foreign matter on the sealing surfaces of the disconnected fuel lines. Clean them if necessary.
Cover the disconnected fuel pipe and fuel tube connector with plastic bags to prevent damage and contamination.
Quick Type B:
Perform the following procedure when connecting a fuel tube connector.
- NOTICE:
-
Check if there is any damage or foreign matter on the connecting parts of the fuel lines.
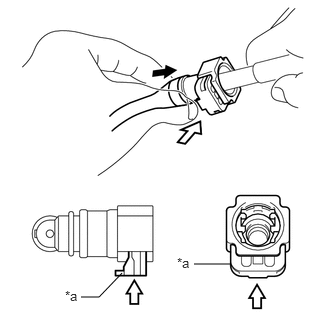
| *a | Retainer |
|
|
Push |
|
|
Push In |
Align the fuel tube connector with the fuel pipe, and push them together until the fuel tube connector makes a "click" sound. If it is difficult to push the fuel pipe into the fuel tube connector, apply a small amount of clean engine oil to the tip of the fuel pipe and reinsert it.
Connect the fuel lines and push in the retainer. Check that the fuel pipe and fuel tube connector are securely connected by pulling on them.
Inspect for fuel leaks.
Click hereEngine / Hybrid System>2GR-FE FUEL>FUEL SYSTEM>ON-VEHICLE INSPECTION
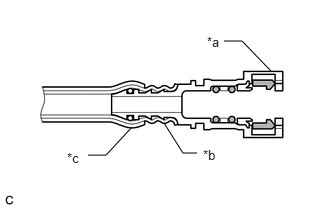
| *a | Fuel Tube Connector |
| *b | Nylon Tube |
| *c | Ethylene Propylene Diene Monomer (EPDM) Rubber Protector |
Observe the following precautions when handling a nylon tube:
- NOTICE:
- ·
Do not twist the fuel tube connector part of the nylon tube or fuel tube connector when connecting it.
·Do not remove the Ethylene Propylene Diene Monomer (EPDM) rubber protector on the outside of the nylon tube.
·Do not pinch or kink the nylon tubes to prevent fuel leaks.
FUEL INJECTOR ASSEMBLY
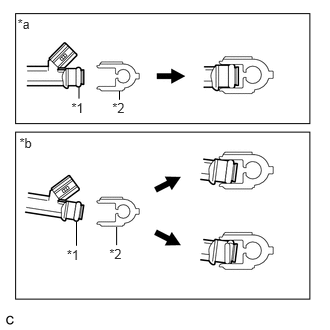
| *1 | O-ring |
| *2 | Fuel Delivery Pipe Sub-assembly |
| *a | Correct |
| *b | Incorrect |
Observe the following precautions when removing and installing the fuel injector assemblies:
Do not reuse the O-ring or injector vibration insulator.
When placing a new O-ring onto the fuel injector assembly, do not damage the O-ring.
Coat a new O-ring with gasoline or spindle oil before installing it.
- NOTICE:
-
Do not use engine oil, gear oil or brake fluid.
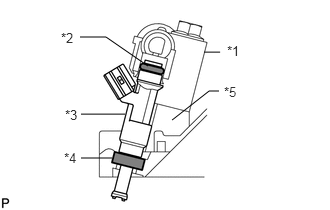
| *1 | Fuel Delivery Pipe Sub-assembly |
| *2 | O-ring |
| *3 | Fuel Injector Assembly |
| *4 | Injector Vibration Insulator |
| *5 | Intake Manifold |
Install the fuel injector assembly into the fuel delivery pipe sub-assembly and intake manifold as shown in the illustration.
- NOTICE:
-
Apply gasoline or spindle oil to the contact surfaces of the fuel delivery pipe sub-assembly and fuel injector assembly before installing it.
FUEL SUCTION TUBE WITH PUMP AND GAUGE ASSEMBLY
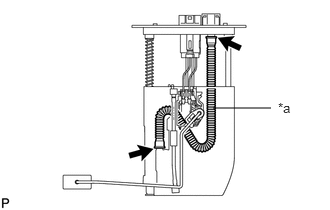
| *a | Tube |
Do not disconnect the tube shown in the illustration when disassembling the fuel suction tube with pump and gauge assembly. Doing so will cause reassembly of the fuel suction tube with pump and gauge assembly to be impossible as the tube is pressed into the fuel suction plate sub-assembly.
When replacing the fuel filter, replace it together with the fuel suction plate sub-assembly.
INSPECT FOR FUEL LEAK
Check that there are no fuel leaks from the fuel system after doing any maintenance or repairs.
Click hereEngine / Hybrid System>2GR-FE FUEL>FUEL SYSTEM>ON-VEHICLE INSPECTION