EXTERIOR PANELS / TRIM BACK DOOR OUTSIDE GARNISH INSTALLATION
PROCEDURE

 76822
1.INSTALL LOWER BACK DOOR GARNISH MOULDING PROTECTOR
Clean the back door outside garnish.
Remove any double-sided tape from the back door outside garnish.
Wipe off any tape adhesive residue with cleaner.
Install a new lower back door garnish moulding protector.
Remove the release paper from the new lower back door garnish moulding protector.
- HINT:
-
After removing the release paper, keep the exposed adhesive free from foreign matter.
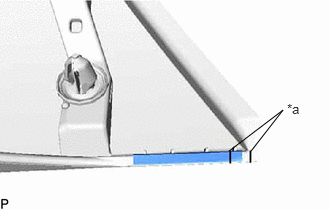
| *a | Marking |
Install the lower back door garnish moulding protector as shown in the illustration.
76825
2.INSTALL BACK DOOR OUTSIDE GARNISH PROTECTOR
Clean the back door outside garnish.
Remove any double-sided tape from the back door outside garnish.
Wipe off any tape adhesive residue with cleaner.
Install a new back door outside garnish protector.
Remove the release paper from the new back door outside garnish protector.
- HINT:
-
After removing the release paper, keep the exposed adhesive free from foreign matter.
Install the back door outside garnish protector as shown in the illustration.
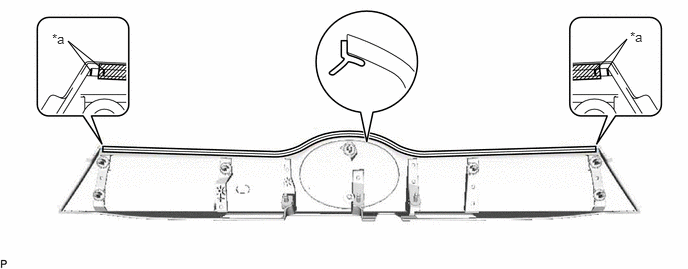
| *a | Marking | - | - |
84840F
3.INSTALL GLASS HATCH OPENER SWITCH ASSEMBLY (for Glass Hatch Type)
76832B
4.INSTALL BACK DOOR FINISH PANEL COVER LH
Engage the 2 claws to install the back door finish panel cover LH.
76831B
5.INSTALL BACK DOOR FINISH PANEL COVER RH
- HINT:
-
Use the same procedure as for the LH side.
75741E
6.INSTALL SYMBOL EMBLEM
- HINT:
-
When installing the symbol emblem, heat the back door outside garnish and symbol emblem using a heat light.
| Item | Temperature |
|---|---|
| Back Door Outside Garnish and Symbol Emblem | 20 to 30°C (68 to 86°F) |
- NOTICE:
-
Do not heat the back door outside garnish or symbol emblem excessively.
Clean the back door outside garnish surface.
Using a heat light, heat the back door outside garnish surface.
Remove any double-sided tape from the back door outside garnish.
Wipe off any tape adhesive residue with cleaner.
Install a new symbol emblem.
Using a heat light, heat the back door outside garnish and symbol emblem.
Remove the release paper from the symbol emblem.
- HINT:
-
After removing the release paper, keep the exposed adhesive free from foreign matter.
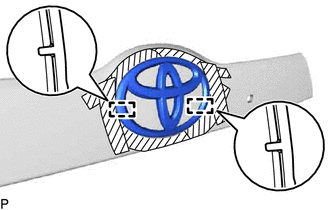
Engage the 2 pins and install the symbol emblem.
84840G
7.INSTALL BACK DOOR OPENER SWITCH ASSEMBLY
8.INSTALL BACK DOOR OUTSIDE GARNISH SUB-ASSEMBLY
Install 7 new clips.
Install 3 new gaskets.
Engage the 7 clips.
Install the back door outside garnish sub-assembly with the 3 nuts.
Connect the connector.
81590A
9.INSTALL REAR LIGHT ASSEMBLY LH
81580D
10.INSTALL REAR LIGHT ASSEMBLY RH
- HINT:
-
Use the same procedure as for the LH side.
84280D
11.INSTALL POWER BACK DOOR SENSOR ASSEMBLY LH (w/ Power Back Door)
84270G
12.INSTALL POWER BACK DOOR SENSOR ASSEMBLY RH (w/ Power Back Door)
- HINT:
-
Use the same procedure as for the LH side.
69806
13.INSTALL BACK DOOR GLASS GUIDE BRACKET SUB-ASSEMBLY (for Fixed Glass Type)
69370E
14.INSTALL BACK WINDOW LOCK ASSEMBLY (for Glass Hatch Type)
85110R
15.INSTALL REAR WIPER MOTOR ASSEMBLY