HEATING / AIR CONDITIONING REFRIGERANT LINE REMOVAL
PROCEDURE

 1.RECOVER REFRIGERANT FROM REFRIGERATION SYSTEM
2.REMOVE WINDSHIELD WIPER MOTOR AND LINK ASSEMBLY
55701J
3.REMOVE OUTER COWL TOP PANEL SUB-ASSEMBLY (for LHD)
55701J
4.REMOVE OUTER COWL TOP PANEL SUB-ASSEMBLY (for RHD)
5.REMOVE PIPING CLAMP
for Low Pressure:
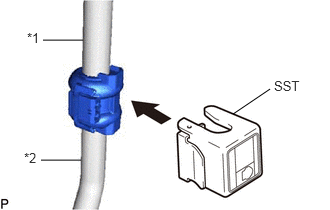
| *1 | Suction Hose Sub-assembly |
| *2 | No. 1 Air Conditioning Accessory Assembly |
Install SST to the piping clamp as shown in the illustration.
- SST
- 09870-00015
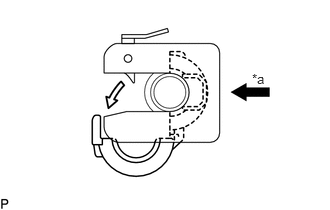
| *a | Push in |
Hold the suction hose sub-assembly and No. 1 air conditioning accessory assembly with each hand and push in SST with both thumbs.
- NOTICE:
-
Do not apply excessive force to the suction hose sub-assembly or No. 1 air conditioning accessory assembly as they may bend.
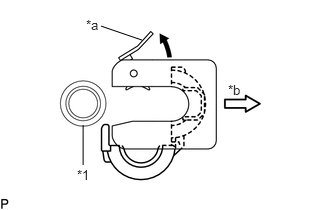
| *1 | No. 1 Air Conditioning Accessory Assembly |
| *a | Stopper |
| *b | Pull off |
Raise the stopper of SST and remove SST and the piping clamp together from the No. 1 air conditioning accessory assembly.
Remove the piping clamp from SST.
Disconnect the suction hose sub-assembly from the No. 1 air conditioning accessory assembly.
Remove the 2 O-rings from the suction hose sub-assembly.
- NOTICE:
-
Seal the openings of the disconnected parts using vinyl tape to prevent entry of moisture and foreign matter.
for High Pressure:
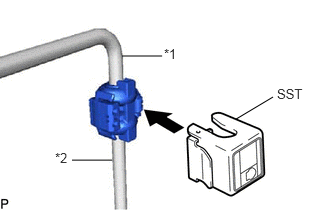
| *1 | Air Conditioner Tube and Accessory Assembly |
| *2 | No. 1 Air Conditioning Accessory Assembly |
Install SST to the piping clamp as shown in the illustration.
- SST
- 09870-00025
| *a | Push in |
Hold the air conditioner tube and accessory assembly and No. 1 air conditioning accessory assembly with each hand and push in SST with both thumbs.
- NOTICE:
-
Do not apply excessive force to the air conditioner tube and accessory assembly or No. 1 air conditioning accessory assembly as they may bend.
| *1 | No. 1 Air Conditioning Accessory Assembly |
| *a | Stopper |
| *b | Pull off |
Raise the stopper of SST and remove SST and the piping clamp together from the No. 1 air conditioning accessory assembly.
Remove the piping clamp from SST.
Disconnect the air conditioner tube and accessory assembly from the No. 1 air conditioning accessory assembly.
Remove the 2 O-rings from the air conditioner tube and accessory assembly.
- NOTICE:
-
Seal the openings of the disconnected parts using vinyl tape to prevent entry of moisture and foreign matter.