PRE-CRASH SAFETY PRE-CRASH SAFETY SYSTEM C1A4B Stop Light Relay Circuit
DESCRIPTION
The skid control ECU (brake actuator assembly) sends a stop light operation signal to the stop light control relay (STOP LP relay). When the skid control ECU (brake actuator assembly) detects a malfunction in the stop light circuit, the driving support ECU assembly stores DTC C1A4B.
| DTC No. | Detection Item | DTC Detection Condition | Trouble Area |
|---|---|---|---|
| C1A4B | Stop Light Relay Circuit | While the engine switch is on (IG), the skid control ECU detects a malfunction in the stop light relay circuit, it sends a malfunction signal to the driving support ECU assembly via CAN communication and the driving support ECU assembly stores this DTC. | ·
Lighting system ·
Vehicle stability control system ·
Harness or connector ·
Stop light switch assembly ·
Stop light control relay (STOP LP relay) ·
Skid control ECU (brake actuator assembly) ·
Driving support ECU assembly |
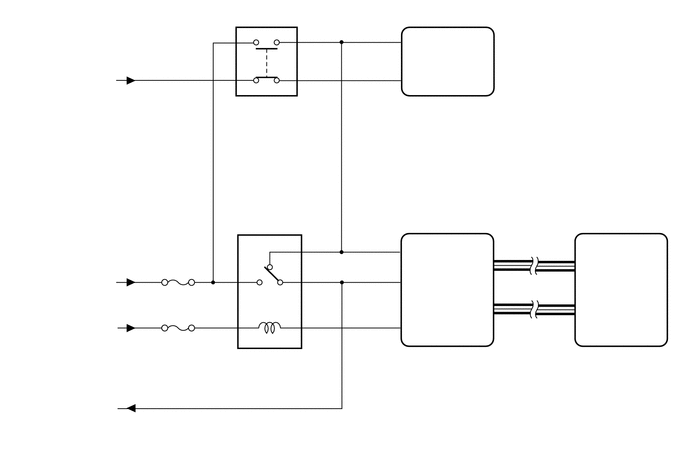
WIRING DIAGRAM
CAUTION / NOTICE / HINT
- NOTICE:
- ·
Inspect the fuses for circuits related to this system before performing the following procedure.
·When this DTC is output, a malfunction in the lighting system is suspected. Check if the lighting system is functioning normally.
Click hereVehicle Exterior>LIGHTING (EXT)>LIGHTING SYSTEM>HOW TO PROCEED WITH TROUBLESHOOTING
·When replacing the driving support ECU assembly, always replace it with a new one. If a driving support ECU assembly which was installed to another vehicle is used, the information stored in the driving support ECU assembly will not match the information from the vehicle. As a result, a DTC may be stored.
PROCEDURE
Connect the GTS to the DLC3.
Turn the engine switch on (IG).
Turn the GTS on.
Enter the following menus: Chassis / ABS/VSC/TRC / Trouble Codes.
Check for DTCs.
- Chassis > ABS/VSC/TRC > Trouble Codes
- 50001 105
- Result:
Result Proceed to Vehicle stability control system DTCs are not output A Vehicle stability control system DTCs are output B
Turn the engine switch off.
A
B
Check that the stop lights come on when the brake pedal is depressed, and go off when the brake pedal is released.
- OK:
Condition Illumination Condition Brake pedal depressed On Brake pedal released Off
- Result:
Proceed to OK NG
OK
NG
Inspect the stop light switch assembly.
Click hereVehicle Exterior>LIGHTING (EXT)>STOP LIGHT SWITCH>INSPECTION
- Result:
Proceed to OK NG
OK
NG
Turn the engine switch on (IG).
Make sure that there is no looseness at the locking part and the connecting part of the connector.
Disconnect the A47 skid control ECU (brake actuator assembly) connector.
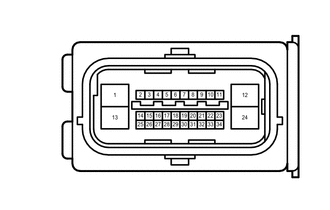
| *a | Front view of wire harness connector
(to Skid Control ECU (Brake Actuator Assembly)) |
Measure the voltage according to the value(s) in the table below.
- Standard Voltage:
Tester Connection Condition Specified Condition A47-2 (STP) - Body ground Stop light switch assembly on (Brake pedal depressed) 11 to 14 V A47-2 (STP) - Body ground Stop light switch assembly off (Brake pedal released) Below 1.5 V
Reconnect the A47 skid control ECU (brake actuator assembly) connector.
Turn the engine switch off.
- Result:
Proceed to OK NG
OK
NG
Connect the GTS to the DLC3.
Turn the engine switch on (IG).
Turn the GTS on.
Enter the following menus: Chassis / ABS/VSC/TRC / Active Test.
Perform "Active Test" according to the display on GTS.
- Chassis > ABS/VSC/TRC > Active Test
-
Tester Display Measurement Item Control Range Diagnostic Note Stop Light Relay Stop light control relay (STOP LP relay) ON or OFF Stop lights come on
- Chassis > ABS/VSC/TRC > Active Test
-
Tester Display Stop Light Relay - 50004 105 5
Enter the following menus: Chassis / ABS/VSC/TRC / Data List.
Check the Data List for proper functioning of the stop light control relay (STOP LP relay).
- Chassis > ABS/VSC/TRC > Data List
-
Tester Display Measurement Item Range Normal Condition Diagnostic Note Stop Light Relay Output Stop light control relay (STOP LP relay) output ON or OFF ON: Relay output on (Stop light on)
OFF: Relay output off (Stop light off)-
- Chassis > ABS/VSC/TRC > Data List
-
Tester Display Stop Light Relay Output - 50003 105 291
- Result:
Result Proceed to Data List content and stop light operation are abnormal or Data List content is normal but stop lights do not turn on or off. A Data List content and stop light operation are normal. B
Turn the engine switch off.
A
B
Remove the stop light control relay (STOP LP relay) from the engine room relay block and junction block assembly.
Disconnect the A47 skid control ECU (brake actuator assembly) connector.
Measure the resistance according to the value(s) in the table below.
- Standard Resistance (Check for Open):
Tester Connection Condition Specified Condition Relay terminal 1 - A47-31 (STPO) Always Below 1 Ω Relay terminal 3 - A47-2 (STP) Always Below 1 Ω Relay terminal 4 - A47-22 (STP2) Always Below 1 Ω
- Standard Resistance (Check for Short):
Tester Connection Condition Specified Condition Relay terminal 1 or A47-31 (STPO) - Body ground Always 10 kΩ or higher Relay terminal 3 or A47-2 (STP) - Body ground Always 10 kΩ or higher Relay terminal 4 or A47-22 (STP2) - Body ground Always 10 kΩ or higher
Reinstall the stop light control relay (STOP LP relay) to the engine room relay block and junction block assembly.
Reconnect the A47 skid control ECU (brake actuator assembly) connector.
- Result:
Proceed to OK NG
OK
NG
Turn the engine switch on (IG).
Disconnect the A47 skid control ECU (brake actuator assembly) connector.
| *a | Front view of wire harness connector
(to Skid Control ECU (Brake Actuator Assembly)) |
Measure the voltage according to the value(s) in the table below.
- Standard Voltage:
Tester Connection Condition Specified Condition A47-22 (STP2) - Body ground Stop light switch assembly on (Brake pedal depressed) 11 to 14 V A47-22 (STP2) - Body ground Stop light switch assembly off (Brake pedal released) Below 1.5 V
Reconnect the A47 skid control ECU (brake actuator assembly) connector.
- Result:
Proceed to OK NG
Turn the engine switch off.
OK
NG
Connect the GTS to the DLC3.
Turn the engine switch on (IG).
Clear the DTCs.
Click hereVehicle Interior>PRE-CRASH SAFETY>PRE-CRASH SAFETY SYSTEM>DTC CHECK / CLEAR
Make sure that the DTC detection conditions are met.
- HINT:
-
If the detection conditions are not met, the system cannot detect the malfunction.
Enter the following menus: Body Electrical / Pre-Crash 2 / Trouble Codes.
Check for DTCs.
- Body Electrical > Pre-Crash 2 > Trouble Codes
- 50001 220
- Result:
Result Proceed to DTC C1A4B is not output. A DTC C1A4B is output. B
Turn the engine switch off.
A
B
Replace the brake actuator assembly.
Click hereBrake>BRAKE CONTROL / DYNAMIC CONTROL SYSTEMS>BRAKE ACTUATOR>REMOVAL
- Result:
Proceed to NEXT
NEXT
Connect the GTS to the DLC3.
Turn the engine switch on (IG).
Clear the DTCs.
Click hereVehicle Interior>PRE-CRASH SAFETY>PRE-CRASH SAFETY SYSTEM>DTC CHECK / CLEAR
Make sure that the DTC detection conditions are met.
- HINT:
-
If the detection conditions are not met, the malfunction cannot be detected.
Enter the following menus: Body Electrical / Pre-Crash 2 / Trouble Codes.
Check for DTCs.
- Body Electrical > Pre-Crash 2 > Trouble Codes
- 50001 220
- Result:
Result Proceed to DTC C1A4B is not output A DTC C1A4B is output B
Turn the engine switch off.
A
B
Disconnect the A54 stop light switch assembly connector.
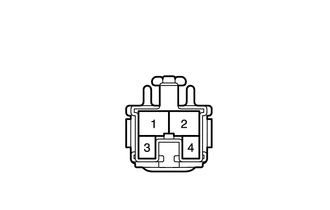
| *a | Front view of wire harness connector
(to Stop Light Switch Assembly) |
Measure the voltage according to the value(s) in the table below.
- Standard Voltage:
Tester Connection Condition Specified Condition A54-2 - Body ground Always 11 to 14 V
Reconnect the A54 stop light switch assembly connector.
- Result:
Proceed to OK NG
OK
NG
Disconnect the A54 stop light switch assembly connector.
Disconnect the A43 ECM connector.
Measure the resistance according to the value(s) in the table below.
- Standard Resistance (Check for Open):
Tester Connection Condition Specified Condition A54-3 - A43-36 (ST1-) Always Below 1 Ω A54-1 - A43-51 (STP) Always Below 1 Ω
- Standard Resistance (Check for Short):
Tester Connection Condition Specified Condition A54-3 or A43-36 (ST1-) - Body ground Always 10 kΩ or higher A54-1 or A43-51 (STP) - Body ground Always 10 kΩ or higher
Reconnect the A54 stop light switch assembly connector.
Reconnect the A43 ECM connector.
- Result:
Proceed to OK NG
OK
NG
Disconnect the A54 stop light switch assembly connector.
Measure the resistance according to the value(s) in the table below.
- Standard Resistance (Check for Short):
Tester Connection Condition Specified Condition A54-1 - Body ground Always 10 kΩ or higher A54-3 - Body ground Always 10 kΩ or higher
Reconnect the A54 stop light switch assembly connector.
- Result:
Proceed to OK NG
OK
NG