METER / GAUGE / DISPLAY METER / GAUGE SYSTEM Fuel Receiver Gauge Malfunction
DESCRIPTION
FUEL RECEIVER GAUGE OPERATION
The combination meter assembly uses the fuel sender gauge assembly to detect the amount of fuel remaining in the fuel tank. The Hall IC built into the fuel sender gauge assembly changes the output voltage according to the amount of fuel remaining. The combination meter assembly receives fuel consumption signals from the ECM and detects the voltage output from the fuel sender gauge assembly and operates the fuel receiver gauge.
FUEL RECEIVER GAUGE READING
During normal driving:
While driving, the fuel level indicated by the fuel receiver gauge decreases according to the fuel consumed. As the fuel level in the fuel tank may be unstable depending on the driving conditions, the combination meter assembly corrects the fuel receiver gauge reading based on the fluctuations in the fuel level.
During refueling:
When fuel is added to the fuel tank, if the fuel level increases by a certain amount or more, the output of the fuel sender gauge assembly will change. The combination meter assembly detects this change and determines that refueling has been performed and calculates the volume of fuel added. This is called refueling judgment. The combination meter assembly adjusts the fuel receiver gauge reading based on the refueling judgment.
REFUELING JUDGMENT CONDITIONS
- NOTICE:
-
Add fuel with the ignition switch off to ensure safety and to enable refueling judgment so that an appropriate fuel receiver gauge reading will be obtained.
Normal judgment condition (When normal refueling method is used)
With the ignition switch off, the fuel sender gauge assembly detects a change of 5.0 liters (5.3 US qts, 4.4 Imp. qts) or more in the fuel level.
Other judgment conditions (When other refueling method is used)
With the ignition switch ON and the vehicle and engine stopped, the fuel sender gauge assembly detects a change of 5.0 liters (5.3 US qts, 4.4 Imp. qts) or more in the fuel level.
PRECAUTION FOR REFUELING
The fuel sender gauge assembly cannot detect changes in the fuel level within certain ranges (around points E and F). Therefore, even if the refueling judgment conditions are satisfied, the fuel receiver gauge reading may not change when the fuel level is within either range.
When refueling judgment is performed, it takes up to approximately 25 seconds for the fuel receiver gauge reading to change to the appropriate level.
FORCED RESET OF FUEL RECEIVER GAUGE
When refueling judgment conditions are not met, if the output of the fuel sender gauge assembly and the fuel receiver gauge reading differ by 15.0 liters (15.9 US qts, 13.2 Imp. qts) or more for approximately 5 minutes continuously, the fuel receiver gauge reading will reflect the detected fuel level without correction and it may take up to approximately 25 seconds for the reading to change to the appropriate level.
WIRING DIAGRAM
CAUTION / NOTICE / HINT
- NOTICE:
- ·
When replacing the combination meter assembly, always replace it with a new one. If a combination meter assembly which was installed to another vehicle is used, the information stored in it will not match the information from the vehicle and a DTC may be stored.
·Before preforming this procedure, check for Meter / Gauge System DTC B150013 which is stored if an open or short in the circuit is detected. If DTC B150013 is output, perform troubleshooting and repairs as necessary.
Click hereVehicle Interior>METER / GAUGE / DISPLAY>METER / GAUGE SYSTEM>DTC CHECK / CLEAR
- HINT:
-
When the fuel level drops below the following amount, the fuel level warning light illuminates.
for HV Model: 9.8 liters (10.4 US qts, 8.6 Imp. qts)
for Gasoline Model: 10.2 liters (10.8 US qts, 9.0 Imp. qts)
PROCEDURE
Check if CAN communication DTCs are output.
for HV Model: Click herePower Source / Network>NETWORKING>CAN COMMUNICATION SYSTEM (for HV Model)>DIAGNOSIS SYSTEM
for Gasoline Model: Click herePower Source / Network>NETWORKING>CAN COMMUNICATION SYSTEM (for Gasoline Model)>DIAGNOSIS SYSTEM
- Result:
Result Proceed to DTCs are not output A DTCs are output B
A
B
for HV Model: Click herePower Source / Network>NETWORKING>CAN COMMUNICATION SYSTEM (for HV Model)>HOW TO PROCEED WITH TROUBLESHOOTING
for Gasoline Model: Click herePower Source / Network>NETWORKING>CAN COMMUNICATION SYSTEM (for Gasoline Model)>HOW TO PROCEED WITH TROUBLESHOOTING
Check if electronically controlled brake system DTCs are output.
for HV Model
- Chassis > Brake/EPB > Trouble Codes
- 50001 435
- Chassis > Brake Booster > Trouble Codes
- 50001 466
for Gasoline Model
- Chassis > Brake/EPB > Trouble Codes
- 50001 435
- Result:
Result Proceed to DTCs are not output A DTCs are output B
A
B
for HV Model: Click hereBrake>BRAKE CONTROL / DYNAMIC CONTROL SYSTEMS>ELECTRONICALLY CONTROLLED BRAKE SYSTEM (for Gasoline Model)>DIAGNOSTIC TROUBLE CODE CHART
for Gasoline Model: Click hereBrake>BRAKE CONTROL / DYNAMIC CONTROL SYSTEMS>ELECTRONICALLY CONTROLLED BRAKE SYSTEM (for Gasoline Model)>DIAGNOSTIC TROUBLE CODE CHART
Check if SFI system DTCs are output.
- Powertrain > Engine > Trouble Codes
- 50001 372
- Result:
Result Proceed to DTCs are not output A DTCs are output B
A
B
for HV Model: Click hereEngine / Hybrid System>A25A-FXS, A25B-FXS (ENGINE CONTROL)>SFI SYSTEM>DIAGNOSTIC TROUBLE CODE CHART
for Gasoline Model: Click hereEngine / Hybrid System>2GR-FKS (ENGINE CONTROL)>SFI SYSTEM>DIAGNOSTIC TROUBLE CODE CHART
Ask the customer about the problem symptoms.
- Result:
Result Proceed to Malfunction occurs when adding fuel (Even after adding fuel, reading does not increase at all or increases very slowly, etc.) A Malfunction occurs during normal driving (The reading does not change, decreases quickly or decreases when the vehicle is not being driven, etc.)
(The problem symptom recurs)B Malfunction occurs during normal driving (The reading does not change, decreases quickly or decreases when the vehicle is not being driven, etc.)
(The problem symptom does not recur)C
A
B
C
Perform the Active Test according to the display on the GTS.
- Body Electrical > Combination Meter > Active Test
-
Tester Display Measurement Item Control Range Diagnostic Note Fuel Gauge Operation (Sender E) Fuel receiver gauge
(Fuel sender gauge lower limit)ON See [Display 1] Fuel Gauge Operation (Empty) Fuel receiver gauge
(Fuel receiver gauge indicates E)ON See [Display 1] Fuel Gauge Operation (Warning) Fuel receiver gauge
(Position at which fuel level warning light turns on/off)ON See [Display 1] Fuel Gauge Operation (1/4) Fuel receiver gauge
(Fuel receiver gauge indicates 1/4)ON See [Display 1] Fuel Gauge Operation (1/2) Fuel receiver gauge
(Fuel receiver gauge indicates 1/2)ON See [Display 1] Fuel Gauge Operation (3/4) Fuel receiver gauge
(Fuel receiver gauge indicates 3/4)ON See [Display 1] Fuel Gauge Operation (Full) Fuel receiver gauge
(Fuel receiver gauge indicates F)ON See [Display 1] Fuel Gauge Operation (Sender F) Fuel receiver gauge
(Fuel sender gauge upper limit)ON See [Display 1]
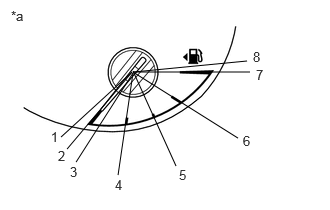
| *a | Fuel Receiver Gauge |
- HINT:
-
Refer to the following table for the specified fuel receiver gauge position for each selected value:
Tester Display Fuel Receiver Gauge Indication Fuel Gauge Operation
(Sender E)Approximately 1 is indicated Fuel Gauge Operation
(Empty)Approximately 2 is indicated Fuel Gauge Operation
(Warning)Approximately 3 is indicated Fuel Gauge Operation
(1/4)Approximately 4 is indicated Fuel Gauge Operation
(1/2)Approximately 5 is indicated Fuel Gauge Operation
(3/4)Approximately 6 is indicated Fuel Gauge Operation
(Full)Approximately 7 is indicated Fuel Gauge Operation
(Sender F)Approximately 8 is indicated
- Body Electrical > Combination Meter > Active Test
-
Tester Display Fuel Gauge Operation (Sender E) - 50004 409 221
- Body Electrical > Combination Meter > Active Test
-
Tester Display Fuel Gauge Operation (Empty) - 50004 409 222
- Body Electrical > Combination Meter > Active Test
-
Tester Display Fuel Gauge Operation (Warning) - 50004 409 223
- Body Electrical > Combination Meter > Active Test
-
Tester Display Fuel Gauge Operation (1/4) - 50004 409 224
- Body Electrical > Combination Meter > Active Test
-
Tester Display Fuel Gauge Operation (1/2) - 50004 409 225
- Body Electrical > Combination Meter > Active Test
-
Tester Display Fuel Gauge Operation (3/4) - 50004 409 226
- Body Electrical > Combination Meter > Active Test
-
Tester Display Fuel Gauge Operation (Full) - 50004 409 227
- Body Electrical > Combination Meter > Active Test
-
Tester Display Fuel Gauge Operation (Sender F) - 50004 409 228
- OK:
Fuel receiver gauge indication is normal.
- Result:
Proceed to OK NG
OK
NG
- HINT:
-
Inspect the fuel tank sub-assembly and fuel sender assembly for deformation, foreign matter or an improperly installed fuel receiver gauge, as this may be the cause of the fuel receiver gauge malfunction.
Visually check the fuel tank sub-assembly for any abnormalities.
Check if there is an excessive amount of foreign matter in the fuel tank sub-assembly.
Visually check the fuel sender gauge assembly for damage and confirm that it operates correctly.
Check the installation condition of the fuel tank sub-assembly and fuel sender gauge assembly.
- Result:
Result Proceed to Normal A Appearance of the fuel tank sub-assembly is abnormal B There is an excessive amount of foreign matter in the fuel tank sub-assembly C The fuel sender gauge assembly is visually damaged or does not operate correctly D The fuel tank sub-assembly or fuel sender gauge assembly is not installed correctly E
A
B
for HV Model: Click hereEngine / Hybrid System>A25A-FXS, A25B-FXS (FUEL)>FUEL TANK>REMOVAL
for Gasoline Model: Click hereEngine / Hybrid System>2GR-FKS (FUEL)>FUEL TANK>REMOVAL
C
D
for HV Model: Click hereEngine / Hybrid System>A25A-FXS, A25B-FXS (FUEL)>FUEL SENDER GAUGE ASSEMBLY>REMOVAL
for Gasoline Model: Click hereEngine / Hybrid System>2GR-FKS (FUEL)>FUEL SENDER GAUGE ASSEMBLY>REMOVAL
E
If the fuel tank is almost full, drain 20 liters (21.1 US qts, 17.6 Imp. qts) or more of fuel.
- HINT:
-
This is not necessary when the fuel tank is sufficiently below full.
Record the fuel receiver gauge reading.
Turn the ignition switch off.
Disconnect the cable from the negative (-) auxiliary battery terminal to reset the fuel receiver gauge.
Connect the cable to the negative (-) auxiliary battery terminal.
Turn the ignition switch to ON.
Drive the vehicle at 1.8 km/h (1 mph) or more, then stop the vehicle.
Turn the ignition switch off.
Add 5.0 liters (5.3 US qts, 4.4 Imp. qts) or more of fuel.
Turn the ignition switch to ON.
Check that the fuel receiver gauge reading increases in proportion to the amount of fuel added.
- Result:
Result Proceed to Fuel receiver gauge reading increases in proportion to the amount of fuel added A Fuel receiver gauge reading does not change even when fuel is added B
A
Click hereGeneral>INTRODUCTION>HOW TO TROUBLESHOOT ECU CONTROLLED SYSTEMS>HOW TO PROCEED WITH TROUBLESHOOTING
B
Perform the Active Test according to the display on the GTS.
- Body Electrical > Combination Meter > Active Test
-
Tester Display Measurement Item Control Range Diagnostic Note Fuel Gauge Operation (Sender E) Fuel receiver gauge
(Fuel sender gauge lower limit)ON See [Display 1] Fuel Gauge Operation (Empty) Fuel receiver gauge
(Fuel receiver gauge indicates E)ON See [Display 1] Fuel Gauge Operation (Warning) Fuel receiver gauge
(Position at which fuel level warning light turns on/off)ON See [Display 1] Fuel Gauge Operation (1/4) Fuel receiver gauge
(Fuel receiver gauge indicates 1/4)ON See [Display 1] Fuel Gauge Operation (1/2) Fuel receiver gauge
(Fuel receiver gauge indicates 1/2)ON See [Display 1] Fuel Gauge Operation (3/4) Fuel receiver gauge
(Fuel receiver gauge indicates 3/4)ON See [Display 1] Fuel Gauge Operation (Full) Fuel receiver gauge
(Fuel receiver gauge indicates F)ON See [Display 1] Fuel Gauge Operation (Sender F) Fuel receiver gauge
(Fuel sender gauge upper limit)ON See [Display 1]
| *a | Fuel Receiver Gauge |
- HINT:
-
Refer to the following table for the specified fuel receiver gauge position for each selected value:
Tester Display Fuel Receiver Gauge Indication Fuel Gauge Operation
(Sender E)Approximately 1 is indicated Fuel Gauge Operation
(Empty)Approximately 2 is indicated Fuel Gauge Operation
(Warning)Approximately 3 is indicated Fuel Gauge Operation
(1/4)Approximately 4 is indicated Fuel Gauge Operation
(1/2)Approximately 5 is indicated Fuel Gauge Operation
(3/4)Approximately 6 is indicated Fuel Gauge Operation
(Full)Approximately 7 is indicated Fuel Gauge Operation
(Sender F)Approximately 8 is indicated
- Body Electrical > Combination Meter > Active Test
-
Tester Display Fuel Gauge Operation (Sender E) - 50004 409 221
- Body Electrical > Combination Meter > Active Test
-
Tester Display Fuel Gauge Operation (Empty) - 50004 409 222
- Body Electrical > Combination Meter > Active Test
-
Tester Display Fuel Gauge Operation (Warning) - 50004 409 223
- Body Electrical > Combination Meter > Active Test
-
Tester Display Fuel Gauge Operation (1/4) - 50004 409 224
- Body Electrical > Combination Meter > Active Test
-
Tester Display Fuel Gauge Operation (1/2) - 50004 409 225
- Body Electrical > Combination Meter > Active Test
-
Tester Display Fuel Gauge Operation (3/4) - 50004 409 226
- Body Electrical > Combination Meter > Active Test
-
Tester Display Fuel Gauge Operation (Full) - 50004 409 227
- Body Electrical > Combination Meter > Active Test
-
Tester Display Fuel Gauge Operation (Sender F) - 50004 409 228
- OK:
Fuel receiver gauge indication is normal.
- Result:
Proceed to OK NG
OK
NG
- HINT:
-
Inspect the fuel tank sub-assembly and fuel sender assembly for deformation, foreign matter or an improperly installed fuel receiver gauge, as this may be the cause of the fuel receiver gauge malfunction.
Visually check the fuel tank sub-assembly for any abnormalities.
Check if there is an excessive amount of foreign matter in the fuel tank sub-assembly.
Visually check the fuel sender gauge assembly for damage and confirm that it operates correctly.
Check the installation condition of the fuel tank sub-assembly and fuel sender gauge assembly.
- Result:
Result Proceed to Normal A Appearance of the fuel tank sub-assembly is abnormal B There is an excessive amount of foreign matter in the fuel tank sub-assembly C The fuel sender gauge assembly is visually damaged or does not operate correctly D The fuel tank sub-assembly or fuel sender gauge assembly is not installed correctly E
A
B
for HV Model: Click hereEngine / Hybrid System>A25A-FXS, A25B-FXS (FUEL)>FUEL TANK>REMOVAL
for Gasoline Model: Click hereEngine / Hybrid System>2GR-FKS (FUEL)>FUEL TANK>REMOVAL
C
D
for HV Model: Click hereEngine / Hybrid System>A25A-FXS, A25B-FXS (FUEL)>FUEL SENDER GAUGE ASSEMBLY>REMOVAL
for Gasoline Model: Click hereEngine / Hybrid System>2GR-FKS (FUEL)>FUEL SENDER GAUGE ASSEMBLY>REMOVAL
E
Record the fuel receiver gauge reading.
Turn the ignition switch off.
Disconnect the cable from the negative (-) auxiliary battery terminal to reset the fuel receiver gauge.
Connect the cable to the negative (-) auxiliary battery terminal.
Turn the ignition switch to ON.
Check if the fuel receiver gauge reading corresponds with the amount of fuel remaining in the fuel tank.
- Result:
Result Proceed to Fuel receiver gauge reading corresponds with the amount of fuel remaining in the fuel tank A Fuel receiver gauge reading does not correspond with the amount of fuel remaining in the fuel tank B
A
Click hereGeneral>INTRODUCTION>HOW TO TROUBLESHOOT ECU CONTROLLED SYSTEMS>HOW TO PROCEED WITH TROUBLESHOOTING
B
- HINT:
-
Inspect the fuel tank sub-assembly and fuel sender assembly for deformation, foreign matter or an improperly installed fuel receiver gauge, as this may be the cause of the fuel receiver gauge malfunction.
Visually check the fuel tank sub-assembly for any abnormalities.
Check if there is an excessive amount of foreign matter in the fuel tank sub-assembly.
Visually check the fuel sender gauge assembly for damage and confirm that it operates correctly.
Check the installation condition of the fuel tank sub-assembly and fuel sender gauge assembly.
- Result:
Result Proceed to Normal A Appearance of the fuel tank sub-assembly is abnormal B There is an excessive amount of foreign matter in the fuel tank sub-assembly C The fuel sender gauge assembly is visually damaged or does not operate correctly D The fuel tank sub-assembly or fuel sender gauge assembly is not installed correctly E
A
Click hereGeneral>INTRODUCTION>HOW TO TROUBLESHOOT ECU CONTROLLED SYSTEMS>HOW TO PROCEED WITH TROUBLESHOOTING
B
for HV Model: Click hereEngine / Hybrid System>A25A-FXS, A25B-FXS (FUEL)>FUEL TANK>REMOVAL
for Gasoline Model: Click hereEngine / Hybrid System>2GR-FKS (FUEL)>FUEL TANK>REMOVAL
C
D
for HV Model: Click hereEngine / Hybrid System>A25A-FXS, A25B-FXS (FUEL)>FUEL SENDER GAUGE ASSEMBLY>REMOVAL
for Gasoline Model: Click hereEngine / Hybrid System>2GR-FKS (FUEL)>FUEL SENDER GAUGE ASSEMBLY>REMOVAL
E