SEAT BELT FRONT SEAT OUTER BELT ASSEMBLY REMOVAL
CAUTION / NOTICE / HINT
The necessary procedures (adjustment, calibration, initialization, or registration) that must be performed after parts are removed and installed, or replaced during front seat outer belt assembly removal/installation are shown below.
| Replaced Part or Performed Procedure | Necessary Procedure | Effect/Inoperative Function when Necessary Procedure not Performed | Link |
|---|---|---|---|
|
*1: Learning can also be performed using the GTS. Click here( |
|||
| Disconnect cable from negative auxiliary battery terminal | Perform steering sensor zero point calibration | Lane Control System | ( ) |
| Parking Support Brake System*1 | |||
| Pre-collision System | |||
| Memorize steering angle neutral point | Parking Assist Monitor System | ()
|
|
| Panoramic View Monitor System | ()
|
||
| Initialize back door lock | Power Door Lock Control System | ()
|
|
| Reset back door close position | Power Back Door System | ()
|
|
| Replaced Part or Performed Procedure | Necessary Procedure | Effect/Inoperative Function when Necessary Procedure not Performed | Link |
|---|---|---|---|
|
*1: Learning can also be performed using the GTS. Click here( |
|||
| Disconnect cable from negative auxiliary battery terminal | Perform steering sensor zero point calibration | Lane Control System | ()
|
| Parking Support Brake System*1 | |||
| Pre-collision System | |||
| Memorize steering angle neutral point | Parking Assist Monitor System | ()
|
|
| Panoramic View Monitor System | ()
|
||
| Initialize back door lock | Power Door Lock Control System | ()
|
|
| Reset back door close position | Power Back Door System | ()
|
|
- CAUTION:
- ·
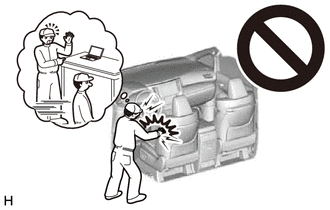
Be sure to read Precaution thoroughly before servicing.
Click hereVehicle Interior>SUPPLEMENTAL RESTRAINT SYSTEMS>AIRBAG SYSTEM>PRECAUTION
- NOTICE:
- ·
After the ignition switch is turned off, the radio and display receiver assembly or the radio receiver assembly records various types of memory and settings. As a result, after turning the ignition switch off, make sure to wait at least 120 seconds before disconnecting the cable from the negative (-) auxiliary battery terminal.
CAUTION / NOTICE / HINT
- HINT:
- ·
Use the same procedure for the RH side and LH side.
·The following procedure is for the LH side.
PROCEDURE

 1. PRECAUTION
- NOTICE:
-
After turning the ignition switch off, waiting time may be required before disconnecting the cable from the negative (-) auxiliary battery terminal. Therefore, make sure to read the disconnecting the cable from the negative (-) auxiliary battery terminal notices before proceeding with work.
58441L
2.REMOVE BATTERY SERVICE HOLE COVER (for HV Model)
3.DISCONNECT CABLE FROM NEGATIVE AUXILIARY BATTERY TERMINAL
for 2GR-FKS: Click hereGeneral>MAINTENANCE>2GR-FKS BATTERY>REMOVAL
for A25A-FXS, A25B-FXS: Click hereGeneral>MAINTENANCE>A25A-FXS, A25B-FXS AUXILIARY BATTERY>REMOVAL
- CAUTION:
-
Wait at least 90 seconds after disconnecting the cable from the negative (-) auxiliary battery terminal to disable the SRS system.
- NOTICE:
-
When disconnecting the cable, some systems need to be initialized after the cable is reconnected.
-
Click hereGeneral>INTRODUCTION>REPAIR INSTRUCTION>INITIALIZATION
67914
4.REMOVE FRONT DOOR SCUFF PLATE
5.DISCONNECT FRONT DOOR OPENING TRIM WEATHERSTRIP
Disconnect the front door opening trim weatherstrip.
72138M
6.REMOVE REAR OUTER SEAT TRACK BRACKET COVER
67918A
7.REMOVE REAR DOOR SCUFF PLATE
8.DISCONNECT REAR DOOR OPENING TRIM WEATHERSTRIP
Disconnect the rear door opening trim weatherstrip.
73233
9.REMOVE LAP BELT OUTER ANCHOR COVER
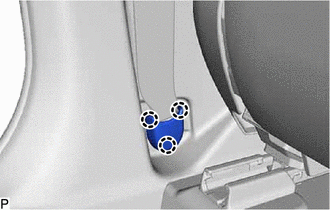
Disengage the 3 claws to remove the lap belt outer anchor cover.
73220
10.DISCONNECT FRONT SEAT OUTER BELT ASSEMBLY
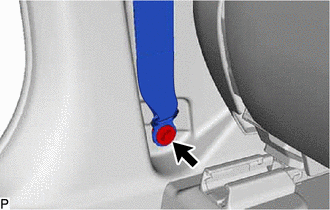
Remove the bolt to disconnect the floor anchor of the front seat outer belt assembly.
62414A
11.REMOVE LOWER CENTER PILLAR GARNISH
62420A
12.REMOVE CENTER PILLAR GARNISH ASSEMBLY
73220
13.REMOVE FRONT SEAT OUTER BELT ASSEMBLY
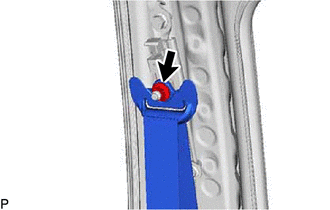
Remove the nut and disconnect the shoulder anchor of the front seat outer belt assembly.
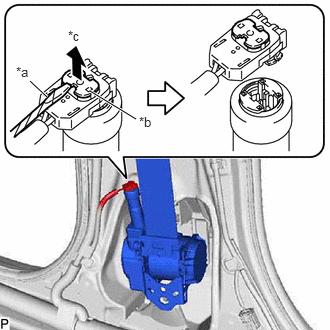
| *a | Protective Tape |
| *b | Locking Button |
| *c | Release |
Using a screwdriver, pull out the locking button as shown in the illustration to release the lock and disconnect the pretensioner connector as shown in the illustration.
- HINT:
-
Tape the screwdriver tip before use.
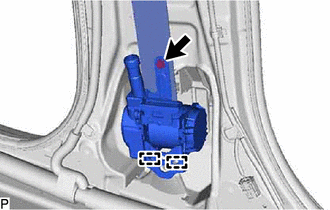
Remove the bolt.
Disengage the 2 guides to remove the front seat outer belt assembly.
73200A
14.REMOVE FRONT SHOULDER BELT ANCHOR ADJUSTER ASSEMBLY
- HINT:
-
Perform this procedure only when replacement of the front shoulder belt anchor adjuster assembly is necessary.
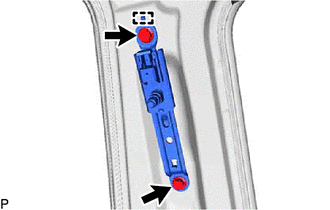
Remove the 2 bolts.
Disengage the guide to remove the front shoulder belt anchor adjuster assembly.