PARK ASSIST / MONITORING CLEARANCE WARNING ECU REMOVAL
CAUTION / NOTICE / HINT
The necessary procedures (adjustment, calibration, initialization, or registration) that must be performed after parts are removed and installed, or replaced during clearance warning ECU assembly removal/installation are shown below.
| Replaced Part or Performed Procedure | Necessary Procedures | Effect/Inoperative Function When Necessary Procedures are not Performed | Link |
|---|---|---|---|
| Clearance warning ECU assembly | w/o Parking Support Brake System:
Registration of bumper type |
TOYOTA Parking Assist-sensor System | ( ) |
w/ Parking Support Brake System:
·
Measurement of ultrasonic sensor detection angle ·
Steering angle neutral point ·
Bumper type registration ·
Ultrasonic sensor detection angle registration |
·
TOYOTA Parking Assist-sensor System ·
Parking Support Brake System |
()
|
| Replaced Part or Performed Procedure | Necessary Procedures | Effect/Inoperative Function When Necessary Procedures are not Performed | Link |
|---|---|---|---|
| Clearance warning ECU assembly | w/o Parking Support Brake System:
Registration of bumper type |
TOYOTA Parking Assist-sensor System | ()
|
w/ Parking Support Brake System:
·
Measurement of ultrasonic sensor detection angle ·
Steering angle neutral point ·
Bumper type registration ·
Ultrasonic sensor detection angle registration |
·
TOYOTA Parking Assist-sensor System ·
Parking Support Brake System |
()
|
PROCEDURE

 67913
1.REMOVE FRONT DOOR SCUFF PLATE RH
- HINT:
-
Use the same procedure as for the LH side.
-
Click hereVehicle Interior>INTERIOR PANELS / TRIM>ROOF HEADLINING>REMOVAL
62111A
2.REMOVE COWL SIDE TRIM SUB-ASSEMBLY RH
- HINT:
-
Use the same procedure as for the LH side.
-
Click hereVehicle Interior>INTERIOR PANELS / TRIM>ROOF HEADLINING>REMOVAL
62311B
3.DISCONNECT FRONT DOOR OPENING TRIM WEATHERSTRIP RH
55435A
4.REMOVE INSTRUMENT PANEL FINISH END PANEL RH
55607
5.REMOVE NO. 2 INSTRUMENT PANEL UNDER COVER SUB-ASSEMBLY
55303B
6.REMOVE LOWER INSTRUMENT PANEL SUB-ASSEMBLY
82877
7.REMOVE ECU INTEGRATION BOX RH
89340A
8.REMOVE CLEARANCE WARNING ECU ASSEMBLY
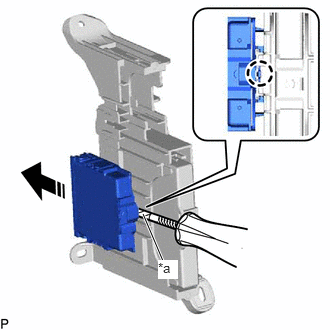
| *a | Protective Tape |

|
Remove in this Direction |
Using a screwdriver with its tip wrapped with protective tape, disengage the claw and remove the clearance warning ECU assembly as shown in the illustration.
- NOTICE:
- ·
If the ECU integration box is deformed or damaged, replace it.
·Do not bend the claw more than necessary.