HYBRID / BATTERY CONTROL SUB RADIATOR REMOVAL
CAUTION / NOTICE / HINT
The necessary procedures (adjustment, calibration, initialization or registration) that must be performed after parts are removed and installed, or replaced during radiator assembly removal/installation are shown below.
| Replaced Part or Performed Procedures | Necessary Procedures | Effect/Inoperative Function When Necessary Procedures are not Performed | Link |
|---|---|---|---|
|
*: Even when not replacing the part, it is necessary to perform the specified necessary procedures after installation. |
|||
| Front bumper assembly* | ·
Measurement of ultrasonic sensor detection angle ·
Ultrasonic sensor detection angle registration |
Parking Support Brake System | ( ) |
| Front television camera view adjustment | Panoramic View Monitor System | ()
|
|
Replacement or removal and installation of 2 or more parts:
·
Front television camera assembly, radiator grille sub-assembly or front bumper assembly ·
Rear television camera assembly ·
Side television camera assembly LH or outer rear view mirror assembly LH ·
Side television camera assembly RH or outer rear view mirror assembly RH |
Television camera view adjustment | Panoramic View Monitor System | ()
|
PROCEDURE

 1.DRAIN COOLANT (for Inverter)
2.REMOVE HEADLIGHT ASSEMBLY
52611
3.REMOVE FRONT BUMPER ENERGY ABSORBER
52021
4.REMOVE FRONT BUMPER REINFORCEMENT SUB-ASSEMBLY
16595B
5.REMOVE NO. 1 RADIATOR AIR GUIDE LH
16593B
6.REMOVE NO. 1 RADIATOR AIR GUIDE RH
G9010A
7.REMOVE RADIATOR ASSEMBLY (for Inverter Coolant)
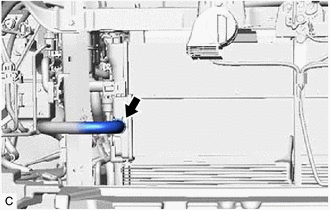
Slide the clip and disconnect the No. 3 inverter cooling hose from the radiator assembly (for inverter coolant).
- NOTICE:
- ·
Put pieces of cloth into the pipes and disconnected hoses or cover the pipes and hoses with plastic bags to prevent foreign matter from entering the radiator assembly (for inverter coolant) and inverter cooling system.
·Do not apply excessive force to the No. 3 inverter cooling hose.
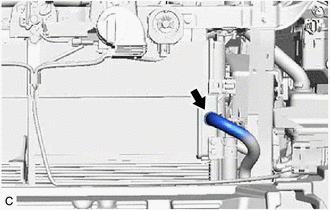
Slide the clip and disconnect the No. 4 inverter cooling hose from the radiator assembly (for inverter coolant).
- NOTICE:
- ·
Put pieces of cloth into the pipes and disconnected hoses or cover the pipes and hoses with plastic bags to prevent foreign matter from entering the radiator assembly (for inverter coolant) and inverter cooling system.
·Do not apply excessive force to the No. 4 inverter cooling hose.
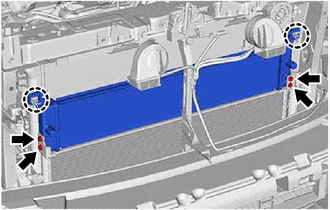
Remove the 4 bolts.
Disengage the 2 claws and remove the radiator assembly (for inverter coolant) from the radiator assembly.