BRAKE SYSTEM (OTHER) VACUUM PUMP INSTALLATION
PROCEDURE

 29300
1.INSTALL VACUUM PUMP ASSEMBLY
Clean the vacuum pump assembly installation bolt holes in the camshaft housing sub-assembly and cylinder head sub-assembly.
When using a new vacuum pump assembly:
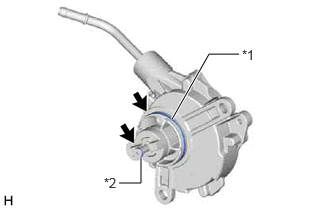
| *1 | No. 2 O-ring |
| *2 | No. 3 O-ring |

|
Engine Oil |
Apply engine oil to the No. 2 O-ring and No. 3 O-ring which are installed to a new vacuum pump assembly.
When reusing the vacuum pump assembly:
| *1 | No. 2 O-ring |
| *2 | No. 3 O-ring |
|
|
Engine Oil |
Apply engine oil to a new No. 2 O-ring and No. 3 O-ring and install them to the vacuum pump assembly.
Apply engine oil to the inner surface of the installation hole.
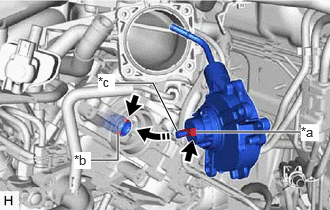
| *a | Coupling Teeth |
| *b | Groove |
| *c | Oil Pipe |

|
Install in this Direction |
Temporarily install the vacuum pump assembly so that the oil pipe engages with the hole of the camshaft and the coupling teeth engage with the groove of the camshaft.
- NOTICE:
- ·
Ensure that the vacuum pump assembly is installed securely.
·Be careful not to pinch the O-ring.
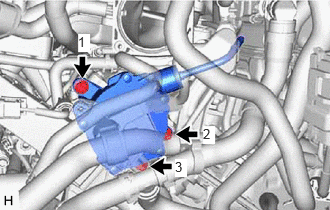
Install the vacuum pump assembly with 3 new bolts.
- Torque:
- 21 N*m (214 kgf*cm, 15 ft.*lbf)
- NOTICE:
- ·
After installation, check that there are no gaps between the matching surfaces and that the vacuum pump assembly is not installed at an angle.
·Tighten the 3 bolts in the order shown in the illustration.
17361M
2.CONNECT AIR TUBE
Connect the air tube to the vacuum pump assembly and slide the clip to secure it.
82121
3.INSTALL ENGINE WIRE
Install the earth wire with the bolt.
- Torque:
- 10 N*m (102 kgf*cm, 7 ft.*lbf)
Install the engine wire with the 2 bolts.
- Torque:
- 10 N*m (102 kgf*cm, 7 ft.*lbf)
35104V
4.INSTALL BREATHER PLUG HOSE
Engage the clamp to install the breather plug hose.
17308B
5.INSTALL VACUUM HOSE SUB-ASSEMBLY
Engage the clamp to install the vacuum hose sub-assembly.
87245B
6.INSTALL INLET HEATER WATER HOSE B
Engage the clamp to install the inlet heater water hose B.
17126
7.INSTALL NO. 2 SURGE TANK STAY
Install the No. 2 surge tank stay with the 2 bolts.
- Torque:
- 21 N*m (214 kgf*cm, 15 ft.*lbf)
22030
8.INSTALL THROTTLE BODY WITH MOTOR ASSEMBLY
74404B
9.INSTALL BATTERY CLAMP SUB-ASSEMBLY
Install the battery clamp sub-assembly with the 3 bolts and nut.
- Torque:
- Bolt : 18.5 N*m (189 kgf*cm, 14 ft.*lbf)
- Nut : 8.0 N*m (82 kgf*cm, 71 in.*lbf)
Engage the 5 clamps to the battery clamp sub-assembly.
10.INSTALL AIR CLEANER ASSEMBLY WITH AIR CLEANER HOSE
11.INSTALL BATTERY
12.INSPECT VACUUM PUMP OPERATION