NAVIGATION / MULTI INFO DISPLAY NAVIGATION SYSTEM(for 12.3 Inch Display) Visual Mute Signal Circuit between Radio Receiver and Multi-display
DESCRIPTION
The radio receiver assembly sends a visual mute signal to the multi-display assembly. As a result, a black screen is displayed when the screen changes so that noise and distorted images are not displayed.
When an open exists in the circuit, noise and distorted images will be displayed instead of a black screen.
When a short exists in the circuit, even though the multi-display assembly is operating normally, noise and distorted images will be displayed (black screen will not be displayed) during screen changes or the black screen will always be displayed.
WIRING DIAGRAM
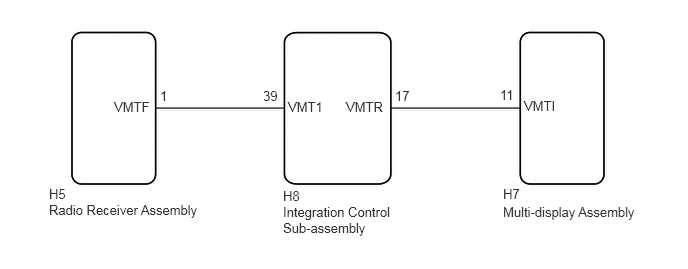
CAUTION / NOTICE / HINT
- NOTICE:
-
Depending on the parts that are replaced during vehicle inspection or maintenance, performing initialization, registration or calibration may be needed. Refer to Precaution for Navigation System.
PROCEDURE
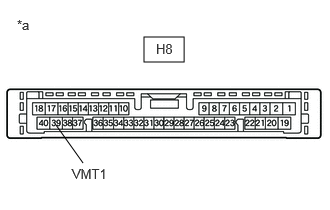
| *a | Component without harness connected
(Integration Control Sub-assembly) |
Measure the voltage according to the value(s) in the table below.
- Standard Voltage:
Tester Connection Condition Specified Condition H8-39 (VMT1) - Body ground Ignition switch ACC
Screen display changing3.5 V or higher
→ Below 1 V
→ 3.5 V or higher
- Result:
Proceed to OK NG
OK
NG
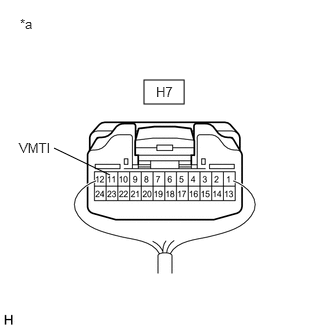
| *a | Component with harness connected
(Multi-display Assembly) |
Measure the voltage according to the value(s) in the table below.
- Standard Voltage:
Tester Connection Condition Specified Condition H7-11 (VMTI) - Body ground Ignition switch ACC
Screen display changing3.5 V or higher
→ Below 1 V
→ 3.5 V or higher
- Result:
Proceed to OK NG
OK
NG
Disconnect the H8 integration control sub-assembly connector.
Disconnect the H7 multi-display assembly connector.
Measure the resistance according to the value(s) in the table below.
- Standard Resistance:
Tester Connection Condition Specified Condition H8-17 (VMTR) - H7-11 (VMTI) Always Below 1 Ω H8-17 (VMTR) or H7-11 (VMTI) - Body ground Always 10 kΩ or higher
- Result:
Proceed to OK NG
OK
NG
Replace the multi-display assembly with a new or known good one.
Click hereAudio / Visual / Telematics>NAVIGATION / MULTI INFO DISPLAY>MULTI-DISPLAY>REMOVAL
Check that the screen display is normal.
- OK:
Screen display is normal.
- Result:
Proceed to OK NG
OK
NG
Disconnect the H5 radio receiver assembly connector.
Disconnect the H8 integration control sub-assembly connector.
Measure the resistance according to the value(s) in the table below.
- Standard Resistance:
Tester Connection Condition Specified Condition H5-1 (VMTF) - H8-39 (VMT1) Always Below 1 Ω H5-1 (VMTF) or H8-39 (VMT1) - Body ground Always 10 kΩ or higher
- Result:
Proceed to OK NG
OK
NG
Replace the integration control sub-assembly with a new or known good one.
Click hereAudio / Visual / Telematics>NAVIGATION / MULTI INFO DISPLAY>MULTI-DISPLAY ECU>REMOVAL
Check that the screen display is normal.
- OK:
Screen display is normal.
- Result:
Proceed to OK NG
OK
NG