WIPER / WASHER WASHER NOZZLE(for Rear Television Camera) REMOVAL
CAUTION / NOTICE / HINT
The necessary procedures (adjustment, calibration, initialization, or registration) that must be performed after parts are removed and installed, or replaced during camera cleaner nozzle assembly removal/installation are shown below.
| Replaced Part or Performed Procedure | Necessary Procedure | Effect/Inoperative Function When Necessary Procedures are not Performed | Link |
|---|---|---|---|
|
*: Even when not replacing the part, it is necessary to perform the specified necessary procedures after installation. |
|||
| Rear television camera assembly* | ·
Parking assist monitor system initialization ·
Television camera assembly optical axis (Back camera position setting) |
Parking Assist Monitor System | ( ) |
| Rear television camera view adjustment | Panoramic View Monitor System | ()
|
|
Replacement or removal and installation of 2 or more parts:
·
Front television camera assembly, radiator grille sub-assembly or front bumper assembly ·
Rear television camera assembly ·
Side television camera assembly LH or outer rear view mirror assembly LH ·
Side television camera assembly RH or outer rear view mirror assembly RH |
Television camera view adjustment | ||
| Replaced Part or Performed Procedure | Necessary Procedure | Effect/Inoperative Function When Necessary Procedures are not Performed | Link |
|---|---|---|---|
|
*: Even when not replacing the part, it is necessary to perform the specified necessary procedures after installation. |
|||
| Rear television camera assembly* | ·
Parking assist monitor system initialization ·
Television camera assembly optical axis (Back camera position setting) |
Parking Assist Monitor System | ()
|
| Rear television camera view adjustment | Panoramic View Monitor System | ()
|
|
Replacement or removal and installation of 2 or more parts:
·
Front television camera assembly, radiator grille sub-assembly or front bumper assembly ·
Rear television camera assembly ·
Side television camera assembly LH or outer rear view mirror assembly LH ·
Side television camera assembly RH or outer rear view mirror assembly RH |
Television camera view adjustment | ||
PROCEDURE

 67848E
1.REMOVE BACK DOOR SERVICE HOLE COVER LH
67847
2.REMOVE BACK DOOR SERVICE HOLE COVER RH
- HINT:
-
Use the same procedure as for the LH side.
64780A
3.REMOVE BACK DOOR TRIM PANEL ASSEMBLY
4.REMOVE TELEVISION CAMERA ASSEMBLY WITH NOZZLE
w/o Digital Inner Mirror: Click hereAudio / Visual / Telematics>PARK ASSIST / MONITORING>TELEVISION CAMERA (for Rear)>REMOVAL
w/ Digital Inner Mirror: Click hereAudio / Visual / Telematics>PARK ASSIST / MONITORING>TELEVISION CAMERA (for Rear)>REMOVAL
867F0
5.REMOVE CAMERA CLEANER NOZZLE ASSEMBLY (w/ Digital Inner Mirror)
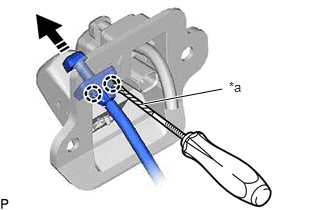
| *a | Protective Tape |

|
Remove in this Direction |
Using a screwdriver with its tip wrapped with protective tape, disengage the 2 claws and remove the camera cleaner nozzle assembly as shown in the illustration.
867F0
6.REMOVE CAMERA CLEANER NOZZLE ASSEMBLY
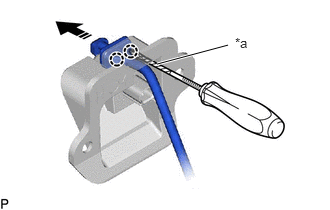
| *a | Protective Tape |
|
|
Remove in this Direction |
Using a screwdriver with its tip wrapped with protective tape, disengage the 2 claws and remove the camera cleaner nozzle assembly as shown in the illustration.