BRAKE CONTROL / DYNAMIC CONTROL SYSTEMS ELECTRONICALLY CONTROLLED BRAKE SYSTEM(for HV Model) C13807E Stop Lamp Relay Actuator Stuck On
DESCRIPTION
When any of the following conditions are met, the No. 2 skid control ECU (brake actuator assembly) sets the drive output (STPO) ON which operates the stop light control relay (stop light switch assembly) and turns on the stop lights.
Pre-collision brake is operating (w/ Pre-collision System).
The dynamic radar cruise control system is operating and is applying the brakes (w/ Pre-collision System).
Secondary collision brake is operating (w/ Pre-collision System).
Brake hold is operating.
The parking brake is engaged while the vehicle is being driven.
| DTC No. | Detection Item | DTC Detection Condition | Trouble Area | Note |
|---|---|---|---|---|
| C13807E | Stop Lamp Relay Actuator Stuck On | When the IG1 terminal voltage exceeds 10 V and the +BS terminal voltage is 9.5 V or higher, stop light drive output (STPO) is OFF, STP2 is OFF and STP is ON continuously for 5 seconds or more. | ·
Wire harness and connector ·
Stop light switch assembly ·
STP circuit ·
STP2 circuit ·
No. 2 skid control ECU (brake actuator assembly) |
Output ECU: No. 2 skid control ECU (brake actuator assembly) |
WIRING DIAGRAM
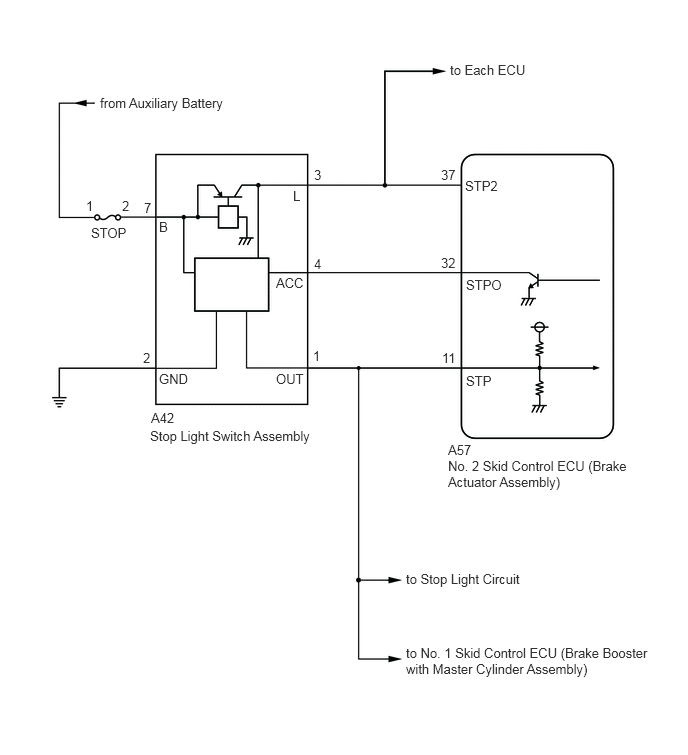
CAUTION / NOTICE / HINT
- NOTICE:
- ·
Inspect the fuses for circuits related to this system before performing the following procedure.
·After replacing the No. 2 skid control ECU (brake actuator assembly), perform "Calibration".
- HINT:
-
When DTC P057112 and/or P057113 are output together with DTC C13807E, inspect and repair the trouble areas indicated by DTC P057112 and/or P057113 first.
-
for P057112: Click hereBrake>BRAKE CONTROL / DYNAMIC CONTROL SYSTEMS>ELECTRONICALLY CONTROLLED BRAKE SYSTEM (for HV Model)>P057112
-
for P057113: Click hereBrake>BRAKE CONTROL / DYNAMIC CONTROL SYSTEMS>ELECTRONICALLY CONTROLLED BRAKE SYSTEM (for HV Model)>P057113
PROCEDURE
With the brake pedal released, check the illumination status of the stop lights.
- Result:
Result Proceed to The stop lights are illuminated. A The stop lights are not illuminated. B
A
B
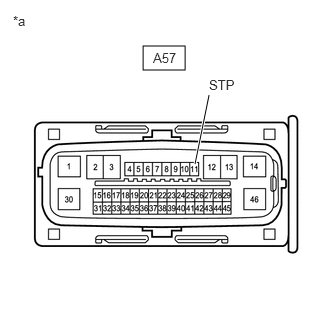
| *a | Front view of wire harness connector
(to No. 2 Skid Control ECU (Brake Actuator Assembly)) |
Make sure that there is no looseness at the locking part and the connecting part of the connectors.
- OK:
The connector is securely connected.
Disconnect the A57 No. 2 skid control ECU (brake actuator assembly) connector.
Check both the connector case and the terminals for deformation and corrosion.
- OK:
No deformation or corrosion.
Measure the voltage according to the value(s) in the table below.
- Standard Voltage:
Tester Connection Condition Specified Condition A57-11 (STP) - Body ground Stop light switch assembly off
(Brake pedal released)Below 1.5 V
- Result:
Proceed to OK NG
OK
for LHD: Click hereBrake>BRAKE CONTROL / DYNAMIC CONTROL SYSTEMS>BRAKE ACTUATOR (for HV Model LHD)>REMOVAL
for RHD: Click hereBrake>BRAKE CONTROL / DYNAMIC CONTROL SYSTEMS>BRAKE ACTUATOR (for HV Model RHD)>REMOVAL
NG
| *a | Front view of wire harness connector
(to No. 2 Skid Control ECU (Brake Actuator Assembly)) |
Make sure that there is no looseness at the locking part and the connecting part of the connectors.
- OK:
The connector is securely connected.
Disconnect the A42 stop light switch assembly connector.
Check both the connector case and the terminals for deformation and corrosion.
- OK:
No deformation or corrosion.
Measure the voltage according to the value(s) in the table below.
- Standard Voltage:
Tester Connection Condition Specified Condition A57-11 (STP) - Body ground Always Below 1.5 V
- Result:
Proceed to OK NG
OK
NG
Check that there is no short to +B in the STP circuit (wire harnesses, connectors, stop lights and ECUs).
- OK:
No short to +B.
- Result:
Proceed to OK NG
OK
Click hereGeneral>INTRODUCTION>HOW TO TROUBLESHOOT ECU CONTROLLED SYSTEMS>HOW TO PROCEED WITH TROUBLESHOOTING
NG
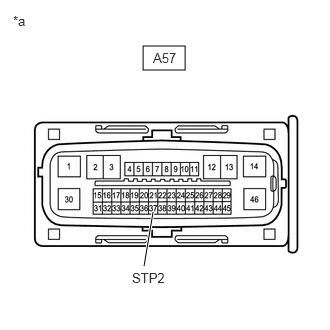
| *a | Front view of wire harness connector
(to No. 2 Skid Control ECU (Brake Actuator Assembly)) |
Make sure that there is no looseness at the locking part and the connecting part of the connectors.
- OK:
The connector is securely connected.
Disconnect the A57 No. 2 skid control ECU (brake actuator assembly) connector.
Check both the connector case and the terminals for deformation and corrosion.
- OK:
No deformation or corrosion.
Measure the voltage according to the value(s) in the table below.
- Standard Voltage:
Tester Connection Condition Specified Condition A57-37 (STP2) - Body ground Stop light switch assembly on (Brake pedal depressed) 11 to 14 V
- Result:
Proceed to OK NG
OK
for LHD: Click hereBrake>BRAKE CONTROL / DYNAMIC CONTROL SYSTEMS>BRAKE ACTUATOR (for HV Model LHD)>REMOVAL
for RHD: Click hereBrake>BRAKE CONTROL / DYNAMIC CONTROL SYSTEMS>BRAKE ACTUATOR (for HV Model RHD)>REMOVAL
NG
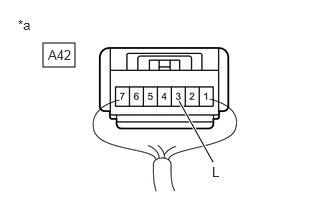
| *a | Component with harness connected
(Stop Light Switch Assembly) |
Make sure that there is no looseness at the locking part and the connecting part of the connector.
- OK:
The connector is securely connected.
Measure the voltage according to the value(s) in the table below.
- Standard Voltage:
Tester Connection Condition Specified Condition A42-3 (L) - Body ground Stop light switch assembly on (Brake pedal depressed) 11 to 14 V
- Result:
Proceed to OK NG
OK
NG
Check that there is no short to ground in the STP2 circuit (wire harnesses, connectors and ECUs)
- OK:
There is no short to ground.
- Result:
Proceed to OK NG
OK
NG