2GR-FKS ENGINE CONTROL CAMSHAFT OIL CONTROL SOLENOID REMOVAL
CAUTION / NOTICE / HINT
The necessary procedures (adjustment, calibration, initialization or registration) that must be performed after parts are removed and installed, or replaced during camshaft timing oil control solenoid assembly removal/installation are shown below.
| Replaced Part or Performed Procedure | Necessary Procedure | Effect/Inoperative Function when Necessary Procedure not Performed | Link |
|---|---|---|---|
|
*1: Learning can also be performed using the GTS. Click here( *2: Not necessary when ECM replaced with new one *3: Even when not replacing the part, it is necessary to perform the specified necessary procedures after installation. *4: If the vehicle height has changed due to suspension or tire replacement |
|||
| Battery terminal is disconnected/reconnected | Idle the engine for approximately 5 to 60 minutes or drive the vehicle until stop and start control is permitted | Stop and Start System | ( ) |
| Perform steering sensor zero point calibration | Lane Control System | ()
|
|
| Parking Support Brake System*1 | |||
| Pre-collision System | |||
| Memorize steering angle neutral point | Parking Assist Monitor System | ()
|
|
| Panoramic View Monitor System | ()
|
||
| Initialize back door lock | Power Door Lock Control System | ()
|
|
| Reset back door close position | Power Back Door System | ()
|
|
| Replacement of ECM | Perform Vehicle Identification Number (VIN) or frame number registration | DTC is output | ()
|
| Code registration | Engine start function | See Service Bulletin for the registration method | |
| Gas leak from exhaust system is repaired | Perform Inspection After Repair | ·
Poor idle, etc. ·
Engine start function, etc. |
()
|
| Replacement of ECM | If transaxle compensation code read from ECM:
·
Perform reset memory*2 ·
Transfer transaxle compensation code ·
Perform road test to allow ECM to learn |
·
Large shift shock ·
Deterioration of fuel efficiency |
for UA80E Initialization:()
for UA80E Registration:( )
for UA80F Initialization:( )
for UA80F Registration:( )
|
If transaxle compensation code not read from ECM:
·
Perform reset memory*2 ·
Reset transaxle compensation code ·
Perform road test to allow ECM to learn |
|||
| Replacement of battery | ·
Integrated Current Value Initialization ·
Switch Battery Type |
Stop and Start System | ()
|
| Replacement of automatic transaxle fluid | ATF thermal degradation estimate reset | The value of the Data List item "ATF Thermal Degradation Estimate" is not estimated correctly | for UA80E:()
for UA80F:( )
|
| Replacement of front bumper assembly*3 | ·
Measurement of ultrasonic sensor detection angle ·
Ultrasonic sensor detection angle registration |
Parking Support Brake System | ()
|
| Front television camera view adjustment | Panoramic View Monitor System | ()
|
|
Replacement or removal and installation of 2 or more parts:
·
Front television camera assembly, radiator grille sub-assembly or front bumper assembly ·
Rear television camera assembly ·
Side television camera assembly LH or outer rear view mirror assembly LH ·
Side television camera assembly RH or outer rear view mirror assembly RH |
Television camera view adjustment | Panoramic View Monitor System | ()
|
| Suspension, tires, etc.*4 | ·
Measurement of ultrasonic sensor detection angle ·
Ultrasonic sensor detection angle registration |
Parking Support Brake System | ()
|
| Rear television camera assembly optical axis (Back camera position setting) | Parking Assist Monitor System | ()
|
|
·
Parking assist ECU initialization ·
Adjust steering angle |
Panoramic View Monitor System | ()
|
|
| Front wheel alignment adjustment | 1.
Perform "Reset Memory". 2.
Perform "Calibration". |
·
VSC is disabled or malfunctions ·
DTCs are output ·
Slip indicator light illuminates ·
ABS warning light illuminates |
()
|
PROCEDURE

 11209
1.REMOVE V-BANK COVER SUB-ASSEMBLY
15370C
2.REMOVE CAMSHAFT TIMING OIL CONTROL SOLENOID ASSEMBLY (for Exhaust Side of Bank 2)
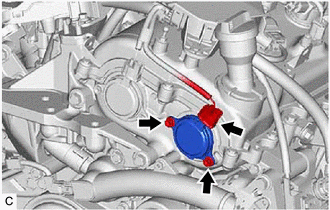
Disconnect the camshaft timing oil control solenoid assembly connector.
Remove the 2 bolts and camshaft timing oil control solenoid assembly from the timing chain cover assembly.
- NOTICE:
-
If the camshaft timing oil control solenoid assembly has been struck or dropped, replace it.
Remove the O-ring from the camshaft timing oil control solenoid assembly.
- NOTICE:
- ·
If the O-ring comes off in the timing chain cover assembly, make sure to remove it.
·Do not drop the O-ring into the timing chain cover assembly.
15370B
3.REMOVE CAMSHAFT TIMING OIL CONTROL SOLENOID ASSEMBLY (for Intake Side of Bank 1)
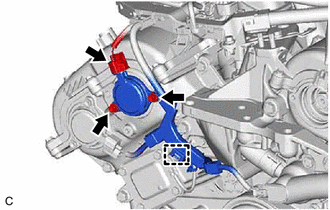
Disconnect the camshaft timing oil control solenoid assembly connector.
Disengage the clamp to disconnect the engine wire.
Remove the 2 bolts and camshaft timing oil control solenoid assembly from the timing chain cover assembly.
- NOTICE:
-
If the camshaft timing oil control solenoid assembly has been struck or dropped, replace it.
Remove the O-ring from the camshaft timing oil control solenoid assembly.
- NOTICE:
- ·
If the O-ring comes off in the timing chain cover assembly, make sure to remove it.
·Do not drop the O-ring into the timing chain cover assembly.
53736
4.REMOVE FRONT FENDER APRON SEAL RH
15370B
5.REMOVE CAMSHAFT TIMING OIL CONTROL SOLENOID ASSEMBLY (for Exhaust Side of Bank 1)
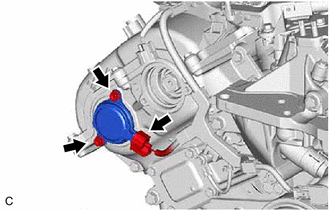
Disconnect the camshaft timing oil control solenoid assembly connector.
Remove the 2 bolts and camshaft timing oil control solenoid assembly from the timing chain cover assembly.
- NOTICE:
-
If the camshaft timing oil control solenoid assembly has been struck or dropped, replace it.
Remove the O-ring from the camshaft timing oil control solenoid assembly.
- NOTICE:
- ·
If the O-ring comes off in the timing chain cover assembly, make sure to remove it.
·Do not drop the O-ring into the timing chain cover assembly.
6.REMOVE ENGINE ASSEMBLY WITH TRANSAXLE
15370C
7.REMOVE CAMSHAFT TIMING OIL CONTROL SOLENOID ASSEMBLY (for Intake Side of Bank 2)
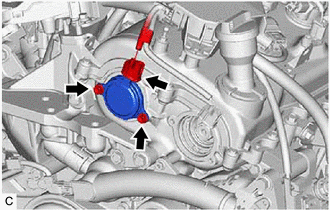
Disconnect the camshaft timing oil control solenoid assembly connector.
Remove the 2 bolts and camshaft timing oil control solenoid assembly from the timing chain cover assembly.
- NOTICE:
-
If the camshaft timing oil control solenoid assembly has been struck or dropped, replace it.
Remove the O-ring from the camshaft timing oil control solenoid assembly.
- NOTICE:
- ·
If the O-ring comes off in the timing chain cover assembly, make sure to remove it.
·Do not drop the O-ring into the timing chain cover assembly.