PARKING BRAKE ELECTRIC PARKING BRAKE SYSTEM(for Gasoline Model) C060B14 Left Electric Parking Brake Actuator Control Circuit Short to Ground or Open
DESCRIPTION
| DTC No. | Detection Item | DTC Detection Condition | Trouble Area | Memory | Note |
|---|---|---|---|---|---|
| C060B14 | Left Electric Parking Brake Actuator Control Circuit Short to Ground or Open | ·
Diagnosis Condition: Ignition switch ON ·
Malfunction Status: When the ECU power supply is normal, a malfunction in the electric parking brake actuator LH internal circuit is detected. ·
Detection Time: Approximately 1 second |
·
Parking brake actuator assembly LH ·
No. 2 parking brake wire assembly ·
Wire harness and connector ·
Skid control ECU (brake actuator assembly) |
DTC stored | An electric parking brake system malfunction is displayed on the multi-information display. |
WIRING DIAGRAM
CAUTION / NOTICE / HINT
- NOTICE:
- ·
The electric parking brake may still operate up to 20 seconds after the ignition switch is turned off. Before disconnecting connectors or fuses, turn the ignition switch off and wait 20 seconds or more.
·After replacing the skid control ECU (brake actuator assembly), perform yaw rate and acceleration sensor zero point calibration and store system information memorization.
·When replacing the skid control ECU (brake actuator assembly), operate the electric parking brake switch (electric parking brake switch assembly) as the parking brake indicator light (red) blinks when the ignition switch is first turned ON.
PROCEDURE
Make sure that there is no looseness at the locking part and the connecting part of the connectors.
- OK:
The connector is securely connected.
Disconnect the uM2 and u2 No. 2 parking brake wire assembly connectors.
Check both the connector case and the terminals for deformation and corrosion.
- OK:
No deformation or corrosion.
Measure the resistance according to the value(s) in the table below.
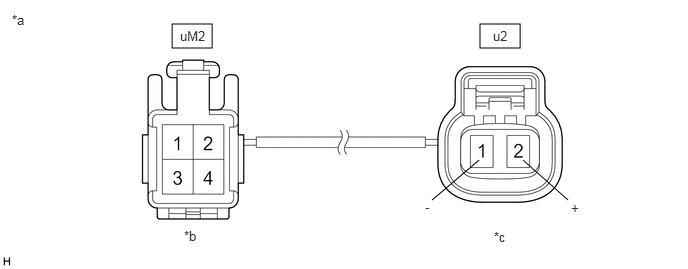
| *a | Front view of No. 2 Parking Brake Wire Assembly | *b | (to wire harness connector) |
| *c | (to Parking Brake Actuator Assembly LH) | - | - |
- Standard Resistance:
Tester Connection Condition Specified Condition uM2-1 - u2-2 (+) Always Below 1 Ω uM2-1 or u2-2 (+) - Body ground and other terminals Always 10 kΩ or higher uM2-2 - u2-1 (-) Always Below 1 Ω uM2-2 or u2-1 (-) - Body ground and other terminals Always 10 kΩ or higher
- Result:
Proceed to OK NG
OK
NG
Make sure the No. 2 parking brake wire assembly is securely installed.
Disconnect the A39 skid control ECU (brake actuator assembly) connector.
Disconnect the u2 parking brake actuator assembly LH connector.
Measure the resistance according to the value(s) in the table below.
- Standard Resistance:
Tester Connection Condition Specified Condition A39-3 (MRL+) - u2-2 (+) Always Below 1 Ω A39-3 (MRL+) or u2-2 (+) - Body ground Always 10 kΩ or higher A39-2 (MRL-) - u2-1 (-) Always Below 1 Ω A39-2 (MRL-) or u2-1 (-) - Body ground Always 10 kΩ or higher
- Result:
Proceed to OK NG
OK
NG
Remove the parking brake actuator assembly LH.
Click hereBrake>PARKING BRAKE>ELECTRIC PARKING BRAKE ACTUATOR>REMOVAL
Inspect the parking brake actuator assembly LH.
Click hereBrake>PARKING BRAKE>ELECTRIC PARKING BRAKE ACTUATOR>INSPECTION
- Result:
Proceed to OK NG
OK
for LHD: Click hereBrake>BRAKE CONTROL / DYNAMIC CONTROL SYSTEMS>BRAKE ACTUATOR (for Gasoline Model LHD)>REMOVAL
for RHD: Click hereBrake>BRAKE CONTROL / DYNAMIC CONTROL SYSTEMS>BRAKE ACTUATOR (for Gasoline Model RHD)>REMOVAL
NG