NAVIGATION / MULTI INFO DISPLAY NAVIGATION ECU REMOVAL
PROCEDURE

 1. PRECAUTION (for 8 Inch Display)
- NOTICE:
- ·
After performing any of the following procedures, the navigation system may restart after turning the ignition switch to ACC for the first time (due to radio and display receiver assembly and navigation ECU certification).
-Disconnecting and reconnecting the cable from the negative (-) terminal of the auxiliary battery, replacing the auxiliary battery, or recharging the auxiliary battery after being discharged.
-Removing and installing or replacing the radio and display receiver assembly or navigation ECU.
·After replacing the navigation ECU, if "New software is not compatible with the system. Contact your dealer." is displayed on the multi-display, update the software of the radio and display receiver assembly.
2. PRECAUTION (for 12.3 Inch Display)
- NOTICE:
- ·
After performing any of the following procedures, the navigation system may restart after turning the ignition switch to ACC for the first time (due to radio receiver assembly and navigation ECU certification).
-Disconnecting and reconnecting the cable from the negative (-) terminal of the auxiliary battery, replacing the auxiliary battery, or recharging the auxiliary battery after being discharged.
-Removing and installing or replacing the radio receiver assembly or navigation ECU.
·After replacing the navigation ECU, if "New software is not compatible with the system. Contact your dealer." is displayed on the multi-display, update the software of the radio receiver assembly.
3.REMOVE CONSOLE BOX ASSEMBLY
67914
4.REMOVE FRONT DOOR SCUFF PLATE LH
62112A
5.REMOVE COWL SIDE TRIM SUB-ASSEMBLY LH
55606
6.REMOVE NO. 1 INSTRUMENT PANEL UNDER COVER SUB-ASSEMBLY
55446A
7.REMOVE NO. 1 SWITCH HOLE BASE
67913
8.REMOVE FRONT DOOR SCUFF PLATE RH
- HINT:
-
Use the same procedure as for the LH side.
62111A
9.REMOVE COWL SIDE TRIM SUB-ASSEMBLY RH
- HINT:
-
Use the same procedure as for the LH side.
62311B
10.DISCONNECT FRONT DOOR OPENING TRIM WEATHERSTRIP RH
55435A
11.REMOVE INSTRUMENT PANEL FINISH END PANEL RH
55607
12.REMOVE NO. 2 INSTRUMENT PANEL UNDER COVER SUB-ASSEMBLY
55303B
13.REMOVE LOWER INSTRUMENT PANEL SUB-ASSEMBLY
55434F
14.REMOVE LOWER CENTER INSTRUMENT PANEL FINISH PANEL
58817A
15.REMOVE FRONT NO. 2 CONSOLE BOX INSERT
58816B
16.REMOVE FRONT CONSOLE BOX INSERT
86740
17.REMOVE TELEMATICS TRANSCEIVER (w/ Telematics Transceiver)
for ERA-GLONASS:
Click hereAudio / Visual / Telematics>TELEMATICS>TELEMATICS TRANSCEIVER>REMOVAL
18.REMOVE TELEMATICS TRANSCEIVER WITH BRACKET (w/ Telematics Transceiver)
for eCall:
Click hereAudio / Visual / Telematics>TELEMATICS>TELEMATICS TRANSCEIVER>REMOVAL
19.REMOVE NAVIGATION ECU WITH BRACKET
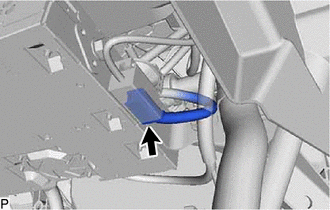
Disconnect the connector.
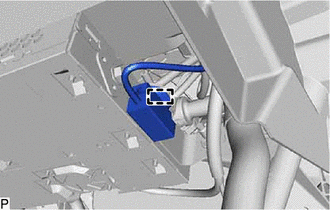
Disengage the clamp.
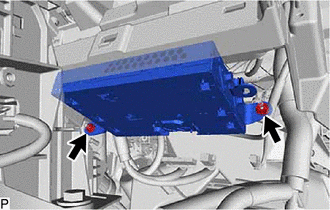
Remove the 2 nuts.
Disconnect each connector and remove the navigation ECU with bracket.
86101H
20.REMOVE ANTENNA CORD SUB-ASSEMBLY
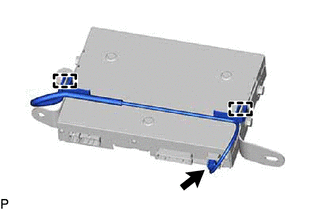
Disconnect the connector.
Disengage the 2 clamps to remove the antenna cord sub-assembly.
86211M
21.REMOVE NO. 3 RADIO RECEIVER BRACKET
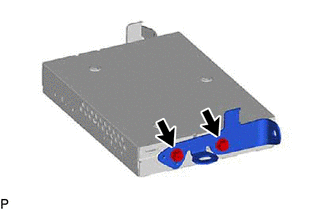
Remove the 2 screws and No. 3 radio receiver bracket.
86212F
22.REMOVE NO. 4 RADIO RECEIVER BRACKET
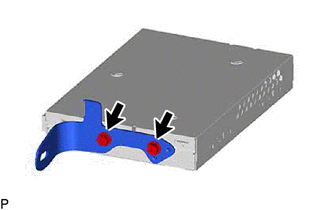
Remove the 2 screws and No. 4 radio receiver bracket.
86841
23.REMOVE NAVIGATION ECU