POWER OUTLETS (INT) POWER OUTLET SOCKET REMOVAL
PROCEDURE

 58872A
1.REMOVE NO. 2 CONSOLE BOX CUSHION
58871
2.REMOVE CONSOLE BOX CUSHION
58818A
3.REMOVE FRONT CONSOLE BOX COVER
33504F
4.REMOVE SHIFT LEVER KNOB SUB-ASSEMBLY
for UA80E: Click hereDrivetrain>UA80E (AUTOMATIC TRANSMISSION / TRANSAXLE)>SHIFT LEVER KNOB>REMOVAL
for UA80F: Click hereDrivetrain>UA80F (AUTOMATIC TRANSMISSION / TRANSAXLE)>SHIFT LEVER KNOB>REMOVAL
for P810: Click hereDrivetrain>P810 (HYBRID TRANSMISSION / TRANSAXLE)>SHIFT LEVER KNOB>REMOVAL
5.REMOVE CONSOLE PANEL SUB-ASSEMBLY
55402E
6.REMOVE NO. 1 LOWER INSTRUMENT PANEL PAD SUB-ASSEMBLY
55403G
7.REMOVE NO. 2 LOWER INSTRUMENT PANEL PAD SUB-ASSEMBLY
55011B
8.REMOVE NO. 1 INSTRUMENT PANEL GARNISH SUB-ASSEMBLY
55012B
9.REMOVE NO. 2 INSTRUMENT PANEL GARNISH SUB-ASSEMBLY
55434F
10.REMOVE LOWER CENTER INSTRUMENT PANEL FINISH PANEL
85530
11.REMOVE NO. 1 POWER OUTLET SOCKET ASSEMBLY
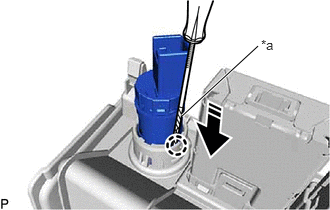
| *a | Protective Tape |

|
Remove in this Direction |
Using a screwdriver with its tip wrapped with protective tape, disengage the claw and remove the No. 1 power outlet socket assembly as shown in the illustration.
85535B
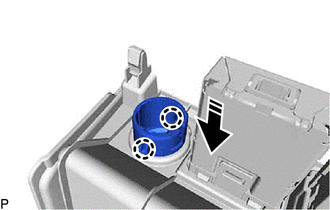
12.REMOVE NO. 1 POWER OUTLET SOCKET COVER
|
|
Remove in this Direction |
Disengage the 2 claws and remove the No. 1 power outlet socket cover as shown in the illustration.
85532
13.REMOVE USB CHARGER SOCKET
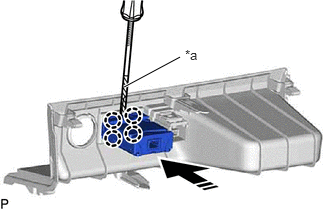
| *a | Protective Tape |
|
|
Remove in this Direction |
Using a screwdriver with its tip wrapped with protective tape, disengage the 4 claws and remove the USB charger socket as shown in the illustration.