Engine
Engine Mechanical
INSPECTION
1. CHECK ENGINE COOLANT
(a) Remove radiator cap.
CAUTION:
Do not remove the radiator cap while the engine and radiator are hot. Pressurised, hot engine coolant and steam may be released and cause serious burns.
-
(b) Check for excessive deposits of rust or scale around the radiator cap and radiator filler opening. Also, the coolant should be free of oil.
If excessively dirty, replace the coolant.
-
(c) Install the radiator cap.
-
2. CHECK ENGINE OIL
(a) Warm the engine to normal operating temperature. Stop the engine and wait 5 minutes.
-
(b) Remove the dipstick and check the oil level is between the low and full level marks.
If low, check for leakage and add oil up to the full level mark.
NOTICE:
Do not fill with engine oil over the full level mark.
-
3. CHECK BATTERY CONDITION
NOTICE:
If the battery is weak or if the engine is difficult to start, perform the following procedures.
(a) Check the battery for damage and deformation. If severe damage, deformation or leakage is found, replace the battery.
-
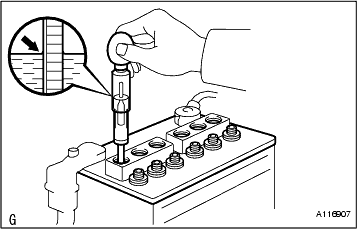
(b) Check the electrolyte quantity of each cell.
For maintenance-free batteries:
• If the electrolyte quantity is below the lower line, replace the battery.
• If the electrolyte quantity is above the lower line, check the battery voltage when cranking the engine.
• If the voltage is less than 9.6 V, recharge or replace the battery.
HINT:
Before checking the battery voltage, turn off all the electrical systems (headlight, blower motor, rear defogger, etc.).
For non-maintenance-free batteries:
• If the electrolyte quantity is below the lower line, add distilled water to each cell. Then, recharge the battery and check the electrolyte's specific gravity.
Standard electrolyte's specific gravity:
1.25 to 1.29 at 20°C (68°F)
If the electrolyte quantity is above the lower line, check the battery voltage when cranking the engine. If the voltage is less than 9.6 V, recharge or replace the battery.
HINT:
Before checking the battery voltage, turn off all the electrical systems (headlight, blower motor, rear defogger, etc.).
-
4. INSPECT IGNITION SYSTEM (
not in this collection
)
5. CHECK AIR CLEANER FILTER
(a) Remove the air filter.
-
(b) Visually check the air filter is not excessively dirty, damaged or oily.
-
(c) If necessary, replace the air filter.
-
6. INSPECT DRIVE BELT (
Click Here
)
7. INSPECT V-RIBBED BELT TENSIONER (
Click Here
)
8. INSPECT IGNITION TIMING
(a) When using intelligent tester:
Check the ignition timing.
(1) Connect the intelligent tester to the DLC3.
HINT:
Refer to the intelligent tester operator's manual for further details.
Ignition timing:
7 to 24° BTDC @ idle
(2) Disconnect the intelligent tester from the DLC3.
-
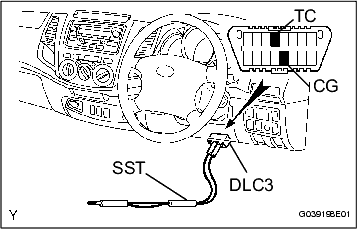
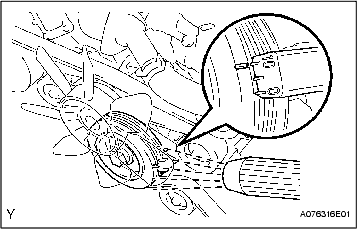
(b) When not using intelligent tester.
Check the ignition timing.
(1) Disconnect No. 2 ventilation hose (
Click Here
)
(2) Remove the air cleaner assembly (
Click Here
)
(3) Connect the tester probe of a timing light to the green-red lead wire of the ignition coil connector for the No.1 cylinder.
(4) Using SST, connect terminals TC and CG of the DLC3.
SST
09843-18040
(5) Using the timing light, check the ignition timing.
Ignition timing:
8 to 12° BTDC @ idle
(6) Remove the SST from the DLC3.
(7) Check the ignition timing.
Ignition timing:
7 to 24° BTDC @ idle
(8) Disconnect the timing light from the engine.
(9) Install the air cleaner assembly (
Click Here
)
(10) Connect No. 2 ventilation hose (
Click Here
)
-
9. INSPECT IDLE SPEED
(a) When using intelligent tester:
(1) Connect the intelligent tester to the DLC3.
HINT:
Refer to the intelligent tester operator's manual for further details.
(2) Switch the air conditioning OFF.
(3) Race the engine at 2,500 rpm for approximately 90 seconds.
(4) Check the idle speed.
Idle speed:
700 +- 50 rpm
If the idle speed is not as specified, check the air intake system.
(5) Disconnect the intelligent tester from the DLC3.
-
(b) When not using intelligent tester:
(1) Using SST, connect tachometer probe to terminal TAC of the DLC3.
SST
09843-18030
(2) Switch the air conditioning OFF.
(3) Race the engine speed at 2,500 rpm for approximately 90 seconds.
(4) Check the idle speed.
Idle speed:
700 +- 50 rpm
If the idle speed is not as specified, check the air intake system.
(5) Disconnect the tachometer from the DLC3.
-
10. INSPECT COMPRESSION
(a) Remove the supercharger assembly (
Click Here
)
-
(b) Remove the 6 ignition coils.
-
(c) Remove the 6 spark plugs.
-
(d) Disconnect the 6 injector connectors.
-
(e) Inspect the cylinder compression pressure.
(1) Insert a compression gauge into the spark plug hole.
(2) While cranking the engine, measure the compression pressure.
HINT:
Always use a fully charged battery to obtain an engine speed of 250 rpm or more.
(3) Repeat steps (1) and (2) for each cylinder.
NOTICE:
This measurement must be done as quickly as possible.
Compression pressure:
1,300 kPa (13.3 kgf/cm2, 189 psi) or more
Minimum pressure:
1,000 kPa (10.2 kgf/cm2, 145 psi)
Difference between each cylinder:
100 kPa (1.0 kgf/cm2, 15 psi) or less
(4) If the cylinder compression in one or more cylinders is low, pour a small amount of engine oil into the cylinder through the spark plug opening and repeat above steps for cylinders with low compression.
• If adding oil increases the compression pressure, it is likely the piston rings and / or cylinder bore are worn or damaged.
• If pressure remains low, a valve may be sticking, seating may be incorrect, or there may be a gasket leakage.
-
(f) Connect the 6 injector connectors.
-
(g) Install the 6 spark plugs.
-
(h) Install the 6 ignition coils.
-
(i) Install the supercharger assembly (
Click Here
)
-
11. INSPECT CO/HC
HINT:
This check is for determining if the idle CO/HC complies with regulations.
(a) Start the engine.
-
(b) Keep the engine speed at 2,500 rpm for approximately 3 minutes.
-
(c) Insert CO/HC meter testing probe at least 40 cm (1.3 ft.) into the tailpipe during idling.
-
(d) Immediately check CO/HC concentration at idle and/or 2,500 rpm.
HINT:
When performing the 2 mode (2,500 rpm and idle) test, follow the measurement order prescribed by the applicable local regulations.
If the CO/HC concentration does not comply with regulations, troubleshoot in the order given below.
(1) Check the A/F sensor operation and heated oxygen sensor operation.
(2) See the table below for possible causes, then inspect and correct the applicable causes if necessary.
-