| B |  |
| REPAIR OR REPLACE ENGINE CONTROL SYSTEM ACCORDING TO DTC OUTPUT (Click here) |
ECD SYSTEM (w/ EGR Cooler) > Engine Difficult to Start or Stalling |
| 1.READ OUTPUT DTC (RELATED TO ENGINE) |
Connect the intelligent tester to the DLC3.
Turn the ignition switch ON and turn the tester ON.
Enter the following menus: Powertrain / Engine / DTC.
Read DTCs.
| Display (DTC Output) | Proceed to |
| No output | A |
| DTCs related to engine | B |
|
| ||||
| A | |
 |
| 2.CHECK FUEL FILTER ASSEMBLY |
Check that the fuel filter is not clogged (Click here).
|
| ||||
| OK | |
|
| 3.CHECK ENGINE CRANKING CONDITION |
Check the engine cranking condition.
Compare the cranking condition with that of a normal engine of the same model, and carefully check if there is any difference between them.
|
| ||||
| OK | |
|
| 4.READ VALUE USING INTELLIGENT TESTER (FUEL PRESS) |
Connect the intelligent tester to the DLC3.
Turn the ignition switch ON and turn the tester ON.
Enter the following menus: Powertrain / Engine / Data List / Fuel Press.
Read the values.
| Item | Inspection Condition | Specified Condition |
| Fuel Press | Cranking, and engine coolant temperature 0°C (32°F) or more | 40 MPa |
|
| ||||
| OK | |
|
| 5.CHECK IF INITIAL COMBUSTION OCCURS |
Check if initial combustion occurs.
| Result | Proceed to |
| No initial combustion with cold engine | A |
| No initial combustion with hot engine | B |
| Initial combustion occurs | C |
|
| ||||
|
| ||||
| A | |
|
| 6.CHECK GLOW INDICATOR LIGHTING TIME AND AFTER GLOW TIME |
Check the lighting duration of the glow indicator light (Click here).
|
| ||||
| OK | |
|
| 7.READ VALUE USING INTELLIGENT TESTER (FUEL PRESS) |
Connect the intelligent tester to the DLC3.
Start the engine and turn the tester ON.
Enter the following menus: Powertrain / Engine / Data List / Fuel Press.
Check that the internal fuel pressure of the common rail is within the specifications below.
| Engine Speed | Specified Condition |
| Idling | Approximately 30 to 40 MPa |
| 3,000 rpm (No engine load) | Approximately 45 to 75 MPa |
|
| ||||
| OK | |
|
| 8.CHECK AIR INTAKE SYSTEM AND EXHAUST SYSTEM |
Remove the air cleaner filter.
Inspect the EGR valve operation.
Start the engine and warm it up.
When the engine is idling and the vacuum hose is disconnected from the EGR valve, check that clicking sounds are emitted from the EGR valve.
Inspect the throttle valve operation.
Start the engine.
Check if the throttle valve fully opens when accelerating the engine speed.
|
| ||||
| OK | |
|
| 9.READ VALUE USING INTELLIGENT TESTER (FUEL PRESS, INJECTION VOLUME) |
Connect the intelligent tester to the DLC3.
Start the engine and turn the tester ON.
Enter the following menus: Powertrain / Engine / Data List.
Enter the following menus in order and read the values.
| Item | Engine Speed* | Reference Value |
| Fuel Press | Idling | 30 to 40 MPa |
| Fuel Press | 2,000 rpm (No engine load) | 35 to 45 MPa |
| Fuel Press | 3,000 rpm (No engine load) | 45 to 75 MPa |
| Injection Volume | Idling | 5 to 12 mm3/st |
| Injection Volume | 2,000 rpm (No engine load) | 5 to 12 mm3/st |
| Injection Volume | 3,000 rpm (No engine load) | 5 to 12 mm3/st |
|
| ||||
| OK | |
|
| 10.INSPECT CYLINDER COMPRESSION PRESSURE |
Check the cylinder compression pressure.
|
| ||||
| OK | |
|
| 11.CHECK HARNESS AND CONNECTOR (INJECTOR - EDU) |
Check the harness and connector between the injector and EDU (INJ terminal).
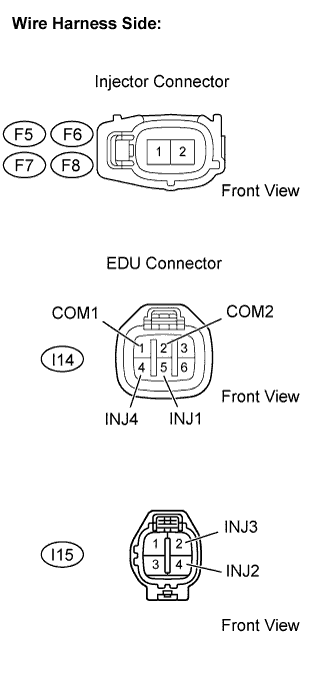 |
Disconnect the F5, F6, F7 and/or F8 injector connectors.
Disconnect the I14 and/or I15 EDU connector.
Measure the resistance of the wire harness side connector.
| Tester Connection | Specified Condition |
| F5-1 - COM1 (I14-1) | Below 1 Ω |
| F6-1 - COM2 (I14-2) | |
| F7-1 - COM2 (I14-2) | |
| F8-1 - COM1 (I14-1) | |
| F5-2 - INJ1 (I14-5) | |
| F6-2 - INJ2 (I15-4) | |
| F7-2 - INJ3 (I15-2) | |
| F8-2 - INJ4 (I14-4) |
| Tester Connection | Specified Condition |
| F5-1 or COM1 (I14-1) - Body ground | 10 kΩ or higher |
| F6-1 or COM2 (I14-2) - Body ground | |
| F7-1 or COM2 (I14-2) - Body ground | |
| F8-1 or COM1 (I14-1) - Body ground | |
| F5-2 or INJ1 (I14-5) - Body ground | |
| F6-2 or INJ2 (I15-4) - Body ground | |
| F7-2 or INJ3 (I15-2) - Body ground | |
| F8-2 or INJ4 (I14-4) - Body ground |
|
| ||||
| OK | |
|
| 12.PERFORM ACTIVE TEST USING INTELLIGENT TESTER (CONTROL THE CYLINDER #1 TO #4 FUEL CUT) |
Connect the intelligent tester to the DLC3.
Start the engine and turn the tester ON.
Enter the following menus: Powertrain / Engine / Active Test / Control the Cylinder#1, #2, #3 and #4 Fuel Cut.
Check the engine idling condition while the fuel injection of each cylinder is cut using the intelligent tester.
| Engine Idling Condition | Proceed to |
| Becomes unstable | A |
| Does not change | B |
|
| ||||
| A | ||
 | ||
| ||
| 13.CHECK IF FUEL IS BEING SUPPLIED TO SUPPLY PUMP |
Disconnect the inlet hose from the supply pump.
Operate the priming pump and check that the fuel is being supplied to the supply pump.
|
| ||||
| NG | ||
| ||
| ||
| 14.INSPECT ECM (THW VOLTAGE) |
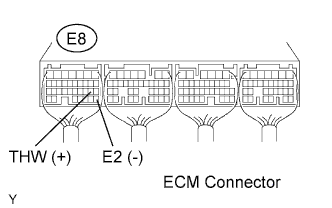 |
Start the engine.
Measure the voltage of the ECM connector.
| Tester Connection | Condition | Specified Condition |
| THW (E8-19) - E2 (E8-28) | Idling, engine coolant temperature between 60 and 120°C (140 and 248°F) | 0.2 to 1.0 V |
|
| ||||
| OK | |
|
| 15.INSPECT ECM (NE SIGNAL) |
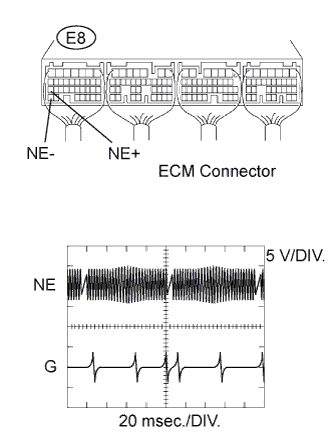 |
While idling the engine, check the waveform between the specified terminals of the E8 ECM connector using the oscilloscope.
| Tester Connection | Condition | Specified Condition |
| NE+ (E8-27) - NE- (E8-34) | Idling | Correct waveform is as shown |
|
| ||||
| OK | |
|
| 16.CHECK HARNESS AND CONNECTOR (ST RELAY - ECM) |
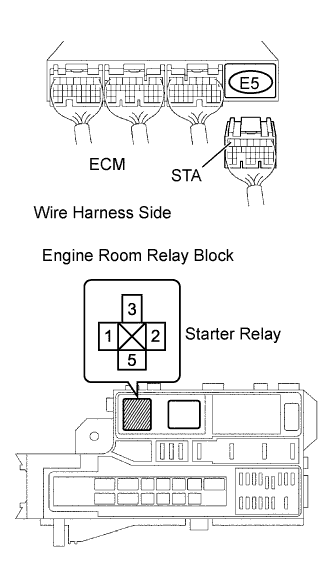 |
Disconnect the E5 ECM connector.
Remove the ST relay from the engine room relay block.
Measure the resistance of the wire harness side connectors.
| Tester Connection | Specified Condition |
| ST relay (2) - STA (E5-7) | Below 1 Ω |
| Tester Connection | Specified Condition |
| ST relay (2) or STA (E5-7) - Body ground | 10 kΩ or higher |
|
| ||||
| OK | |
|
| 17.INSPECT ECM (PCR1 AND PCR2 VOLTAGE) |
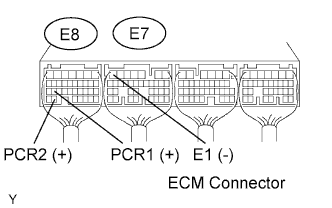 |
Start the engine.
Measure the voltage of the ECM connector.
| Tester Connection | Condition | Specified Condition |
| PCR1 (E8-26) - E1 (E7-7) | Idling | 1.8 to 2.1 V |
| PCR2 (E8-33) - E1 (E7-7) | Idling | 1.2 to 1.5 V |
|
| ||||
| OK | ||
| ||
| ||
| 18.INSPECT ENGINE COOLANT TEMPERATURE SENSOR |
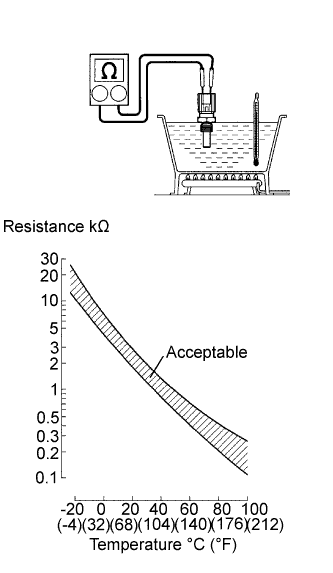 |
Remove the engine coolant temperature sensor.
Measure the resistance of the engine coolant temperature sensor
| Connection | Specified Condition |
| 20°C (68°F) | 2.32 to 2.59 kΩ |
| 80°C (176°F) | 0.310 to 0.326 kΩ |
|
| ||||
| OK | ||
| ||
| ||
| 19.INSPECT CRANKSHAFT POSITION SENSOR |
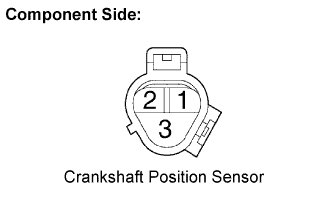 |
Disconnect the C4 crankshaft position sensor connector.
Measure the resistance of the crankshaft position sensor.
| Tester Connection | Condition | Specified Condition |
| 1 - 2 | Cold | 835 to 1400 Ω |
| 1 - 2 | Hot | 1060 to 1645 Ω |
|
| ||||
| OK | ||
| ||
| ||
| 20.INSPECT COMMON RAIL ASSEMBLY (FUEL PRESSURE SENSOR) |
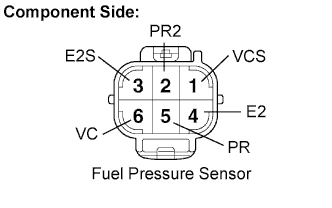 |
Disconnect the F9 fuel pressure sensor connector.
Measure the resistance of the sensor.
| Tester Connection | Specified Condition |
| PR (5) - E2 (4) | 16.4 kΩ or less |
| PR2 (2) - E2S (3) | 16.4 kΩ or less |
| PR (5) - VC (6) | 3 kΩ or less |
| PR2 (2) - VCS (1) | 3 kΩ or less |
|
| ||||
| OK | |
|
| 21.CHECK HARNESS AND CONNECTOR (FUEL PRESSURE SENSOR - ECM) |
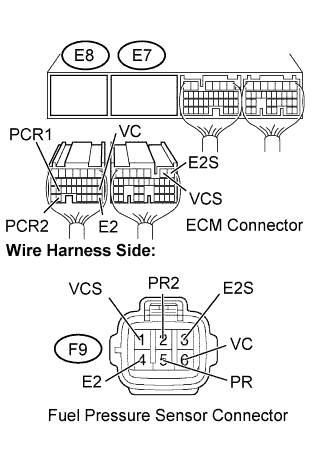 |
Disconnect the E7 and E8 ECM connector.
Disconnect the F9 fuel pressure sensor connector.
Measure the resistance of the wire harness side connectors.
| Tester Connection | Specified Condition |
| PCR1 (E8-26) - PR (F9-5) | Below 1 Ω |
| PCR2 (E8-33) - PR2 (F9-2) | Below 1 Ω |
| VCS (E7-2) - VCS (F9-1) | Below 1 Ω |
| VC (E8-18) - VC (F9-6) | Below 1 Ω |
| E2 (E8-28) - E2 (F9-4) | Below 1 Ω |
| E2S (E7-1) - E2S (F9-3) | Below 1 Ω |
| Tester Connection | Specified Condition |
| PCR1 (E8-26) or PR (F9-5) - Body ground | 10 kΩ or higher |
| PCR2 (E8-33) or PR2 (F9-2) - Body ground | 10 kΩ or higher |
| VCS (E7-2) or VCS (F9-1) - Body ground | 10 kΩ or higher |
| VC (E8-18) or VC (F9-6) - Body ground | 10 kΩ or higher |
| E2 (E8-28) or E2 (F9-4) - Body ground | 10 kΩ or higher |
| E2S (E7-1) or E2S (F9-3) - Body ground | 10 kΩ or higher |
|
| ||||
| OK | |
|
| 22.REPLACE ECM |
|
| ||||
| OK | ||
| ||
| ||
