 |
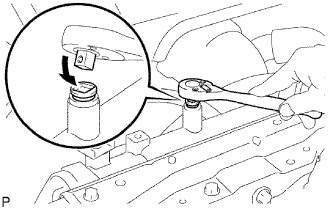
Drain the coolant by removing the reservoir cap and, using a wrench, remove the vent plug.
ENGINE ASSEMBLY > REMOVAL |
| 1. DISCONNECT CABLE FROM NEGATIVE BATTERY TERMINAL |
| 2. REMOVE HOOD SUB-ASSEMBLY |
Disconnect the washer nozzle hose.
Remove the 4 bolts and hood.
| 3. REMOVE NO. 1 ENGINE UNDER COVER (for 4WD) |
Remove the 4 bolts and under cover.
| 4. REMOVE NO. 2 ENGINE UNDER COVER (for 4WD) |
Remove the 2 bolts and under cover.
| 5. DRAIN ENGINE OIL |
Remove the oil filter cap.
Remove the oil drain plug, and drain the engine oil from the oil pan.
| 6. LOOSEN FUEL TANK CAP ASSEMBLY |
| 7. DRAIN FUEL |
| 8. DRAIN ENGINE COOLANT |
|
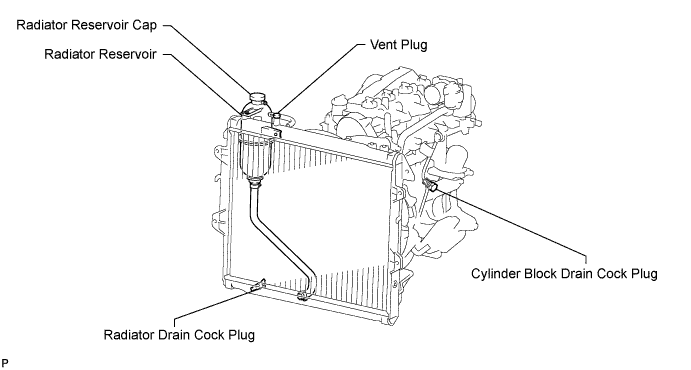
Drain the coolant by removing the reservoir cap and, using a wrench, remove the vent plug.
Loosen the cylinder block drain cock plug and the radiator drain cock plug.
| 9. REMOVE TRANSMISSION ASSEMBLY |
R151/R151F:
Remove the transmission assembly (Click here).
A340F:
Remove the transmission assembly (Click here).
A750F:
Remove the transmission assembly (Click here).
| 10. REMOVE BATTERY BRACKET |
| 11. REMOVE BATTERY AND BATTERY TRAY |
| 12. REMOVE AIR CLEANER ASSEMBLY |
for Ventilation Hose Type:
Disconnect the ventilation hose.
Disconnect the MAF meter connector.
Loosen the hose clamp.
Remove the 2 bolts and air cleaner.
| 13. REMOVE RADIATOR ASSEMBLY |
Remove the radiator assembly (Click here).
| 14. DISCONNECT HOSES AND CONNECTORS |
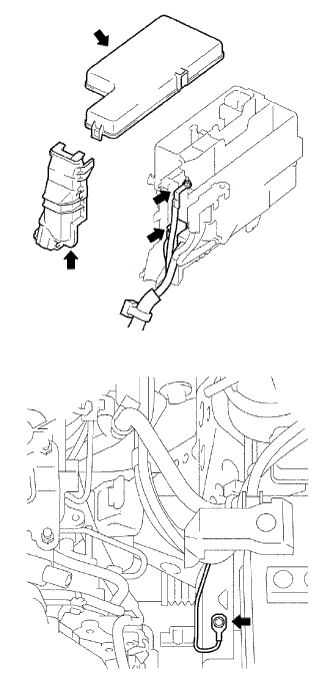 |
Remove the upper relay block cover.
Remove the No. 1 engine room relay block cover.
Remove the nut and disconnect the engine room junction block wire.
Disconnect the 2 engine room junction block connectors.
Remove the bolt and disconnect the ground cable.
 |
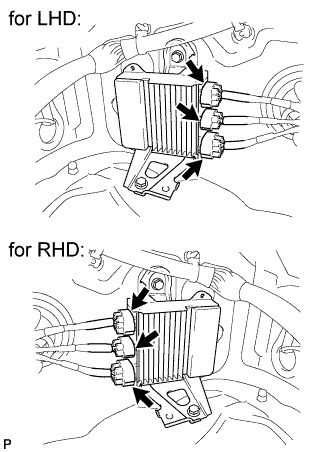
w/o EGR Cooler:
Disconnect the 2 injector driver connectors.
 |
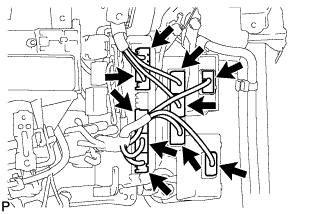
w/ EGR Cooler:
Disconnect the 3 injector driver connectors.
 |
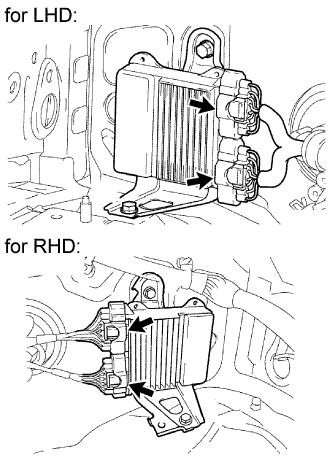
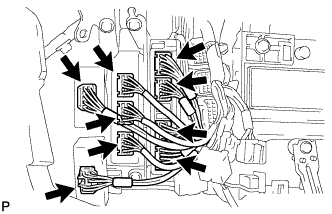
LHD:
Disconnect the connectors.
w/ A.D.D.
Disconnect the 4WD control ECU connector.
Disconnect the turbo motor driver connector.
A/T:
Disconnect the 3 TCM connectors.
Disconnect the 4 ECU connectors.
 |
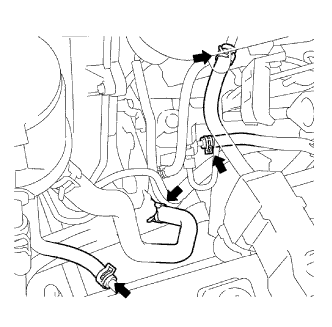
RHD:
Disconnect the connectors.
w/ A.D.D.
Disconnect the 4WD control ECU connector.
Disconnect the turbo motor driver connector.
A/T:
Disconnect the 3 TCM connectors.
Disconnect the 4 ECU connectors.
 |
Disconnect the 2 fuel hoses.
Disconnect the vacuum pump hose.
Disconnect the oil reservoir to pump hose.
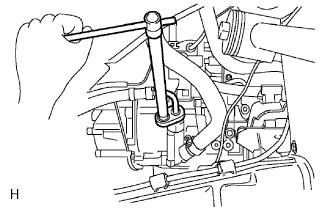 |
Using a union nut wrench, disconnect the pressure feed tube.
| 15. DISCONNECT COOLER COMPRESSOR ASSEMBLY |
Remove the 4 bolts and disconnect the cooler compressor.
| 16. REMOVE CLUTCH COVER ASSEMBLY (for Manual Transmission) |
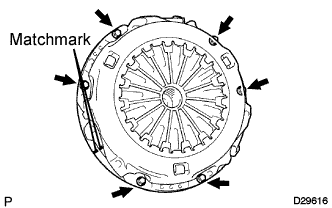 |
Place matchmarks on the clutch cover and flywheel.
Loosen each set bolt one turn at a time until spring tension is released.
Remove the 6 set bolts and pull off the clutch cover.
| 17. REMOVE CLUTCH DISC ASSEMBLY (for Manual Transmission) |
| 18. REMOVE FLYWHEEL SUB-ASSEMBLY (for Manual Transmission) |
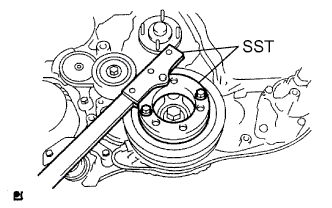 |
Using SST, hold the crankshaft.
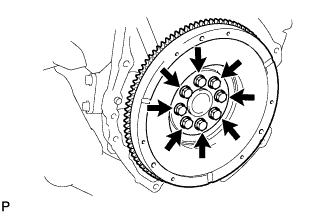 |
Remove the 8 bolts and flywheel.
| 19. REMOVE DRIVE PLATE AND RING GEAR SUB-ASSEMBLY (for Automatic Transmission) |
|
Using SST, hold the crankshaft.
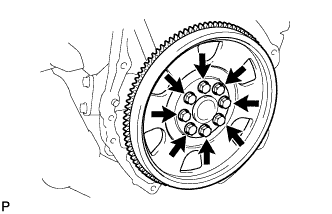 |
Remove the 8 bolts, drive plate spacer, and drive plate and ring gear sub-assembly.
| 20. REMOVE REAR END PLATE |
Remove the bolt and end plate.
| 21. REMOVE ENGINE ASSEMBLY |
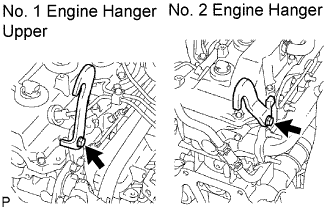 |
Set the No. 1 engine hanger and No. 2 engine hanger to the locations shown in the illustration.
| Parts Name | Part No. | |
| No. 1 engine hanger upper | w/ EGR cooler | 12284-30060 |
| Bolt (90105-T0164 or 91512-61014) | ||
| w/o EGR cooler | 12284-30020 | |
| Bolt (90105-T0164 or 91512-61014) | ||
| No. 2 engine hanger | 12282-67020 | |
| Bolt (90119-T0065 or 91642-81030) | ||
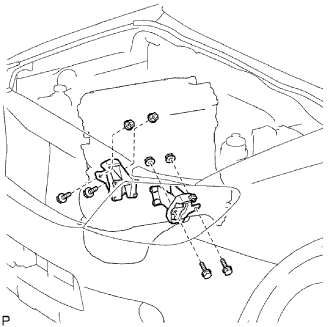 |
Hold the engine with the engine sling device and chain block.
Remove the 4 bolts and 4 nuts.
Remove the engine by operating the engine sling device and chain block.
| 22. FIX ENGINE ON ENGINE STAND |
| 23. REMOVE ENGINE WIRE |
Disconnect the engine wire from the engine.
| 24. REMOVE NO. 1 TIMING BELT COVER |
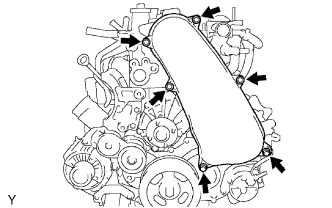 |
Remove the bolt and water hose clamp.
Remove the wire harness clamp.
Remove the 6 bolts and timing belt cover.
| 25. REMOVE TIMING BELT |
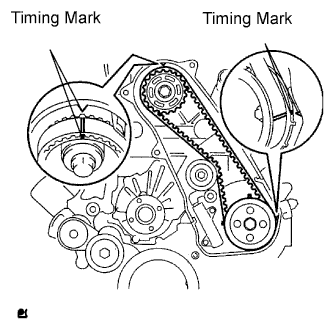 |
Turn the crankshaft clockwise and align the timing marks as shown in the illustration.
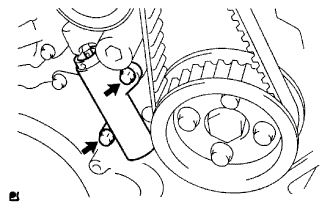 |
Uniformly loosen the 2 bolts and remove the timing belt tensioner.
Remove the timing belt.
Using a 10 mm hexagon wrench, remove the bolt, timing belt idler and washer.
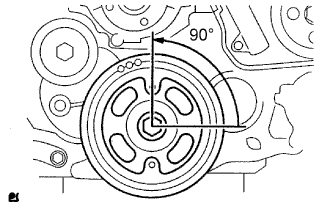
| 26. REMOVE NO. 1 TIMING BELT IDLER SUB-ASSEMBLY |
| 27. REMOVE NO. 1 TIMING BELT TENSIONER ASSEMBLY |
| 28. REMOVE CRANKSHAFT PULLEY |
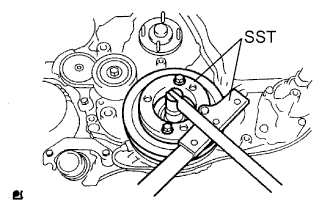 |
Using SST, remove the pulley bolt.
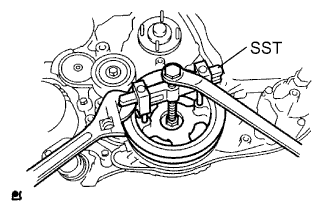 |
Using SST, remove the pulley.
| 29. REMOVE COMPRESSOR INLET ELBOW |
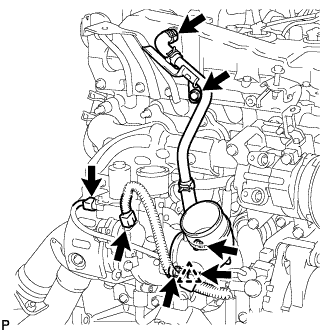 |
for Ventilation Pipe Type:
Remove the ventilation pipe.
Move the clamp so that the hose can be disconnected.
Remove the ventilation pipe.
Disconnect the 2 connectors from the turbocharger.
Remove the wire clamp's clip from the inlet elbow.
Remove the 2 nuts, inlet elbow and gasket.
| 30. REMOVE NO. 1 EXHAUST MANIFOLD HEAT INSULATOR |
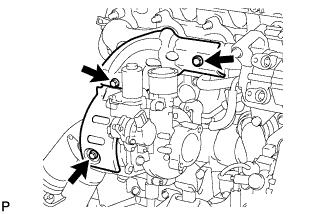 |
Remove the 2 bolts and heat insulator.
| 31. REMOVE NO. 1 TURBO INSULATOR |
Remove the bolt and insulator.
| 32. REMOVE NO. 1 TURBO WATER HOSE |
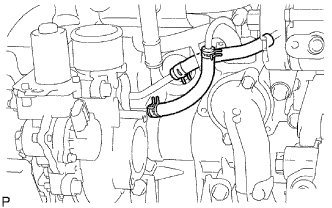 |
Move the 2 clamps and disconnect the 2 hoses.
| 33. REMOVE TURBINE OUTLET ELBOW |
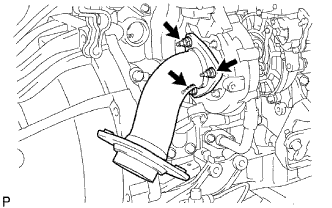 |
Remove the 3 nuts, outlet elbow and gasket.
| 34. REMOVE TURBOCHARGER STAY |
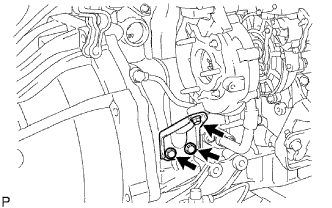 |
Remove the 2 bolts, nut and stay.
| 35. REMOVE TURBO OIL INLET PIPE SUB-ASSEMBLY |
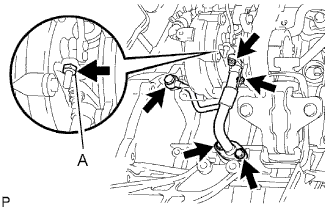 |
Remove the 2 bolts, 2 nuts, union bolt, inlet pipe and 3 gaskets.
| 36. REMOVE TURBOCHARGER SUB-ASSEMBLY |
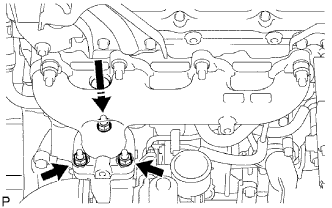 |
Remove the 3 nuts, turbocharger and gasket.
| 37. REMOVE EXHAUST MANIFOLD |
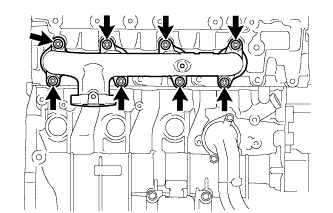 |
Remove the 8 nuts and exhaust manifold as shown in the illustration.
| 38. INSPECT EXHAUST MANIFOLD |
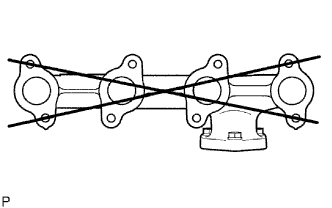 |
Using a precision straightedge and feeler gauge, measure the surface contacting the cylinder head for warpage.
| 39. REMOVE GENERATOR BRACKET |
| 40. REMOVE GENERATOR ASSEMBLY |
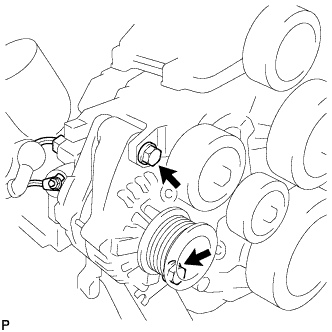 |
Remove the nut and generator wire.
Disconnect the generator connector.
Remove the 2 bolts and generator.
| 41. REMOVE V-RIBBED BELT TENSIONER ASSEMBLY |
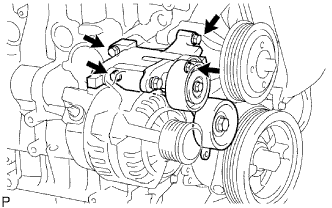 |
Remove the 4 bolts and belt tensioner.
| 42. REMOVE INTERCOOLER SUPPORT BRACKET |
Remove the 2 bolts and support bracket.
| 43. REMOVE NO. 2 INTERCOOLER SUPPORT BRACKET |
Remove the 2 bolts and support bracket.
| 44. REMOVE NO. 1 COMPRESSOR MOUNTING BRACKET |
Remove the 4 bolts and mounting bracket.
| 45. REMOVE THERMOSTAT |
| 46. REMOVE WATER OUTLET |
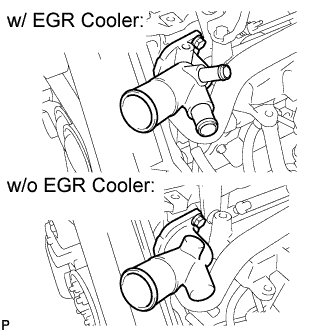 |
Remove the 2 bolts and water outlet.
| 47. REMOVE GLOW PLUG ASSEMBLY |
w/ EGR Cooler:
Remove the glow plug assembly (Click here).
w/o EGR Cooler:
Remove the glow plug assembly (Click here).
| 48. REMOVE OIL FILTER SUB-ASSEMBLY |
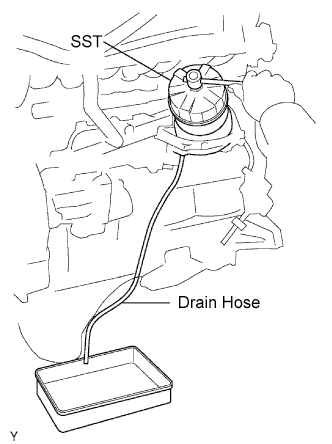 |
Using SST, remove the oil filter.
| 49. REMOVE INTAKE MANIFOLD |
w/ EGR Cooler:
Remove the intake manifold (Click here).
w/o EGR Cooler:
Remove the intake manifold (Click here).
| 50. INSPECT INTAKE MANIFOLD |
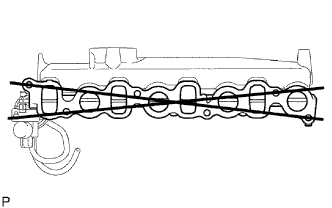 |
Using a precision straightedge and feeler gauge, measure the surface contacting the cylinder head for warpage.
| 51. REMOVE FUEL SUPPLY PUMP ASSEMBLY |
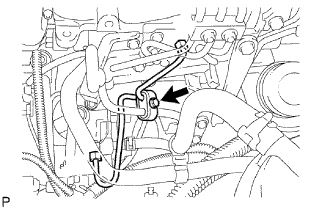 |
Remove the bolt and clamp.
Remove the 2 bolts and oil level gauge guide.
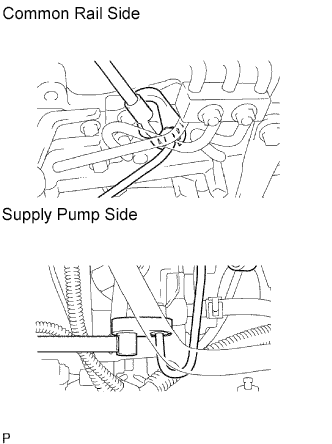 |
Using a 17 mm union nut wrench, loosen the union nuts and remove the fuel inlet pipe.
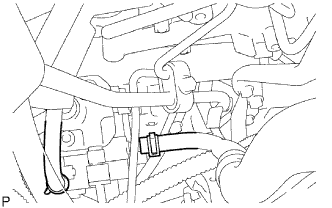 |
Disconnect the 2 fuel hoses.
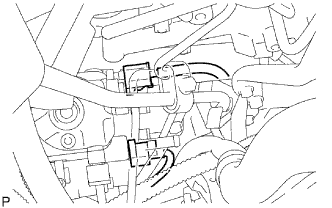 |
Disconnect the 2 connectors.
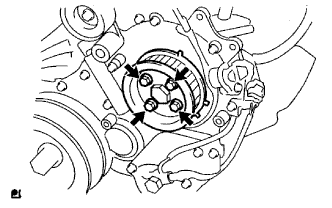 |
Remove the 4 bolts indicated by the arrows in the illustration.
Remove the No. 2 camshaft timing pulley flange and pump drive shaft pulley.
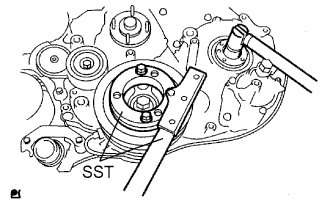 |
Remove the set nut and O-ring while holding the crankshaft pulley by using SST.
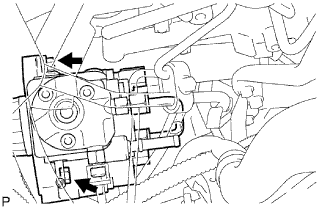 |
Loosen the 2 nuts.
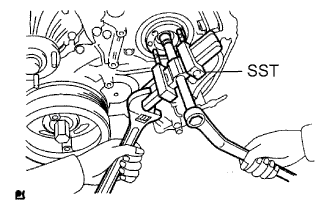 |
Using SST, disconnect the pump from the injection gear.
Remove the 2 nuts and pump.
Remove the O-ring.
| 52. REMOVE COMMON RAIL ASSEMBLY |
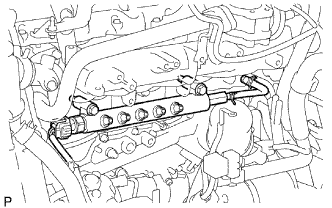 |
Disconnect the fuel pressure sensor connector.
Remove the 2 bolts and common rail.
| 53. REMOVE OIL COOLER COVER SUB-ASSEMBLY |
| 54. REMOVE TIMING GEAR COVER INSULATOR (w/ EGR Cooler) |
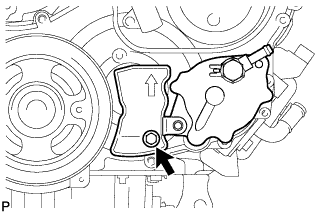 |
Remove the bolt and gear cover insulator.
| 55. REMOVE VACUUM PUMP ASSEMBLY |
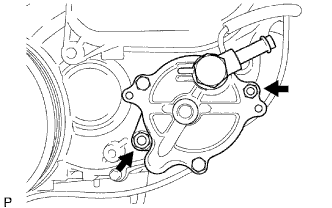 |
Remove the 2 nuts, vacuum pump and 2 O-rings.
| 56. REMOVE VANE PUMP ASSEMBLY |
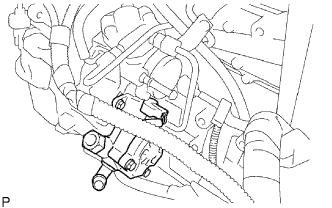 |
Remove the 2 nuts, vane pump and O-ring.
| 57. REMOVE CRANKSHAFT POSITION SENSOR |
Remove the bolt, sensor and O-ring.
| 58. REMOVE CAMSHAFT POSITION SENSOR |
Remove the bolt, sensor and O-ring.
| 59. REMOVE ENGINE COOLANT TEMPERATURE SENSOR |
Using a 17 mm deep socket wrench, remove the sensor.
| 60. REMOVE NO. 1 FRONT ENGINE MOUNTING BRACKET RH |
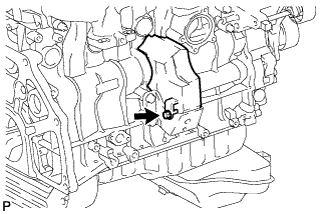 |
Remove the bolt and No. 2 cylinder block insulator.
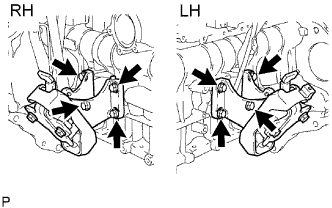 |
Remove the 4 bolts and mounting bracket.
| 61. REMOVE NO. 1 FRONT ENGINE MOUNTING BRACKET LH |
Remove the 4 bolts and mounting bracket.