Home › ENGINE · 1KD-FTV › ENGINE CONTROL SYSTEM › ECD SYSTEM (w/ EGR Cooler)

DTC    P0200    Injector Circuit / Open

for Preparation Click here


DESCRIPTION

HINT:
  1. For more information on the injector driver (EDU) (Click here).
  2. If DTC P0200 is present, refer to the "Diagnostic Trouble Code (DTC) Table for Common Rail System" (Click here).

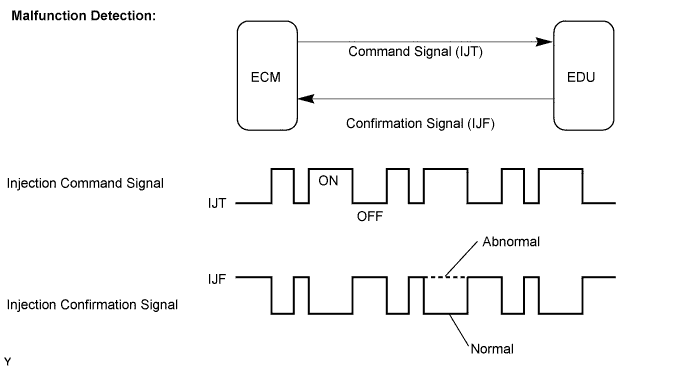
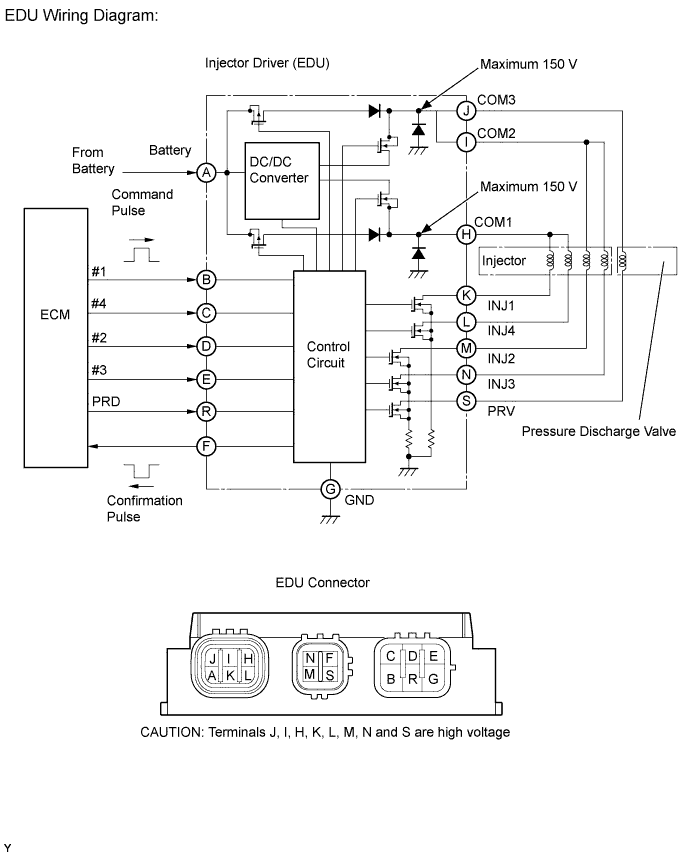
The EDU drives the injectors at high speed. The EDU has realized the high-speed driving under high-pressurized fuel conditions using the DC/DC converter, which provides a high-voltage and the quick-charging system. Soon after the EDU receives an injection command (IJT) signal from the ECM, the EDU responds to the command with an injector injection confirmation (IJF) signal when the current is applied to the injector.

A155861E01


DTC No.
DTC Detection Condition
Trouble Area
P0200
  1. Open or short in injector driver (EDU) or injector circuit
After engine is started, there is no IJF signal from EDU to ECM, despite ECM sending IJT signals to EDU
(1 trip detection logic)
  1. Open or short in injector driver (EDU) circuit
  2. Injector
  3. EDU
  4. ECM

MONITOR DESCRIPTION

  1. P0200 (Open or short in injector driver (EDU) or injector circuit):
    The ECM continuously monitors both injection command (IJT) signals and injection confirmation (IJF) signal. This DTC will be set if the ECM judges that the number of IJT signals and IJF signals are inconsistent.
    The injectors are grounded over a Field Effect Transistor (FET) and a serial resistor. This resistor creates a voltage drop, which is monitored by the EDU, in relation to the current drawn by the injector. When the injector current becomes too high, the voltage drop over the resistor becomes higher than a specified level and for that injector no IJF signal is sent to the ECM.
    P0200 refers to a malfunction of injector drive circuit or injector circuit.
    If this DTC is set, the ECM enters the fail-safe mode and limits engine power. The fail-safe mode continues until the ignition switch is turned OFF.

    A145849E02

  1. PULSE GENERATION INSPECTION

    HINT:
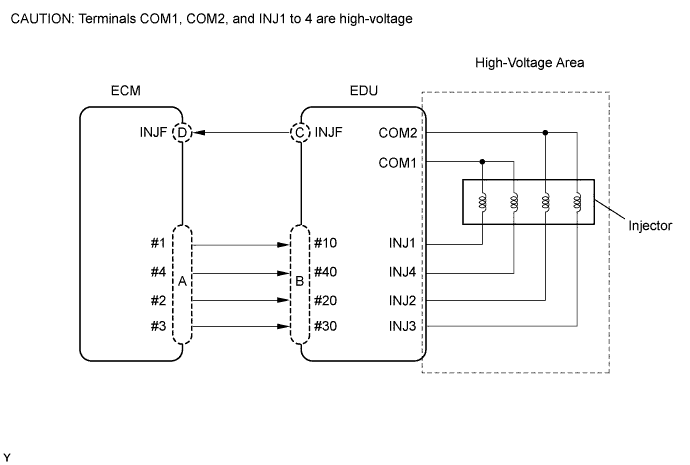
    The problem area can be identified by checking the waveform at the following terminals.


    A145850E02


    HINT:
    If you check the ECM side first, inspect the following A and D in sequence. If you check the EDU side first, inspect the following B and C in sequence. This shortens inspecting time.

    Malfunction Point
    Trouble Area
    A
    1. ECM
    B (If A is normal)
    1. Open or short in "#1 to #4 (ECM)" - "#10 to #40 (EDU)" harness or connector
    C (If A and B are normal)
    1. Open or short in "INJ1 to INJ4 (EDU)" - "COM1 and/or COM2 (EDU)" circuit
    2. Injector
    3. EDU
    D (If A, B and C are normal)
    1. Open or short in "INJF (EDU)" - "INJF (ECM)" circuit (P1271 is set simultaneously)

    1. A145851E01
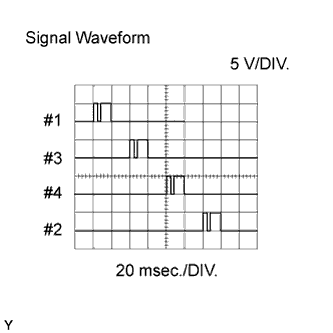
      Reference: Inspection using the oscilloscope.
      During idling, the correct waveform is as shown in the diagram.
      Inspection Point
      Specified Condition
      A and B
      Correct waveform is as shown

    2. A155125E01
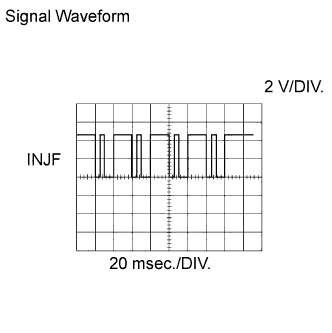
      Reference: Inspection using the oscilloscope.
      During idling, the correct waveform is as shown in the diagram.
      Inspection Point
      Specified Condition
      C and D
      Correct waveform is as shown


MONITOR STRATEGY


Required sensor
INJF signal from EDU
Frequency of operation
Continuous
Duration
10 seconds
MIL operation
1 driving cycle

TYPICAL ENABLING CONDITIONS


Item
Specification
Minimum
Maximum
Engine speed
500 rpm
-
Battery voltage
11 V
-
Ignition switch
ON
ON

TYPICAL MALFUNCTION THRESHOLDS


Threshold
Injection missing counter* for all cylinders, or for one individual cylinder, reaches specified number (taking approximately 1 second from starting engine)
*: Increases when no IJF signal is received from the EDU despite the ECM sending the IJT signals.

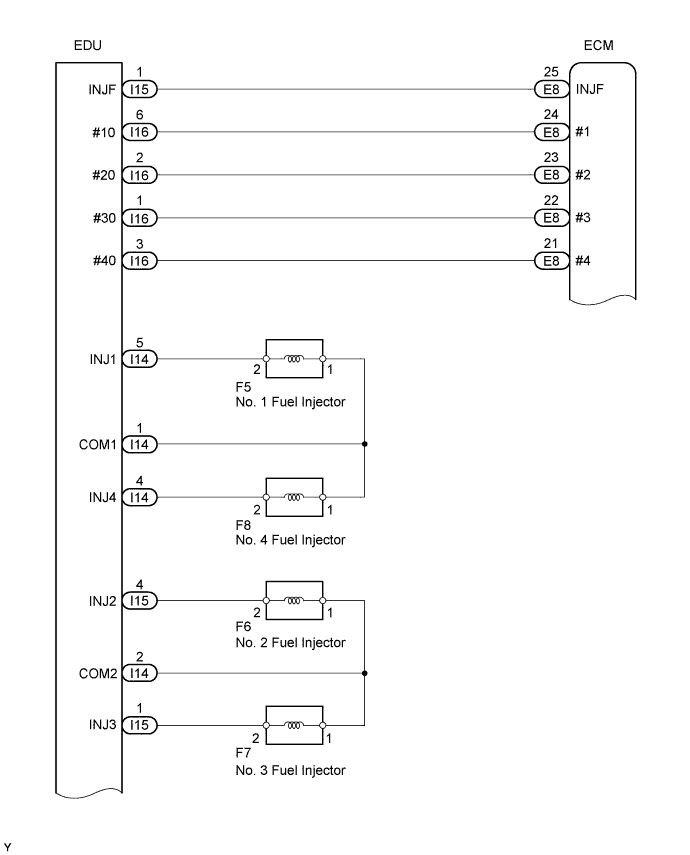
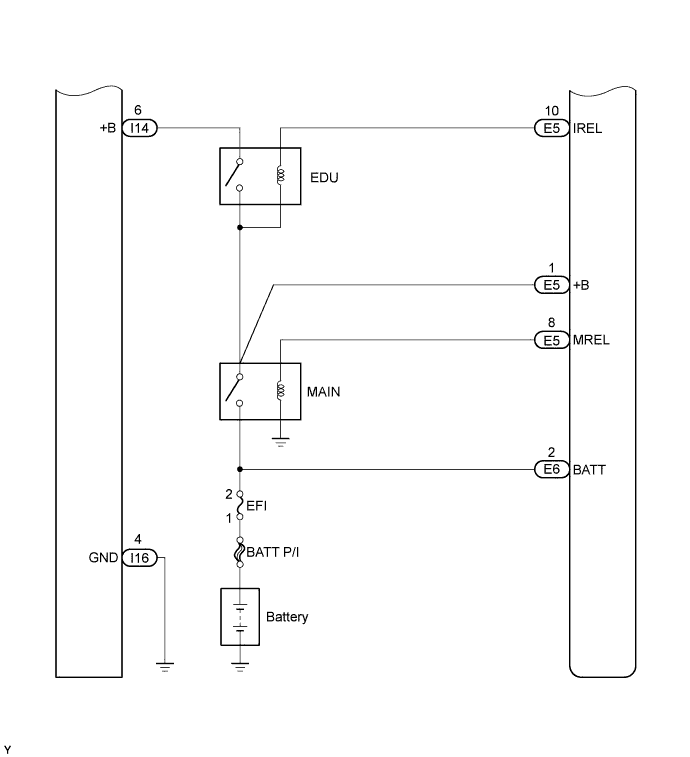
WIRING DIAGRAM


A154312E03


A159235E01


INSPECTION PROCEDURE

NOTICE:
After replacing the ECM, the new ECM needs registration (Click here) and initialization (Click here).

HINT:
  1. If P0200 and P1271 are present simultaneously, there is an open in the INJF wire harness between the EDU and ECM, or there is an open in the wire harness for the both injector and pressure discharge valve.
  2. Read freeze frame data using the intelligent tester. Freeze frame data records the engine condition when malfunctions are detected. When troubleshooting, freeze frame data can help determine if the vehicle was moving or stationary, if the engine was warmed up or not, and other data from the time the malfunction occurred.

1.CHECK OTHER DTC OUTPUT (IN ADDITION TO DTC P0200)
  1. Connect the intelligent tester to the DLC3.

  1. Turn the ignition switch ON and turn the tester ON.

  1. Enter the following menus: Powertrain / Engine / DTC.

  1. Read the DTCs.

    Result:
    Display (DTC Output)
    Proceed to
    P0200 and P1238
    A
    P0200
    B


B
Go to step 3
A


2.READ VALUE USING INTELLIGENT TESTER (COMPENSATION OF INJECTION VOLUME BETWEEN CYLINDERS)
  1. Connect the intelligent tester to the DLC3.

  1. Start the engine and turn the tester ON.

  1. Enter the following menus: Powertrain / Engine / Data List / Injection Feedback Val #1, #2, #3 and #4.

  1. Read the value.

    Standard:
    The compensatory injection volume is between -4.9 mm3/st to 4.9 mm3/st

    HINT:
    1. If the injector is malfunctioning, the compensatory injection volume remains at -5.0 mm3/st to 5.0 mm3/st
    2. The compensatory injection volume is usually between -3.0 mm3/st and 3.0 mm3/st.

  1. Inspect and repair the cylinder that has an improper compensation value according to the following steps.


NEXT


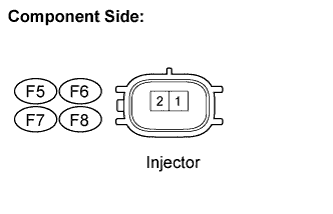
3.INSPECT INJECTOR ASSEMBLY


    A136256E08
  1. Disconnect the F5, F6, F7 and F8 injector connector.

  1. Measure the resistance of the injection assembly.

    Standard:
    Tester Connection
    Condition
    Specified Condition
    1 - 2
    20°C (68°F)
    0.85 to 1.05 Ω


NG
REPLACE INJECTOR ASSEMBLY (Click here)
OK


4.CHECK HARNESS AND CONNECTOR (INJECTOR DRIVER [EDU] - INJECTOR ASSEMBLY)


  1. Check the harness and connector between the injector and EDU (INJ terminal).
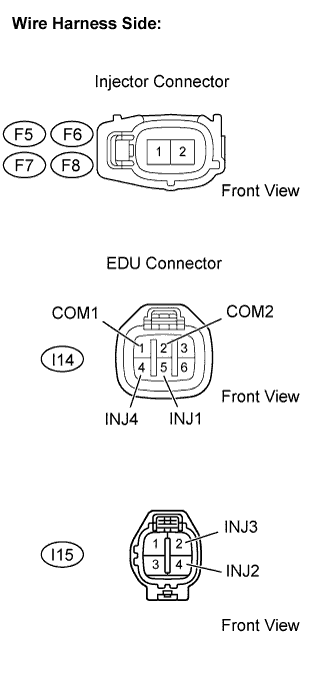


      A155862E02
    1. Disconnect the F5, F6, F7 and/or F8 injector connectors.

    2. Disconnect the I14 and/or I15 EDU connector.

    3. Measure the resistance of the wire harness side connector.

      Standard resistance (Check for open):
      Tester Connection
      Specified Condition
      F5-1 - COM1 (I14-1)
      Below 1 Ω
      F6-1 - COM2 (I14-2)
      F7-1 - COM2 (I14-2)
      F8-1 - COM1 (I14-1)
      F5-2 - INJ1 (I14-5)
      F6-2 - INJ2 (I15-4)
      F7-2 - INJ3 (I15-2)
      F8-2 - INJ4 (I14-4)

      Standard resistance (Check for short):
      Tester Connection
      Specified Condition
      F5-1 or COM1 (I14-1) - Body ground
      10 kΩ or higher
      F6-1 or COM2 (I14-2) - Body ground
      F7-1 or COM2 (I14-2) - Body ground
      F8-1 or COM1 (I14-1) - Body ground
      F5-2 or INJ1 (I14-5) - Body ground
      F6-2 or INJ2 (I15-4) - Body ground
      F7-2 or INJ3 (I15-2) - Body ground
      F8-2 or INJ4 (I14-4) - Body ground


NG
REPAIR OR REPLACE HARNESS OR CONNECTOR
OK


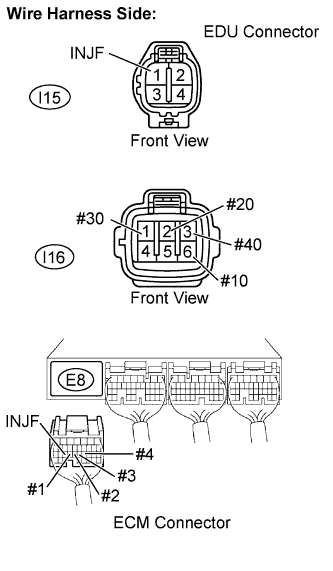
5.CHECK HARNESS AND CONNECTOR (INJECTOR DRIVER [EDU] - ECM)


    A150240E04
  1. Disconnect the I15 and I16 EDU connector.

  1. Disconnect the E8 ECM connector.

  1. Measure the resistance of the wire harness side connector.

    Standard resistance (Check for open):
    Tester Connection
    Specified Condition
    #10 (I16-6) - #1 (E8-24)
    Below 1 Ω
    #20 (I16-2) - #2 (E8-23)
    #30 (I16-1) - #3 (E8-22)
    #40 (I16-3) - #4 (E8-21)
    IJNF (I15-1) - INJF (E8-25)

    Standard resistance (Check for short):
    Tester Connection
    Specified Condition
    #10 (I16-6) or #1 (E8-24) - Body ground
    10 kΩ or higher
    #20 (I16-2) or #2 (E8-23) - Body ground
    #30 (I16-1) or #3 (E8-22) - Body ground
    #40 (I16-3) or #4 (E8-21) - Body ground
    IJNF (I15-1) or INJF (E8-25) - Body ground


NG
REPAIR OR REPLACE HARNESS OR CONNECTOR
OK


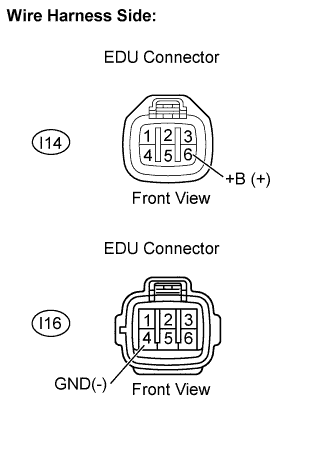
6.INSPECT INJECTOR DRIVER (EDU) (BATTERY VOLTAGE)


    A150234E03
  1. Disconnect the I14 and I16 EDU connectors.

  1. Turn the ignition switch ON.

  1. Measure the voltage of the EDU connectors.

    Standard voltage:
    Tester Connection
    Specified Condition
    +B (I14-6) - GND (I16-4)
    11 to 14 V


NG
CHECK INJECTOR DRIVER POWER SOURCE CIRCUIT (BATTERY - EDU) (Click here)
OK


7.REPLACE INJECTOR DRIVER (EDU)
  1. Replace injector driver (Click here).


NEXT


8.CHECK WHETHER DTC OUTPUT RECURS
  1. Connect the intelligent tester to the DLC3.

  1. Turn the ignition switch ON.

  1. Turn the tester ON.

  1. Clear DTCs (Click here).

  1. Start the engine.

  1. Allow the engine to idle for 30 seconds or more.

  1. Enter the following menus: Powertrain / Engine / DTC.

  1. Read the DTCs.

    Result:
    Display (DTC Output)
    Proceed to
    No output
    A
    P0200
    B

    HINT:
    If the engine does not stat, replace the ECM.


B
REPLACE ECM (Click here)
A

END