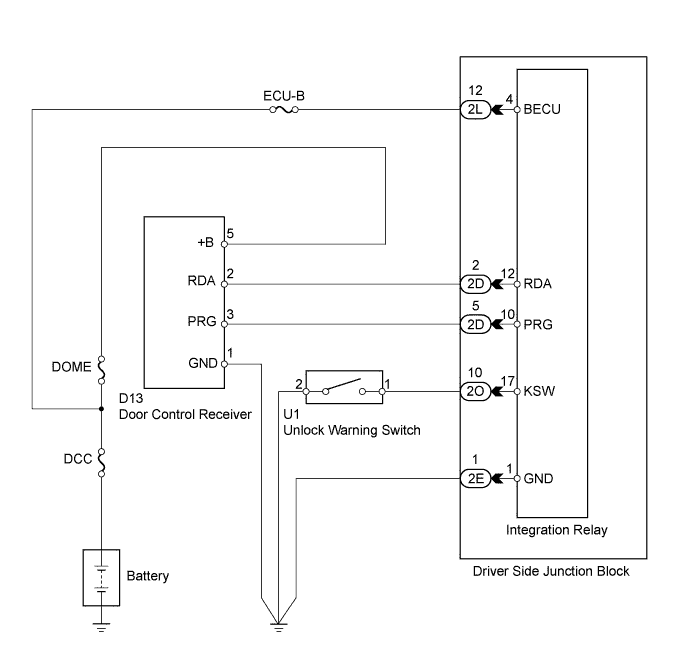
WIRELESS DOOR LOCK CONTROL SYSTEM (for Non-built-in Type Door Control Receiver) > Only Wireless Control Function is Inoperative |
| 1.CHECK THAT TRANSMITTER LED ILLUMINATES |
Check that the transmitter's LED illuminates 3 times when the switch is pressed 3 times.
|
| ||||
| NG | |
 |
| 2.REPLACE TRANSMITTER BATTERY |
Temporarily replace the transmitter battery with a new or normally functioning one (Click here).
Check that the doors can be locked and unlocked using the transmitter switches (Click here).
|
| ||||
| NG | |
|
| 3.CHECK ROOM LIGHT ASSEMBLY |
Check that the room light illumination operates normally.
|
| ||||
| OK | |
|
| 4.SWITCH TO SELF-DIAGNOSTIC MODE |
Switch to self-diagnostic mode by operating the ignition key cylinder.
Make sure the vehicle is in its initial condition (Click here). Then insert the key into the ignition key cylinder and remove it.
Within 5 seconds of removing the key, insert the key into the ignition key cylinder (ignition switch OFF). Then turn the ignition switch ON and OFF.
Within 30 seconds of turning the ignition switch OFF, perform the following 9 times: turn the ignition switch ON and OFF.
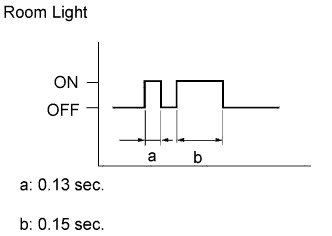 |
Check that the system has switched to self-diagnostic mode by checking the room light flash pattern.
|
| ||||
| OK | |
|
| 5.CHECK BY SELF-DIAGNOSTIC MODE |
Inspect the diagnosis outputs when the door control transmitter switch is held down. The diagnosis outputs can be checked by the flash patterns of the room light.
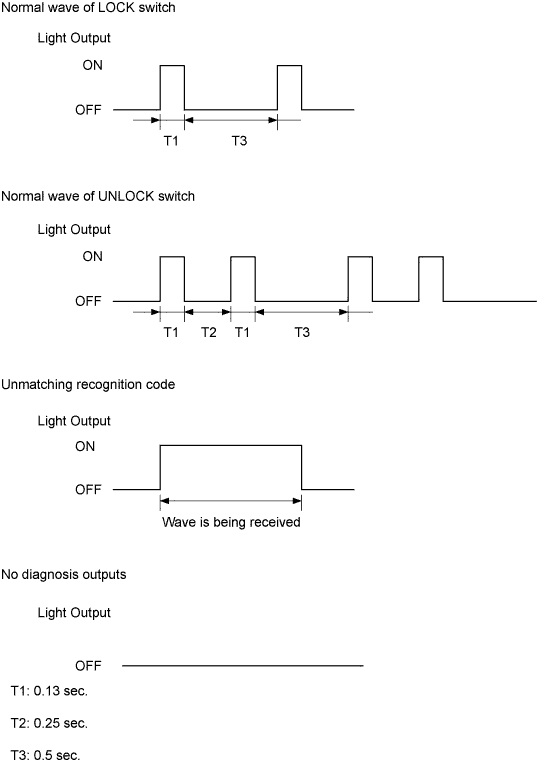
| Result | Proceed to |
| Unmatching recognition code is output | A |
| Normal waves (light flash patterns) for LOCK and UNLOCK switches are output | B |
| No diagnosis outputs are present | C |
|
| ||||
|
| ||||
| A | |
|
| 6.REGISTER RECOGNITION CODE |
Check that the system can be switched to rewrite mode or add mode, and that a recognition code can be registered.
|
| ||||
| OK | ||
 | ||
| ||
| 7.CHECK RESPONSE OF DOOR CONTROL RECEIVER |
When a new or normally functioning door lock control transmitter switch for the same type vehicle is held down, check that an unmatching recognition code is output.
|
| ||||
| NG | |
|
| 8.REPLACE DOOR CONTROL RECEIVER |
Temporarily replace the door control receiver with a new or normally functioning one (Click here).
Register the recognition code to the key (Click here).
Check that the doors can be locked and unlocked by using the transmitter LOCK / UNLOCK switch.
|
| ||||
| OK | ||
| ||
| ||
| 9.INSPECT UNLOCK WARNING SWITCH ASSEMBLY |
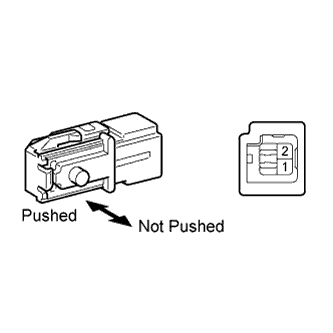 |
Remove the switch.
Measure the resistance of the switch.
| Tester Connection | Switch Condition | Specified Condition |
| 1 - 2 | Not pushed | 10 kΩ or higher |
| Pushed | Below 1 Ω |
|
| ||||
| OK | |
|
| 10.CHECK WIRE HARNESS (DOOR CONTROL RECEIVER - INTEGRATION RELAY) |
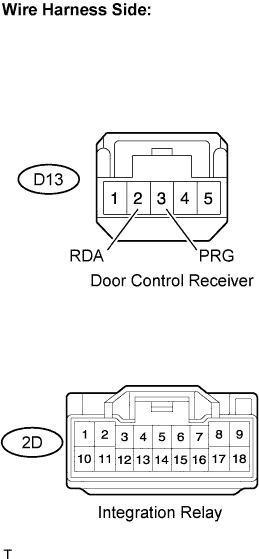 |
Disconnect the D13 receiver connector.
Disconnect the 2D junction block connector.
Measure the resistance of the wire harness side connectors.
| Tester Connection | Specified Condition |
| D13-3 (PRG) - 2D-5 | Below 1 Ω |
| D13-2 (RDA) - 2D-2 | |
| D13-3 (PRG) or 2D-5 - Body ground | 10 kΩ or higher |
| D13-2 (RDA) or 2D-2 - Body ground |
|
| ||||
| OK | |
|
| 11.CHECK DOOR CONTROL RECEIVER (OUTPUT) |
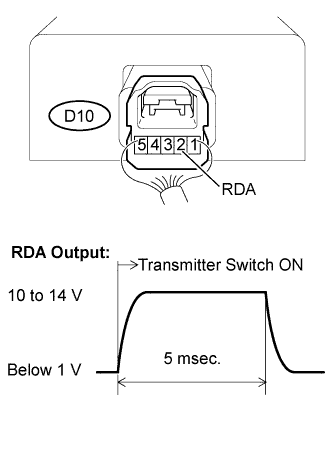 |
Reconnect the D13 receiver connector.
Measure the resistance of the connector.
| Tester Connection | Condition | Specified Condition |
| D13-2 (RDA) - Body ground | Transmitter switch ON (No key in ignition key cylinder, all doors closed) | Below 1 V → 10 to 14 V → Below 1 V (see illustration) |
|
| ||||
| NG | |
|
| 12.REPLACE DOOR CONTROL TRANSMITTER MODULE |
Check that the doors can be locked and unlocked by using the transmitter LOCK / UNLOCK switch (Click here).
|
| ||||
| OK | ||
| ||
| ||

