INSTALLATION
Removal / installation · Vehicles built Jun 2011 – Jul 2012
Versions by build date: Jun 2011 – Jul 2012 Aug 2012 – Jul 2013 from Aug 2013
| 1.
INSTALL INPUT SHAFT FRONT BEARING (for 1KD-FTV, 2KD-FTV, 1GR-FE) |
 |
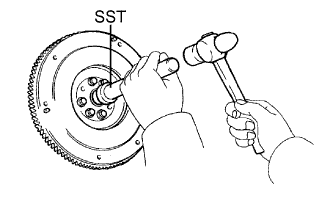
- Using SST and a hammer, tap in a new bearing.
- SST
- 09304-12012
- HINT:
- After installing the bearing to the hub, make sure that it rotates smoothly.
Install 2 new bolts.
-
Torque:
- 178 N*m{
1,815 kgf*cm
, 132 ft.*lbf
}
for 1KD-FTV, 2KD-FTV
- 83 N*m{
846 kgf*cm
, 61 ft.*lbf
}
for 1GR-FE
| 2.
INSTALL INPUT SHAFT FRONT BEARING (for 1TR-FE, 2TR-FE) |
|
- Using SST and a hammer, tap in a new bearing.
- SST
- 09304-12012
- HINT:
- After installing the bearing to the hub, make sure that it rotates smoothly.
Install 2 new bolts.
-
Torque:
- 26.5 N*m{
270 kgf*cm
, 20 ft.*lbf
}
- HINT:
- The mounting bolts are tightened in 2 progressive steps.
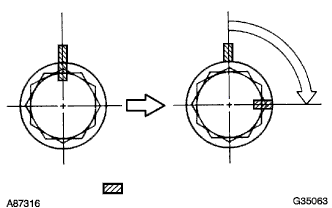
- Mark the mounting bolts with paint.
Retighten the mounting bolts by 90°in the numerical order shown in the illustration.
Check that the painted marks are now at a 90°angle to the position.
| 3.
INSTALL CLUTCH DISC ASSEMBLY |
|
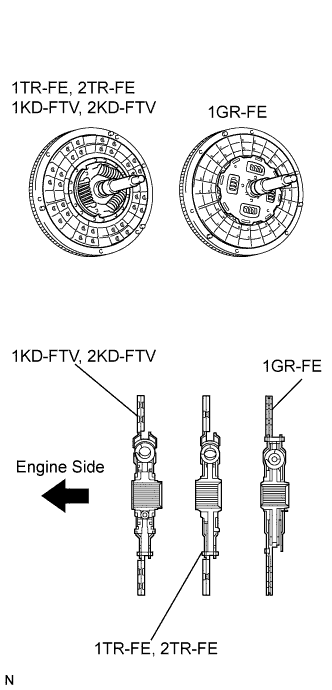
- Insert SST into the clutch disc. Then insert the SST (together with the clutch disc) into the flywheel.
- SST
- 09301-00110
- NOTICE:
- Take care not to insert the clutch disc facing the wrong direction.
| 4.
INSTALL CLUTCH COVER ASSEMBLY |
|
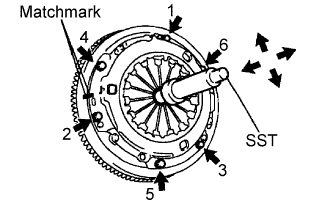
- Align the matchmarks on the clutch cover and flywheel.
Tighten the 6 bolts as described below.
Determine the first bolt to be tightened by choosing the bolt closest to the knock pin.
Uniformly tighten the 6 bolts in diametrically opposite pairs relative to the position of the first bolt. Use the illustration as a reference.
-
Torque:
- 19 N*m{
195 kgf*cm
, 14 in.*lbf
}
Lightly move SST up and down, and right and left.
- SST
- 09301-00110
Check that the disc is in the center, and then tighten the bolts.
| 5.
INSPECT AND ADJUST CLUTCH COVER ASSEMBLY |
|
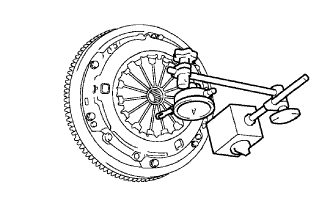
- Using a dial indicator with roller instrument, measure the diaphragm spring tip alignment.
- Maximum misalignment:
- 0.5 mm (0.020 in.)
-
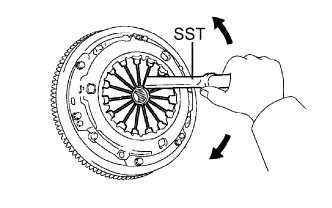
If the alignment is not as specified, use SST to adjust the diaphragm spring tip alignment.
- SST
- 09333-00013
| 6.
INSTALL RELEASE FORK SUPPORT |
|
Install the release fork support to the manual transmission unit.
| 7.
INSTALL RELEASE BEARING HUB CLIP |
|
Install the release bearing hub clip to the release bearing.
| 8.
INSTALL CLUTCH RELEASE FORK SUB-ASSEMBLY |
|
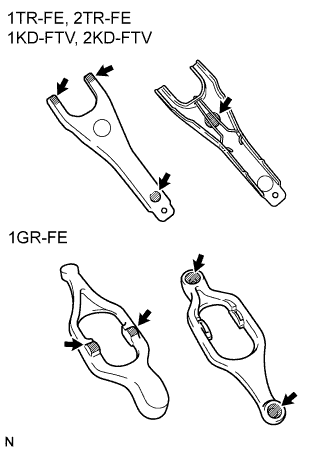
- Apply Multemp 8158 Grease or equivalent to the following areas:
- The contact surfaces of the release fork and release bearing hub.
- The contact surfaces of the release fork and push rod.
- The pivot points of the release fork.
- Grease:
- Multemp 8158 Grease or equivalent
Install the release fork to the release bearing.
| 9.
INSTALL CLUTCH RELEASE BEARING ASSEMBLY |
|
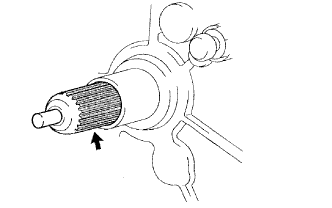
- Apply clutch spline grease to the input shaft spline.
- Grease:
- Toyota Genuine Clutch Spline Grease or equivalent
Install the release fork (with release bearing) to the manual transmission.
- NOTICE:
- After the installation, move the fork forward and backward to check that the release bearing slides smoothly.
| 10.
INSTALL CLUTCH RELEASE FORK BOOT |
|
| 11.
INSTALL MANUAL TRANSMISSION UNIT ASSEMBLY |
|
| 12.
INSTALL FRONT PROPELLER SHAFT ASSEMBLY (4WD) |
|
| 13.
INSTALL REAR PROPELLER SHAFT ASSEMBLY |
|
| 14.
INSTALL NO. 1 ENGINE COVER SUB-ASSEMBLY (4WD) |
|
-
Torque:
- 29 N*m{
296 kgf*cm
, 21 ft.*lbf
}
| 15.
INSTALL NO. 2 ENGINE COVER SUB-ASSEMBLY (4WD) |
|
-
Torque:
- 29 N*m{
296 kgf*cm
, 21 ft.*lbf
}
| 16.
CONNECT CABLE TO NEGATIVE BATTERY TERMINAL |
|
| 17.
PERFORM INITIALIZATION |
|
Perform initialization (Click here ).
- NOTICE:
- Certain systems need to be initialized after disconnecting and reconnecting the cable from the negative (-) battery terminal.
| 18.
CHECK SRS WARNING LIGHT |
|
Check the SRS warning light (Click here).