REMOVAL
Removal / installation · Vehicles built from Jun 2011
| 1. PRECAUTION |
| 2. DISCONNECT CABLE FROM NEGATIVE BATTERY TERMINAL |

- CAUTION:
- Wait at least 90 seconds after disconnecting the cable from the negative (-) battery terminal to prevent airbag and seat belt pretensioner activation.
| 3. PLACE FRONT WHEEL FACING STRAIGHT AHEAD |
| 4. REMOVE STEERING PAD ASSEMBLY |
| 5. REMOVE STEERING WHEEL ASSEMBLY |
Remove the steering wheel assembly set nut.
Put matchmarks on the steering wheel assembly and steering main shaft.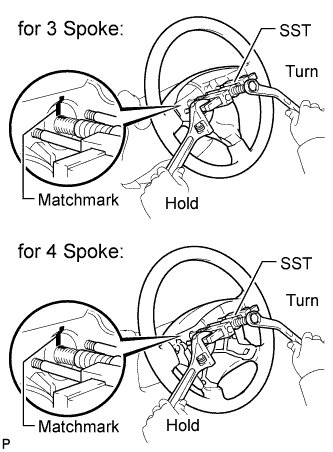

Using SST, remove the steering wheel assembly.
- SST
- 09950-50013
(09951-05010, 09952-05010, 09953-05020, 09954-05021)
- NOTICE:
- Apply a small amount of grease to the threads and tip of SST (09953-05020) before use.
| 6. REMOVE STEERING COLUMN COVER LOWER |
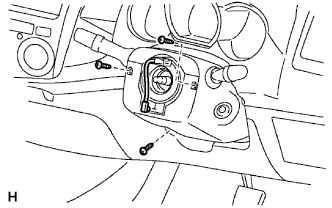 |
Remove the 3 screws and cover lower.
| 7. REMOVE STEERING COLUMN COVER UPPER |
| 8. REMOVE WINDSHIELD WIPER SWITCH ASSEMBLY |
Disconnect the connectors.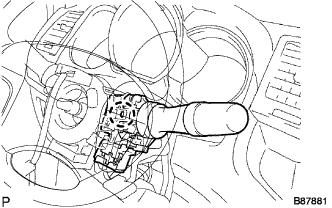
Detach the claw and remove the windshield wiper switch.
- NOTICE:
- Do not push the claw with excessive force as damage may occur.
| 9. REMOVE HEADLIGHT DIMMER SWITCH ASSEMBLY |
Disconnect the connector.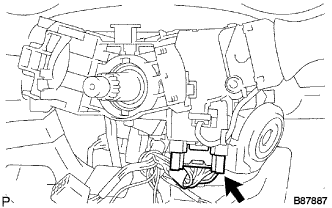
Using needle-nose pliers, remove the band clamp as shown in the illustration.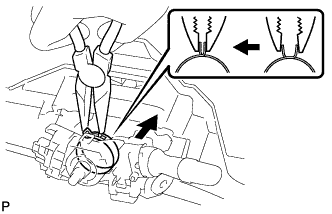
Using a screwdriver, detach the claws and remove the switch.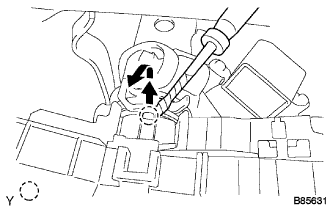
- HINT:
- Tape the screwdriver tip before use.
| 10. REMOVE SPIRAL CABLE SUB-ASSEMBLY |
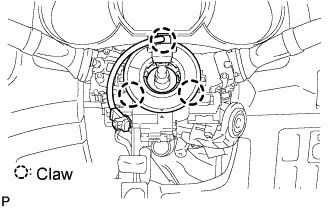 |
Disconnect the connectors from the spiral cable.
- NOTICE:
- When handling the airbag connector, do not damage the airbag wire harness.
Detach the 3 claws and remove the spiral cable.
| 11. REMOVE FRONT WHEEL |
| 12. REMOVE NO. 2 ENGINE UNDER COVER (for 4WD) |
Remove the 4 bolts and under cover.
| 13. REMOVE NO. 1 ENGINE UNDER COVER (for 4WD) |
Remove the 4 bolts and under cover.
| 14. REMOVE FRONT SIDE MEMBER TO FRONT SUSPENSION CROSSMEMBER BRACE |
Remove the 8 bolts and crossmember brace.
| 15. REMOVE FRONT STABILIZER BAR |
| 16. DISCONNECT TIE ROD END SUB-ASSEMBLY LH |
Remove the cotter pin and nut.
Using SST, disconnect the tie rod end from the steering knuckle arm.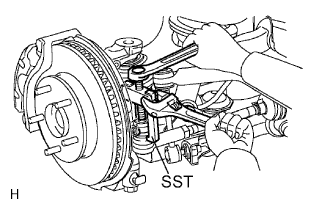
- SST
- 09628-62011
- HINT:
- The illustration is for 2WD vehicles.
- When servicing a 4WD vehicle, use the illustration for 2WD vehicles as a reference.
- The illustration is for 2WD vehicles.
| 17. DISCONNECT TIE ROD END SUB-ASSEMBLY RH |
- HINT:
- Use the same procedures described for the LH side.
| 18. DISCONNECT STEERING SLIDING YOKE |
Loosen the bolt labeled A.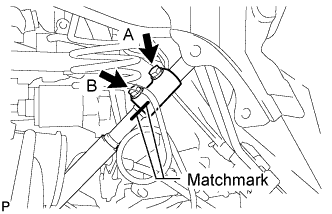
Make matchmarks on the steering yoke and steering intermediate shaft.
Remove the bolt labeled B.
Disconnect the steering sliding yoke from the No. 2 steering intermediate shaft.
| 19. REMOVE NO. 2 STEERING INTERMEDIATE SHAFT SUB-ASSEMBLY |
Make matchmarks on the intermediate shaft and steering link.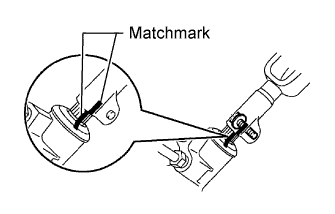
Remove the bolt and intermediate shaft from the steering link.
- NOTICE:
- If the intermediate shaft is struck, replace it with a new one.
| 20. DISCONNECT PRESSURE FEED TUBE ASSEMBLY |
Using a union nut wrench, loosen the flare nut and disconnect the pressure feed tube.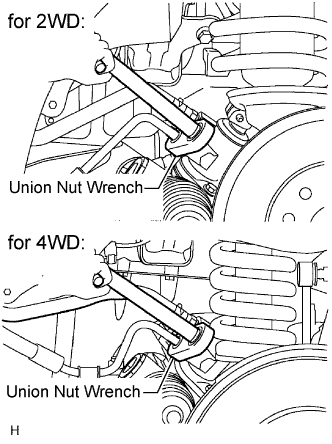
Remove the bolt and disconnect the pressure feed tube from the steering link.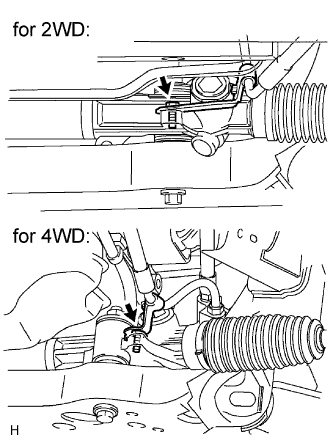
| 21. DISCONNECT STEERING GEAR OUTLET RETURN TUBE |
Remove the clip and disconnect the return hose.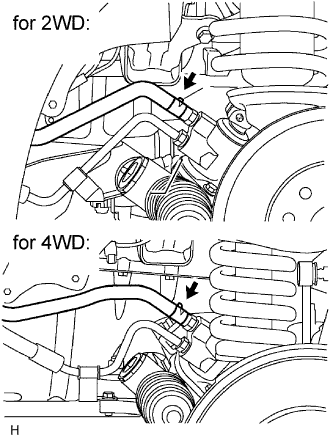
Using a union nut wrench, disconnect the outlet return tube.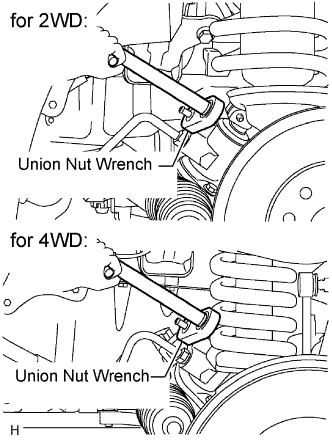
| 22. REMOVE POWER STEERING LINK ASSEMBLY |
Fix the 2 nuts in place and remove the 2 bolts. Then remove the link from the frame.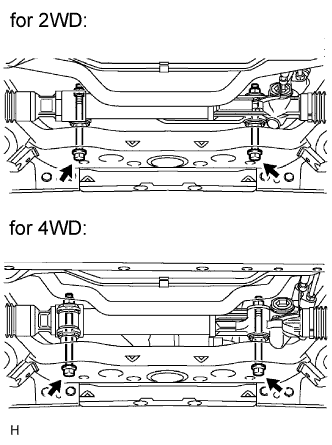
- NOTICE:
- Never turn the nut. Be sure to turn the bolt.
- HINT:
- for 4WD:
- Removal of the link may be easier if the following is performed: 1) remove the differential mount, and 2) slide the differential toward the rear of the vehicle.