11 Room Temperature Sensor Circuit
Diagnostic trouble codes · Vehicles built Aug 2012 – Jul 2013
Versions by build date: Jun 2011 – Jul 2012 Aug 2012 – Jul 2013 from Aug 2013
DESCRIPTION
The cooler thermistor is installed in the instrument panel to detect the room temperature and control the heater and air conditioning AUTO function. The resistance of the cooler thermistor changes in accordance with the room temperature. As the temperature decreases, the resistance increases. As the temperature increases, the resistance decreases.The air conditioning amplifier assembly applies voltage (5 V) to the cooler thermistor and reads voltage changes as the resistance of the cooler thermistor changes.
| DTC Code |
DTC Detection Condition |
Trouble Area |
| 11 |
An open or short in the room temperature sensor circuit. |
|
WIRING DIAGRAM
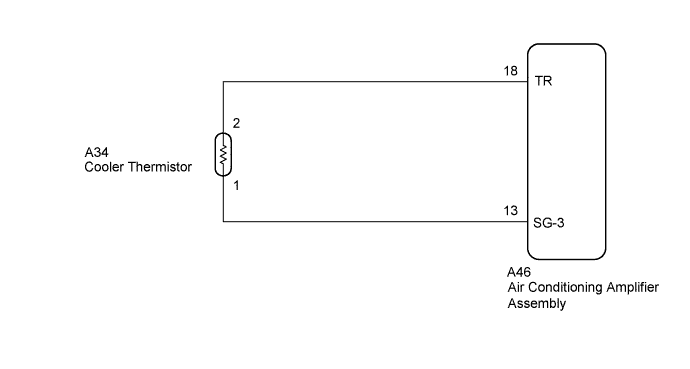

INSPECTION PROCEDURE
| 1. INSPECT COOLER THERMISTOR |

Remove the cooler thermistor (Click here).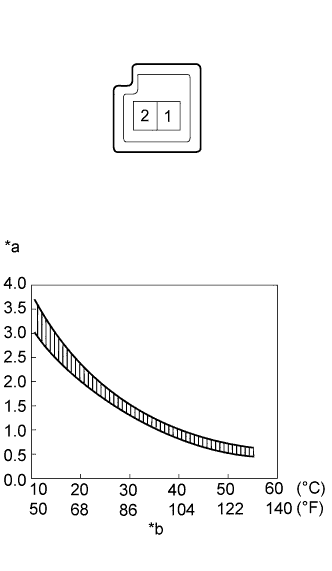
Measure the resistance according to the value(s) in the table below.
- Standard Resistance:
Tester Connection
Condition
Specified Condition
1 - 2
10°C (50°F)
3.00 to 3.73 kΩ
15°C (59°F)
2.45 to 2.88 kΩ
20°C (68°F)
1.95 to 2.30 kΩ
25°C (77°F)
1.60 to 1.80 kΩ
30°C (86°F)
1.28 to 1.47 kΩ
35°C (95°F)
1.00 to 1.22 kΩ
40°C (104°F)
0.80 to 1.00 kΩ
45°C (113°F)
0.65 to 0.85 kΩ
50°C (122°F)
0.50 to 0.70 kΩ
55°C (131°F)
0.44 to 0.60 kΩ
60°C (140°F)
0.36 to 0.50 kΩ
Text in Illustration *a
Resistance (kΩ)
*b
Temperature
- NOTICE:
- Even slightly touching the cooler thermistor may change the resistance value. Be sure to hold the connector of the cooler thermistor.
- When measuring the resistance, the cooler thermistor temperature must be the same as the ambient temperature.
- Even slightly touching the cooler thermistor may change the resistance value. Be sure to hold the connector of the cooler thermistor.
- HINT:
- As the temperature increases, the resistance decreases (Refer to the graph).
|
|
||||

| OK | |
 |
| 2. CHECK AIR CONDITIONING AMPLIFIER ASSEMBLY |
Remove the air conditioning amplifier assembly with its connectors still connected (Click here).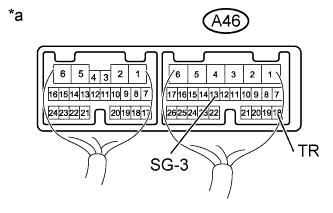
Measure the voltage according to the value(s) in the table below.
- Standard Voltage:
Tester Connection
Condition
Specified Condition
A46-18 (TR) - A46-13 (SG-3)
- Ignition switch ON
- Cabin temperature 25°C (77°F)
1.8 to 2.2 V
- Ignition switch ON
- Cabin temperature 40°C (104°F)
1.2 to 1.6 V
- Ignition switch ON
Text in Illustration *a
Component with harness connected
(Air Conditioning Amplifier Assembly)
- HINT:
- As the temperature increases, the voltage decreases.
Result Result
Proceed to
OK (When troubleshooting according to problem symptoms table.)
A
OK (When troubleshooting according to DTC.)
B
NG
C
|
|
||||
|
|
||||

| A | ||
 |
||
| ||
| 3. CHECK HARNESS AND CONNECTOR (COOLER THERMISTOR - AIR CONDITIONING AMPLIFIER) |
Disconnect the A34 cooler thermistor connector.
Disconnect the A46 air conditioning amplifier assembly connector.
Measure the resistance according to the value(s) in the table below.
- Standard Resistance:
Tester Connection
Condition
Specified Condition
A46-18 (TR) - A34-2
Always
Below 1 Ω
A46-13 (SG-3) - A34-1
A46-18 (TR) - Body ground
Always
10 kΩ or higher
A46-13 (SG-3) - Body ground
|
|
||||
| OK | ||
|
||
| ||