Rear Power Window LH Manual Function does not Operate with Rear Power Window Switch LH
Circuit diagnosis · Vehicles built from Jun 2011
DESCRIPTION
If the rear LH side manual up/down function does not operate, a malfunction may be present in the rear power window regulator motor assembly LH*1 or rear door window regulator sub-assembly LH*2, rear power window regulator switch assembly LH, power window regulator master switch assembly or wire harness.- *1: w/o Regulator
- *2: w/ Regulator
WIRING DIAGRAM
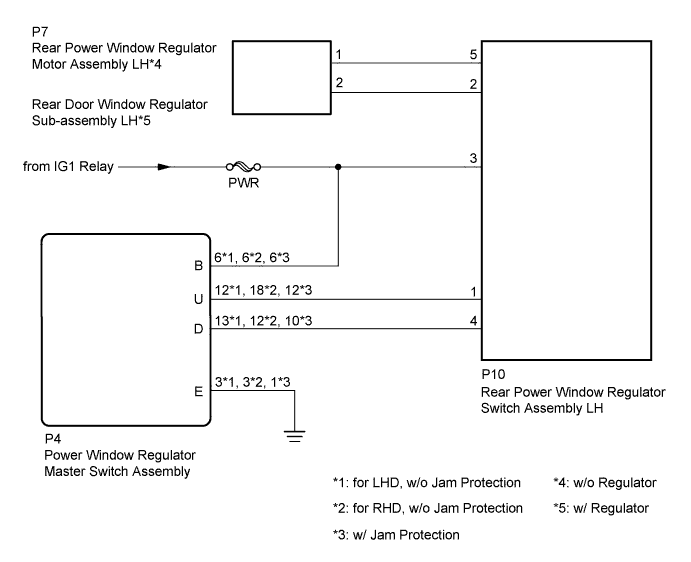

INSPECTION PROCEDURE
- NOTICE:
- Inspect the fuses for circuits related to this system before performing the following inspection procedure.
| 1. CHECK HARNESS AND CONNECTOR (REAR POWER WINDOW REGULATOR SWITCH ASSEMBLY LH - BATTERY) |

Disconnect the P10 rear power window regulator switch assembly LH connector.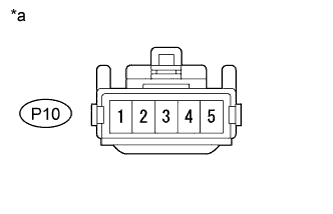
Measure the voltage according to the value(s) in the table below.
- Standard Voltage:
Tester Connection
Switch Condition
Specified Condition
P10-3 - Body ground
Ignition switch ON
11 to 14 V
Ignition switch off
Below 1 V
Text in Illustration *a
Front view of wire harness connector
(to Rear Power Window Regulator Switch Assembly LH)
|
|
||||

| OK | |
 |
| 2. INSPECT REAR POWER WINDOW REGULATOR SWITCH ASSEMBLY LH |
Remove the rear power window regulator switch assembly LH.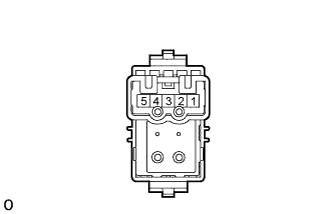
Measure the resistance according to the value(s) in the table below.
- Standard Resistance:
Tester Connection
Switch Condition
Specified Condition
5 - 4
2 - 3
UP
Below 1 Ω
5 - 4
2 - 1
OFF
Below 1 Ω
5 - 3
2 - 1
DOWN
Below 1 Ω
|
|
||||
| OK | |
|
| 3. CHECK HARNESS AND CONNECTOR (REAR POWER WINDOW REGULATOR SWITCH ASSEMBLY LH - REAR POWER WINDOW REGULATOR MOTOR ASSEMBLY LH) |
Disconnect the P10 rear power window regulator switch assembly LH connector.
w/o Regulator:
Disconnect the P7 rear power window regulator motor assembly LH connector.
w/ Regulator:
Disconnect the P7 rear door window regulator sub-assembly LH connector.
Measure the resistance according to the value(s) in the table below.
- Standard Resistance:
Tester Connection
Condition
Specified Condition
P10-5 - P7-1
Always
Below 1 Ω
P10-2 - P7-2
Always
Below 1 Ω
P10-5 or P7-1- Body ground
Always
10 kΩ or higher
P10-2 or P7-2- Body ground
Always
10 kΩ or higher
|
|
||||
| OK | |
|
| 4. INSPECT REAR POWER WINDOW REGULATOR MOTOR ASSEMBLY LH OR REAR DOOR WINDOW REGULATOR SUB-ASSEMBLY LH |
w/o Regulator:
Remove the rear power window regulator motor assembly LH .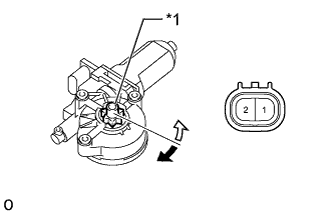
Apply battery voltage to connector terminals 1 and 2.
Check that the motor gear rotates smoothly as follows.
- OK:
Measurement Condition
Specified Condition
Battery positive (+) → 2
Battery negative (-) → 1
Motor gear rotates clockwise
Battery positive (+) → 1
Battery negative (-) → 2
Motor gear rotates counterclockwise
Text in Illustration *1
Motor Gear

Clockwise

Counterclockwise
w/ Regulator: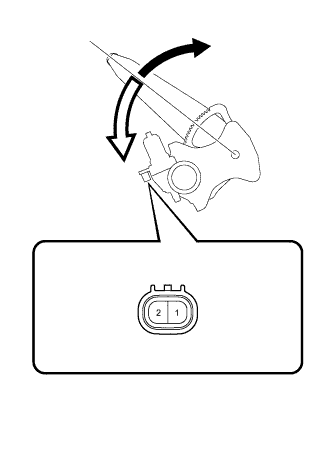
Remove the rear door window regulator sub-assembly LH.
Apply battery voltage to connector terminals 1 and 2.
Check that the arm of window regulator rotates smoothly as follows.
- OK:
Measurement Condition
Specified Condition
Battery positive (+) → 2
Battery negative (-) → 1
Arm of window regulator rotates clockwise (Up)
Battery positive (+) → 1
Battery negative (-) → 2
Arm of window regulator rotates counterclockwise (Down)
Text in Illustration
Up
Down
| Result |
Proceed to |
| OK |
A |
| NG (w/o Regulator) |
B |
| NG (w/ Regulator) |
C |
|
|
||||
|
|
||||
| A | |
|
| 5. CHECK HARNESS AND CONNECTOR (POWER WINDOW REGULATOR MASTER SWITCH ASSEMBLY - REAR POWER WINDOW REGULATOR SWITCH ASSEMBLY LH) |
Disconnect the P4 power window regulator master switch assembly connector.
Disconnect the P10 rear power window regulator switch assembly LH connector.
Measure the resistance according to the value(s) in the table below.
- Standard Resistance:
for LHD, w/o Jam Protection Tester Connection
Condition
Specified Condition
P4-12 (U) - P10-1
Always
Below 1 Ω
P4-13 (D) - P10-4
Always
Below 1 Ω
P4-12 (U) or P10-1 - Body ground
Always
10 kΩ or higher
P4-13 (D) or P10-4 - Body ground
Always
10 kΩ or higher
for RHD, w/o Jam Protection Tester Connection
Condition
Specified Condition
P4-18 (U) - P10-1
Always
Below 1 Ω
P4-12 (D) - P10-4
Always
Below 1 Ω
P4-18 (U) or P10-1 - Body ground
Always
10 kΩ or higher
P4-12 (D) or P10-4 - Body ground
Always
10 kΩ or higher
w/ Jam Protection Tester Connection
Condition
Specified Condition
P4-12 (U) - P10-1
Always
Below 1 Ω
P4-10 (D) - P10-4
Always
Below 1 Ω
P4-12 (U) or P10-1 - Body ground
Always
10 kΩ or higher
P4-10 (D) or P10-4 - Body ground
Always
10 kΩ or higher
|
|
||||
| OK | ||
 |
||
| ||