PTC Heater Circuit
Circuit diagnosis · Vehicles built Jun 2011 – Jul 2012
Versions by build date: Jun 2011 – Jul 2012 Aug 2012 – Jul 2013 from Aug 2013
DESCRIPTION
PTC heater relays are closed in accordance with signals from the air conditioning amplifier assembly and power is supplied to the quick heater assembly installed on the radiator heater unit.WIRING DIAGRAM
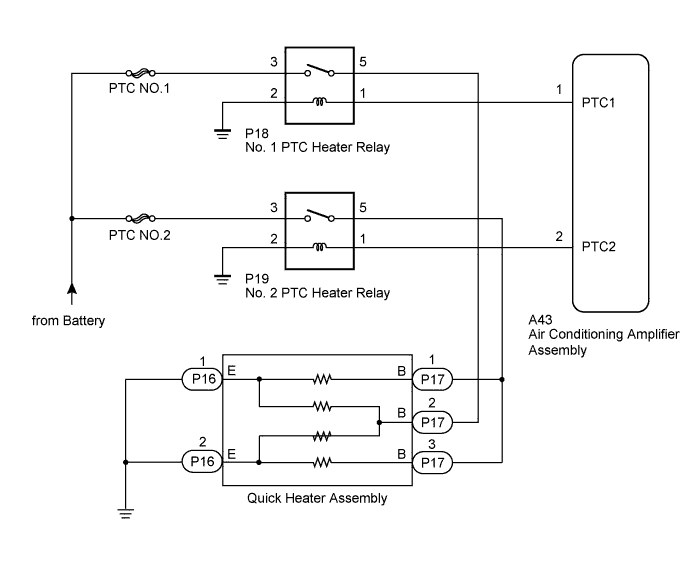

INSPECTION PROCEDURE
- NOTICE:
- Inspect the fuses for circuits related to this system before performing the following inspection procedure.
| 1. INSPECT NO. 1 PTC HEATER RELAY AND NO. 2 PTC HEATER RELAY |

Remove the No. 1 PTC heater relay and No. 2 PTC heater relay (Click here).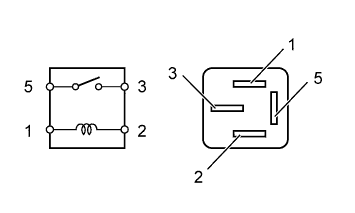
Measure the resistance according to the value(s) in the table below.
- Standard Resistance:
Tester Connection
Condition
Specified Condition
3 - 5
Battery voltage is not applied between terminals 1 and 2
10 kΩ or higher
Battery voltage is applied between terminals 1 and 2
Below 1 Ω
|
|
||||

| OK | |
 |
| 2. CHECK HARNESS AND CONNECTOR (PTC HEATER RELAY - AIR CONDITIONING AMPLIFIER AND BODY GROUND) |
Disconnect the P18 No. 1 PTC heater relay connector.
Disconnect the P19 No. 2 PTC heater relay connector.
Disconnect the A43 air conditioning amplifier assembly connector.
Measure the resistance according to the value(s) in the table below.
- Standard Resistance:
Tester Connection
Condition
Specified Condition
P18-1 - A43-1 (PTC1)
Always
Below 1 Ω
P19-1 - A43-2 (PTC2)
P18-1 - Body ground
Always
10 kΩ or higher
P19-1 - Body ground
P18-2 - Body ground
Always
Below 1 Ω
P19-2 - Body ground
|
|
||||
| OK | |
|
| 3. CHECK AIR CONDITIONING AMPLIFIER ASSEMBLY |
Remove the air conditioning amplifier assembly with its connectors still connected (Click here).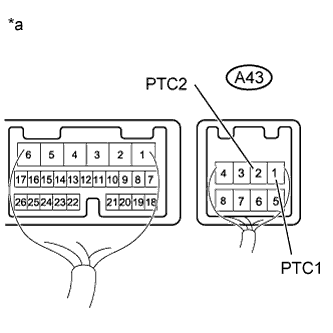
Measure the voltage according to the value(s) in the table below.
- Standard Voltage:
Tester Connection
Condition
Specified Condition
A43-1 (PTC1) - Body ground
- Engine idling
- Temperature switch MAX COLD to MAX HOT
- Coolant temperature 65°C (149°F) or less
- Ambient temperature 10°C (50°F) or less
- Headlight dimmer switch not in head position
- Generator is operating
- Blower switch on (Lo level)
- Heater switch assembly on
11 to 14 V
- Engine idling
- Temperature switch MAX COLD to MAX HOT
- Coolant temperature 65°C (149°F) or less
- Ambient temperature 10°C (50°F) or less
- Headlight dimmer switch not in head position
- Generator is operating
- Blower switch on (Lo level)
- Heater switch assembly off
Below 1 V
A43-2 (PTC2) - Body ground
- Engine idling
- Temperature switch MAX COLD to MAX HOT
- Coolant temperature 65°C (149°F) or less
- Ambient temperature 10°C (50°F) or less
- Headlight dimmer switch not in head position
- Generator is operating
- Blower switch on (Lo level)
- Heater switch assembly on
11 to 14 V
- Engine idling
- Temperature switch MAX COLD to MAX HOT
- Coolant temperature 65°C (149°F) or less
- Ambient temperature 10°C (50°F) or less
- Headlight dimmer switch not in head position
- Generator is operating
- Blower switch on (Lo level)
- Heater switch assembly off
Below 1 V
- Engine idling
Text in Illustration *a
Component with harness connected
(Air Conditioning Amplifier Assembly)
|
|
||||
| OK | |
|
| 4. CHECK HARNESS AND CONNECTOR (PTC HEATER RELAY - BATTERY) |
Disconnect the P18 No. 1 PTC heater relay connector.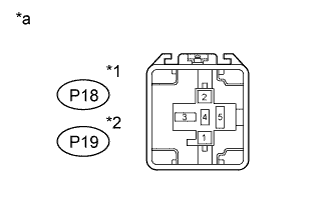
Disconnect the P19 No. 2 PTC heater relay connector.
Measure the voltage according to the value(s) in the table below.
- Standard Voltage:
Tester Connection
Condition
Specified Condition
P18-3 - Body ground
Always
11 to 14 V
P19-3 - Body ground
| *1 |
for No. 1 PTC Heater Relay |
| *2 |
for No. 2 PTC Heater Relay |
| *a |
Front view of wire harness connector (to No. 1 PTC Heater Relay or No. 2 PTC Heater Relay) |
|
|
||||
| OK | |
|
| 5. CHECK HARNESS AND CONNECTOR (PTC HEATER RELAY - QUICK HEATER) |
Disconnect the P18 No. 1 PTC heater relay connector.
Disconnect the P19 No. 2 PTC heater relay connector.
Disconnect the P16 and P17 quick heater assembly connector.
Measure the resistance according to the value(s) in the table below.
- Standard Resistance:
Tester Connection
Condition
Specified Condition
P19-5 - P17-1 (B)
Always
Below 1 Ω
P19-5 - P17-3 (B)
P18-5 - P17-2 (B)
P18-5 - Body ground
Always
10 kΩ or higher
P18-5 - Body ground
P16-1 (E) - Body ground
Always
Below 1 Ω
P16-2 (E) - Body ground
|
|
||||
| OK | |
|
| 6. INSPECT QUICK HEATER ASSEMBLY |
Remove the quick heater assembly (Click here).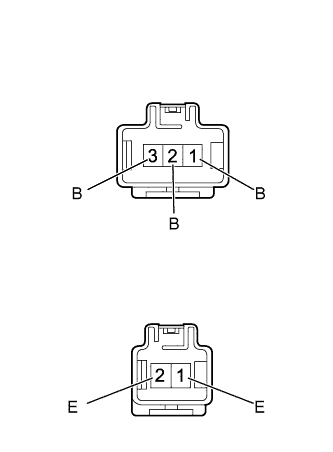
Measure the resistance according to the value(s) in the table below.
- Standard Resistance:
Tester Connection
Condition
Specified Condition
1 (B) - 1 (E)
Always
Below 1 kΩ
2 (B) - 1 (E)
2 (B) - 2 (E)
3 (B) - 2 (E)
|
|
||||
| OK | ||
 |
||
| ||