Brake Warning Light Remains ON
Circuit diagnosis · Vehicles built from Aug 2014
Versions by build date: Jun 2011 – Oct 2011 Nov 2011 – Mar 2012 Apr 2012 – Jul 2012 Aug 2012 – Jul 2013 Aug 2013 – Jul 2014 from Aug 2014
DESCRIPTION
When one of the following conditions is met, the brake warning light remains on:- The skid control ECU (brake actuator assembly) connector is disconnected from the skid control ECU (brake actuator assembly).
- The brake fluid level is insufficient.
- The parking brake is applied.
- The vacuum inside the brake booster decreases.
- There is an open circuit in the harness between the combination meter and the skid control ECU (brake actuator assembly).
- EBD operation has been disabled.
WIRING DIAGRAM
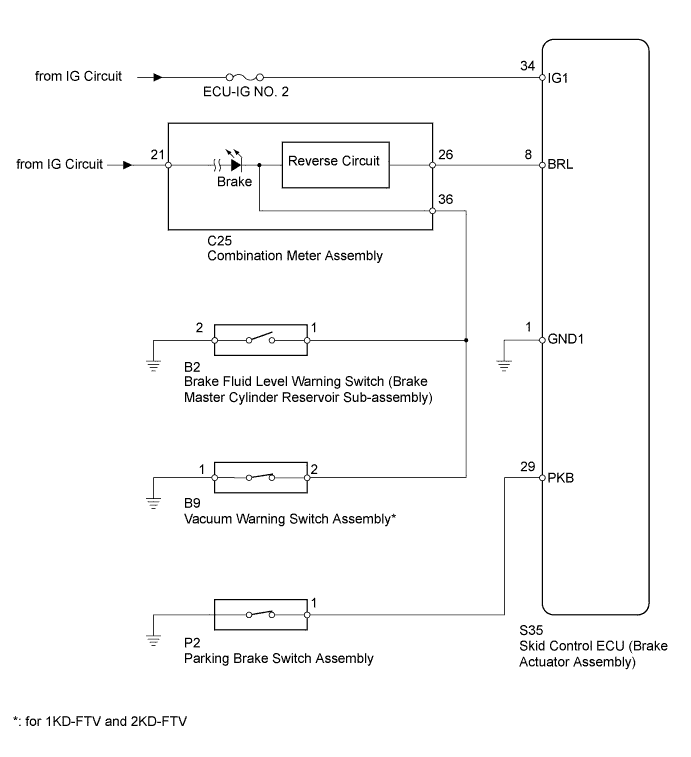

INSPECTION PROCEDURE
- NOTICE:
- After replacing the brake actuator assembly, perform calibration (Click here).
- Inspect the fuses for circuits related to this system before performing the following inspection procedure.
- Before disconnecting the connector, make sure that there are no problems with the connection.
- After disconnecting the connector, make sure that the connector case and terminals are not deformed or corroded.
- After replacing the brake actuator assembly, perform calibration (Click here).
| 1. CHECK FOR DTC |

Check for DTCs (Click here).
Result Result
Proceed to
DTC is not output
A
DTC is output
B
|
|
||||

| A | |
 |
| 2. CHECK IF SKID CONTROL ECU CONNECTOR IS SECURELY CONNECTED |
Check if the skid control ECU (brake actuator assembly) connector is securely connected.
- OK:
- The connector is securely connected.
|
|
||||
| OK | |
|
| 3. CHECK TERMINAL VOLTAGE (IG1 TERMINAL) |
Turn the ignition switch off.
Disconnect the skid control ECU (brake actuator assembly) connector.
Measure the voltage according to the value(s) in the table below.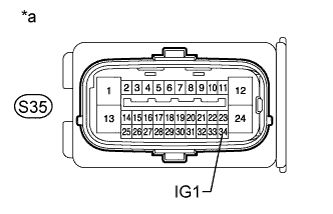
- Standard Voltage:
Tester Connection
Switch Condition
Specified Condition
S35-34 (IG1) - Body ground
Ignition switch ON
11 to 14 V
Text in Illustration *a
Front view of wire harness connector
(to Skid Control ECU [Brake Actuator Assembly])
|
|
||||
| OK | |
|
| 4. CHECK HARNESS AND CONNECTOR (GND1 TERMINAL) |
Turn the ignition switch off.
Disconnect the skid control ECU (brake actuator assembly) connector.
Measure the resistance according to the value(s) in the table below.
- Standard Resistance:
Tester Connection
Condition
Specified Condition
S35-1 (GND1) - Body ground
Always
Below 1 Ω
|
|
||||
| OK | |
|
| 5. CHECK BRAKE BOOSTER ASSEMBLY |
Check the brake booster assembly (Click here).
|
|
||||
| OK | |
|
| 6. INSPECT BRAKE FLUID LEVEL WARNING SWITCH |
Turn the ignition switch to ON.
With the brake fluid at the specified level, disconnect the brake fluid level warning switch (brake master cylinder reservoir sub-assembly) connector and check the brake warning light.
Result Result
Proceed to
Brake warning light turns off
A
Brake warning light does not turn off
for 1KD-FTV and 2KD-FTV
B
except for 1KD-FTV and 2KD-FTV
C
- HINT:
- If the brake warning light turns off, the brake fluid level warning switch (brake master cylinder reservoir sub-assembly) has an internal short circuit.
|
|
||||
|
|
||||

| A | ||
 |
||
| ||
| 7. CHECK VACUUM WARNING SWITCH ASSEMBLY |
Start the engine.
Idle the engine.
Disconnect the vacuum warning switch connector and check the brake warning light.
Result Result
Proceed to
Brake warning light does not turn off
A
Brake warning light turns off
B
- HINT:
- If the brake warning light turns off, the vacuum warning switch has an internal short circuit.
|
|
||||
| A | |
|
| 8. INSPECT PARKING BRAKE SWITCH ASSEMBLY |
Turn the ignition switch off.
Remove the parking brake switch.
Measure the resistance according to the value(s) in the table below.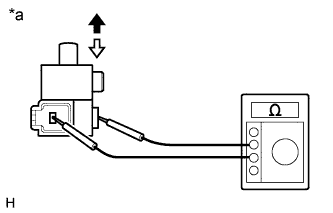
Standard Resistance Tester Connection
Switch Condition
Specified Condition
Switch connector terminal - Switch body
On (Shaft is not pressed)
Below 1 Ω
Off (Shaft is pressed)
10 kΩ or higher
Text in Illustration *a
Component without harness connected
(Parking Brake Switch Assembly)

On

Off
|
|
||||
| OK | |
|
| 9. CHECK HARNESS AND CONNECTOR (SKID CONTROL ECU - COMBINATION METER AND PARKING BRAKE SWITCH) |
Turn the ignition switch off.
Disconnect the skid control ECU (brake actuator assembly) connector.
Disconnect the C25 combination meter connector.
Disconnect the parking brake switch connector.
Measure the resistance according to the value(s) in the table below.
- Standard Resistance:
Tester Connection
Condition
Specified Condition
S35-8 (BRL) - C25-26
Always
Below 1 Ω
S35-8 (BRL) - Body ground
Always
10 kΩ or higher
S35-29 (PKB) - P2-1
Always
Below 1 Ω
S35-29 (PKB) - Body ground
Always
10 kΩ or higher
|
|
||||
| OK | |
|
| 10. CHECK HARNESS AND CONNECTOR (COMBINATION METER - BODY GROUND) |
Turn the ignition switch off.
Disconnect the C25 combination meter connector.
Disconnect the skid control ECU (brake actuator assembly) connector.
Disconnect the brake fluid level warning switch (brake master cylinder reservoir assembly) connector.
Disconnect the vacuum warning switch connector.
Measure the resistance according to the value(s) in the table below.
- Standard Resistance:
Tester Connection
Condition
Specified Condition
C25-36 - Body ground
Always
10 kΩ or higher
|
|
||||
| OK | |
|
| 11. PERFORM ACTIVE TEST USING INTELLIGENT TESTER (BRAKE WARNING LIGHT) |
Turn the ignition switch off.
Connect the intelligent tester to the DLC3.
Turn the ignition switch to ON.
Turn the intelligent tester on.
Enter the following menus: Chassis / ABS/VSC/TRC / Active Test.
ABS/VSC/TRC Tester Display
Test Part
Control Range
Diagnostic Note
Brake Warning Light
Brake warning light
Warning light ON / OFF
Observe the combination meter.
When performing the Brake Warning Light Active Test, check Brake Warning Light in the Data List.
ABS/VSC/TRC Tester Display
Measurement Item / Range
Normal Condition
Diagnostic Note
Brake Warning Light
Brake warning light /
ON or OFF
ON: Brake warning light on
OFF: Brake warning light off
-
Result Result
Proceed to
Data List Display
Data List Display When Performing Active Test ON/OFF Operation
ON
Does not change between ON and OFF
for LHD
A
Does not change between ON and OFF
for RHD
B
Changes between ON and OFF
C
OFF
Does not change between ON and OFF
for LHD
A
Does not change between ON and OFF
for RHD
B
Changes between ON and OFF
C
|
|
||||
|
|
||||
| A | ||
|
||
| ||