INSTALLATION
Removal / installation · Vehicles built Jun 2011 – Jul 2012
Versions by build date: Jun 2011 – Jul 2012 Aug 2012 – Jul 2013 from Aug 2013
| 1. INSTALL NO. 1 COOLER WIRE |

Install the No. 1 cooler wire to the air conditioning amplifier assembly as shown in the illustration.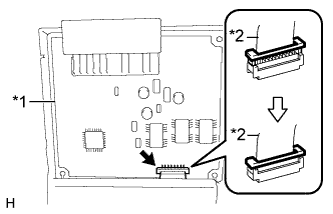

Text in Illustration *1
Air Conditioning Amplifier Assembly
*2
No. 1 Cooler Wire
| 2. INSTALL HEATER CONTROL BASE |
Attach the 4 claws to install the heater control base.
| 3. CONNECT NO. 1 COOLER WIRE |
Connect the connector as shown in the illustration.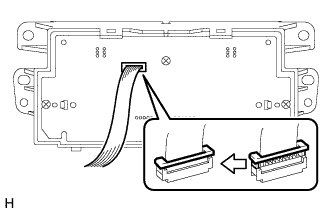
| 4. INSTALL LOWER HEATER CONTROL BASE |
Attach the 3 claws to the lower heater control base.
Install the 4 screws.
Install the 4 screws.
| 5. INSTALL CENTER INSTRUMENT CLUSTER FINISH PANEL ASSEMBLY |
for Manual Air Conditioning System:
Connect the connectors.
Attach the 4 claws to connect the air conditioner control.
Attach the 10 claws and 4 clips to install the center instrument cluster finish panel.
for Automatic Air Conditioning System:
Connect the connectors.
Attach the 8 claws and 4 clips to install the center instrument cluster finish panel.
| 6. CONNECT CABLE TO NEGATIVE BATTERY TERMINAL |
- NOTICE:
- When disconnecting the cable, some systems need to be initialized after the cable is reconnected (Click here).