1KD-FTV ENGINE CONTROL ECD SYSTEM(for i-ART) P052F Glow Plug Control Module System Voltage P0683 Glow Plug Control Module to PCM Communication Circuit
DESCRIPTION
The glow system consists of the glow plug controller, glow plugs and ECM. The glow plug controller turns on the glow plug of each cylinder according to the duty command signal from the ECM in order to maintain optimal engine temperatures. The glow plugs can be controlled according to the engine coolant temperature at engine start by using duty signals. This helps induce ignition under low temperatures and prevent rough idle after starting the engine.
The glow plug controller contains a self-diagnosis function. When the glow plug controller detects an internal malfunction, it sends a signal indicating the malfunction to the ECM. When the ECM receives this signal, it stores a DTC.
| DTC No. | Detection Item | DTC Detection Condition | Trouble Area | MIL | Memory |
|---|---|---|---|---|---|
| P052F | Glow Plug Control Module System Voltage | The glow plug controller recognizes the battery voltage as being 18.4 V or higher 3 times or more when the glow plugs are on (2 trip detection logic). | Glow plug controller | - | DTC stored |
| P0683 | Glow Plug Control Module to PCM Communication Circuit | When the glow plugs are on, the ECM detects that there is no output from the glow plug control unit for 3 seconds even though the ECM outputs an SI signal ("ON" command signal) (1 trip detection logic). | ·
Open or short circuit in ground wire ·
Open or short circuit in battery wire ·
Open in SI wire ·
SI wire short circuit to ground or battery ·
Open in DI wire ·
DI wire short circuit to ground or battery ·
Low battery voltage ·
Glow plug controller ·
ECM |
- | DTC stored |
CONFIRMATION DRIVING PATTERN
| DTC Detection Drive Pattern | Enter check mode |
WIRING DIAGRAM
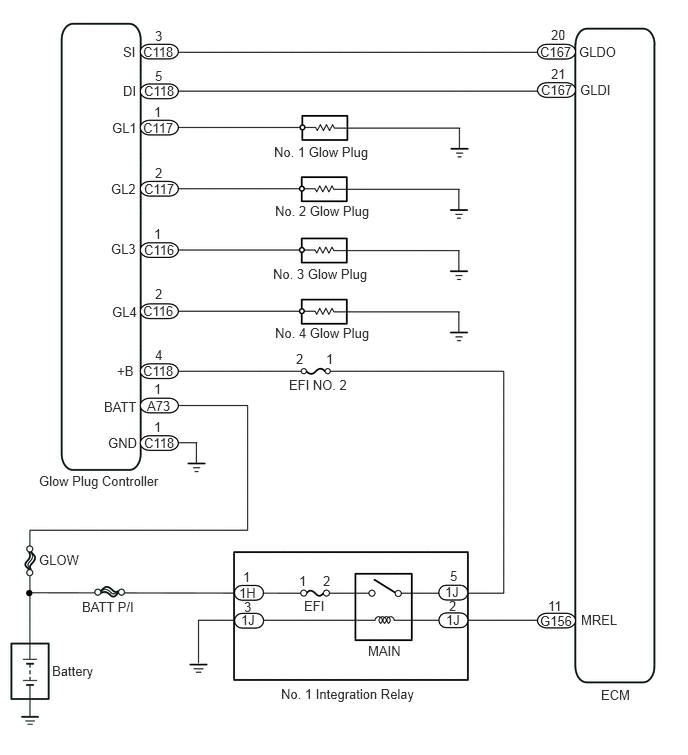
CAUTION / NOTICE / HINT
- NOTICE:
- ·
Inspect the fuses of circuits related to this system before performing the following inspection procedure.
·After replacing the ECM, the new ECM needs registration (See page Engine / Hybrid System>1KD-FTV ENGINE CONTROL>ECD SYSTEM(for i-ART)>REGISTRATION) and initialization (See page Engine / Hybrid System>1KD-FTV ENGINE CONTROL>ECD SYSTEM(for i-ART)>INITIALIZATION).
- HINT:
-
Read freeze frame data using the GTS. Freeze frame data records the engine condition when malfunctions are detected. When troubleshooting, freeze frame data can help determine if the vehicle was moving or stationary, if the engine was warmed up or not, and other data from the time the malfunction occurred.
PROCEDURE
Connect the GTS to the DLC3.
Turn the ignition switch to ON and turn the GTS on.
Enter the following menus: Powertrain / Engine / Trouble Codes.
- Powertrain > Engine > Trouble Codes
- 50001 61
Read the DTCs.
- Result:
Result Proceed to P0683 is output A P052F is output B
A
B
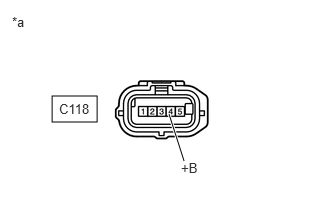
| *a | Front view of wire harness connector
(to Glow Plug Controller) |
Disconnect the glow plug controller connector.
Measure the voltage according to the value(s) in the table below.
- Standard Voltage:
Tester Connection Switch Condition Specified Condition C118-4 (+B) - Body ground Ignition switch ON 11 to 14 V C118-4 (+B) - Body ground Ignition switch off Below 0.5 V
Reconnect the glow plug controller connector.
- Result:
Proceed to OK NG
OK
NG
Disconnect the glow plug controller connector.
Measure the resistance according to the value(s) in the table below.
- Standard Resistance:
Tester Connection Condition Specified Condition C118-1 (GND) - Body ground Always Below 1 Ω
Reconnect the glow plug controller connector.
- Result:
Proceed to OK NG
OK
NG
Disconnect the glow plug controller connector.
Disconnect the ECM connector.
Measure the resistance according to the value(s) in the table below.
- Standard Resistance:
Tester Connection Condition Specified Condition C118-3 (SI) - C167-20 (GLDO) Always Below 1 Ω C118-5 (DI) - C167-21 (GLDI) Always Below 1 Ω C118-3 (SI) or C167-20 (GLDO) - Body ground Always 10 kΩ or higher C118-5 (DI) or C167-21 (GLDI) - Body ground Always 10 kΩ or higher
Reconnect the glow plug controller connector.
Reconnect the ECM connector.
- Result:
Proceed to OK NG
OK
NG
Replace the glow plug controller.
Click hereEngine / Hybrid System>1KD-FTV STARTING>GLOW PLUG CONTROLLER(w/ Glow Plug Controller)>REMOVAL
- Result:
Proceed to NEXT
NEXT
Connect the GTS to the DLC3.
Clear the DTCs.
Click hereEngine / Hybrid System>1KD-FTV ENGINE CONTROL>ECD SYSTEM(for i-ART)>DTC CHECK / CLEAR
- Powertrain > Engine > Clear DTCs
- 50002 61
Turn the ignition switch off for 30 seconds or more.
Turn the ignition switch to ON.
Turn the GTS on.
Using the GTS, switch the ECM from normal mode to check mode.
Click hereEngine / Hybrid System>1KD-FTV ENGINE CONTROL>ECD SYSTEM(for i-ART)>CHECK MODE PROCEDURE
- Powertrain > Engine > Utility
-
Tester Display Check Mode - 50005 61 1
Confirm that the DTC is not output again.
- HINT:
-
Check for DTCs in check mode.
- Result:
Proceed to OK NG
OK
NG
Replace the glow plug controller.
Click hereEngine / Hybrid System>1KD-FTV STARTING>GLOW PLUG CONTROLLER(w/ Glow Plug Controller)>REMOVAL
- Result:
Proceed to NEXT
NEXT
Connect the GTS to the DLC3.
Clear the DTCs.
Click hereEngine / Hybrid System>1KD-FTV ENGINE CONTROL>ECD SYSTEM(for i-ART)>DTC CHECK / CLEAR
- Powertrain > Engine > Clear DTCs
- 50002 61
Turn the ignition switch off for 30 seconds or more.
Turn the ignition switch to ON.
Turn the GTS on.
Using the GTS, switch the ECM from normal mode to check mode.
Click hereEngine / Hybrid System>1KD-FTV ENGINE CONTROL>ECD SYSTEM(for i-ART)>CHECK MODE PROCEDURE
- Powertrain > Engine > Utility
-
Tester Display Check Mode - 50005 61 1
Confirm that the DTC is not output again.
- HINT:
-
Check for DTCs in check mode.
- Result:
Proceed to NEXT
NEXT
Disconnect the glow plug controller connector.
Remove the No. 1 integration relay from the engine room relay block and junction block assembly.
Measure the resistance according to the value(s) in the table below.
- Standard Resistance:
Tester Connection Condition Specified Condition C118-4 (+B) - 1J-5 Always Below 1 Ω C118-4 (+B) or 1J-5 - Body ground Always 10 kΩ or higher
Reconnect the glow plug controller connector.
Reinstall the No. 1 integration relay
- Result:
Proceed to OK NG
OK
NG
Check the charging system and perform repairs as necessary.
Click herePower Source / Network>1KD-FTV BATTERY / CHARGING>CHARGING SYSTEM>ON-VEHICLE INSPECTION
- Result:
Proceed to NEXT
NEXT
Repair or replace the harness or connector.
- Result:
Proceed to NEXT
NEXT
Replace the ECM.
Click hereEngine / Hybrid System>1KD-FTV ENGINE CONTROL>ECM>REMOVAL
- Result:
Proceed to NEXT
NEXT
Connect the GTS to the DLC3.
Clear the DTCs.
Click hereEngine / Hybrid System>1KD-FTV ENGINE CONTROL>ECD SYSTEM(for i-ART)>DTC CHECK / CLEAR
- Powertrain > Engine > Clear DTCs
- 50002 61
Turn the ignition switch off for 30 seconds or more.
Turn the ignition switch to ON.
Turn the GTS on.
Using the GTS, switch the ECM from normal mode to check mode.
Click hereEngine / Hybrid System>1KD-FTV ENGINE CONTROL>ECD SYSTEM(for i-ART)>CHECK MODE PROCEDURE
- Powertrain > Engine > Utility
-
Tester Display Check Mode - 50005 61 1
Confirm that the DTC is not output again.
- HINT:
-
Check for DTCs in check mode.
- Result:
Proceed to NEXT
NEXT