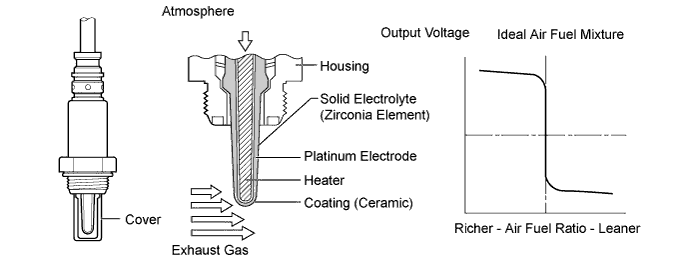
DTC P0136 Oxygen Sensor Circuit Malfunction (Bank 1 Sensor 2) |
DTC P0137 Oxygen Sensor Circuit Low Voltage (Bank 1 Sensor 2) |
DTC P0138 Oxygen Sensor Circuit High Voltage (Bank 1 Sensor 2) |
| DTC No. | DTC Detection Condition | Trouble Area |
| P0136 |
|
|
| P0137 |
|
|
| P0138 |
|
|
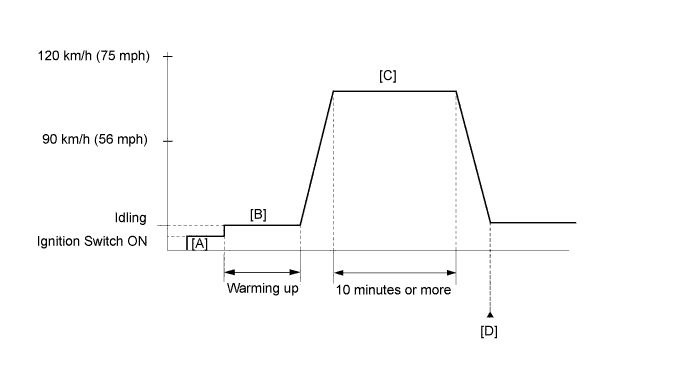
| Intelligent tester Display | Description |
| NORMAL |
|
| ABNORMAL |
|
| INCOMPLETE |
|
| N/A |
|
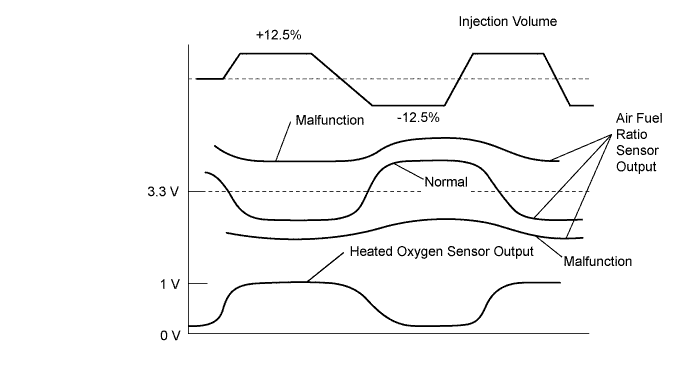
| Tester Display (Sensor) | Injection Volume | Status | Voltage |
| AFS Voltage B1S1 (Air fuel ratio sensor) | +12.5% | Rich | Below 3.1 V |
| AFS Voltage B1S1 (Air fuel ratio sensor) | -12.5% | Lean | Higher than 3.4 V |
| O2S B1S2 (Heated oxygen sensor) | +12.5% | Rich | Higher than 0.55 V |
| O2S B1S2 (Heated oxygen sensor) | -12.5% | Lean | Below 0.4 V |
| Case | Air Fuel Ratio Sensor Output Voltage | Heated Oxygen Sensor Output Voltage | Main Suspected Trouble Area |
| 1 |   |  | - |
| 2 |  | |
|
| 3 | | |
|
| 4 | | |
|
| 1.READ OUTPUT DTC (DTC P0136, P0137 OR P0138) |
Connect the intelligent tester to the DLC3.
Turn the ignition switch to ON.
Turn the tester on.
Enter the following menus: Powertrain / Engine and ECT / DTC.
Read DTCs.
| Result | Proceed to |
| DTC P0138 is output | A |
| DTC P0137 is output | B |
| DTC P0136 is output | C |
| P0136, P0137 or P0138 and other DTCs are output | D |
|
| ||||
|
| ||||
|
| ||||
| A | |
 |
| 2.READ VALUE USING INTELLIGENT TESTER (OUTPUT VOLTAGE OF HEATED OXYGEN SENSOR) |
Connect the intelligent tester to the DLC3.
Turn the ignition switch to ON.
Turn the tester on.
Enter the following menus: Powertrain / Engine and ECT / Data List / A/F Control System / O2S B1S2.
Allow the engine to idle.
Read the heated oxygen sensor output voltage while idling.
| Result | Proceed to |
| Higher than 1.0 V | A |
| Below 1.0 V | B |
|
| ||||
| A | |
|
| 3.INSPECT HEATED OXYGEN SENSOR (CHECK FOR SHORT) |
Inspect the heated oxygen sensor connector (Click here).
Reconnect the heated oxygen sensor connector.
|
| ||||
| OK | |
|
| 4.CHECK HARNESS AND CONNECTOR (CHECK FOR SHORT) |
Disconnect the ECM connector.
Measure the resistance according to the value(s) in the table below.
| Tester Connection | Condition | Specified Condition |
| E22-18 (HT1B) - E22-13 (OX1B) | Always | 10 kΩ or higher |
Reconnect the ECM connector.
|
| ||||
| OK | ||
 | ||
| ||
| 5.PERFORM ACTIVE TEST USING INTELLIGENT TESTER (CONTROL THE INJECTION VOLUME FOR A/F SENSOR) |
Connect the intelligent tester to the DLC3.
Start the engine.
Turn the tester on.
Warm up the engine.
Enter the following menus: Powertrain / Engine / Active Test / Control the Injection Volume for A/F Sensor.
Change the fuel injection volume using the tester and monitor the voltage output of the air fuel ratio sensor and heated oxygen sensor displayed on the tester.
| Tester Display (Sensor) | Voltage Variation | Proceed to |
| AFS Voltage B1S1 (Air fuel ratio sensor) | Alternates between higher than and below 3.3 V | OK |
| AFS Voltage B1S1 (Air fuel ratio sensor) | Remains at higher than 3.3 V | NG |
| AFS Voltage B1S1 (Air fuel ratio sensor) | Remains at below 3.3 V | NG |
|
| ||||
| OK | |
|
| 6.CHECK AIR FUEL RATIO SENSOR |
Connect the intelligent tester to the DLC3.
Turn the ignition switch to ON.
Turn the tester on.
Enter the following menus: Powertrain / Engine and ECT / DTC / Clear.
Clear DTCs.
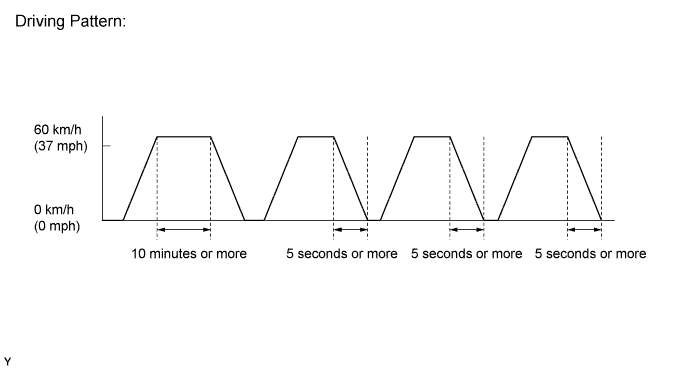
Drive the vehicle according to the driving pattern listed below:
Warm up the engine.
Drive the vehicle at 60 km/h (37 mph) or more for 10 minutes or more.
Stop the vehicle.
Accelerate the vehicle to 60 km/h (37 mph) or more and then decelerate for 5 seconds or more. Repeat this process at least 3 times.
Enter the following menus: Powertrain / Engine and ECT / Data List / A/F Control System / AFS Current B1S1.
Read the value of the air fuel ratio sensor current while the fuel-cut operation is being performed.
| Result | Proceed to |
| Outside standard range | A |
| Within standard range | B |
|
| ||||
|
| ||||
| 7.READ VALUE USING INTELLIGENT TESTER (OUTPUT VOLTAGE OF HEATED OXYGEN SENSOR) |
Connect the intelligent tester to the DLC3.
Turn the ignition switch to ON.
Turn the tester on.
Start the engine.
Enter the following menu items: Powertrain / Engine and ECT / Active Test / Control the Injection Volume for A/F Sensor.
Change the fuel injection volume using the tester, and monitor the voltage output of the heated oxygen sensor displayed on the tester.
| Tester Display (Sensor) | Voltage Variation | Proceed to |
| O2S B1S2 (Heated oxygen sensor) | Alternates between 0.5 V or more and less than 0.4 V | OK |
| Remains at 0.5 V or more | NG | |
| Remains at less than 0.4 V | NG |
|
| ||||
| OK | |
|
| 8.PERFORM ACTIVE TEST USING INTELLIGENT TESTER (CONTROL THE INJECTION VOLUME FOR A/F SENSOR) |
Connect the intelligent tester to the DLC3.
Start the engine.
Turn the tester on.
Warm up the engine.
Enter the following menus: Powertrain / Engine / Active Test / Control the Injection Volume for A/F Sensor.
Change the fuel injection volume using the tester and monitor the voltage output of the air fuel ratio sensor and heated oxygen sensor displayed on the tester.
| Tester Display (Sensor) | Voltage Variation | Proceed to |
| AFS Voltage B1S1 (Air fuel ratio sensor) | Alternates between higher than and below 3.3 V | OK |
| AFS Voltage B1S1 (Air fuel ratio sensor) | Remains at higher than 3.3 V | NG |
| AFS Voltage B1S1 (Air fuel ratio sensor) | Remains at below 3.3 V | NG |
|
| ||||
| OK | ||
| ||
| ||
| 9.CHECK FOR EXHAUST GAS LEAK |
Check for exhaust gas leakage.
|
| ||||
| OK | |
|
| 10.INSPECT HEATED OXYGEN SENSOR (HEATER RESISTANCE) |
Inspect the heated oxygen sensor (Click here).
|
| ||||
| OK | |
|
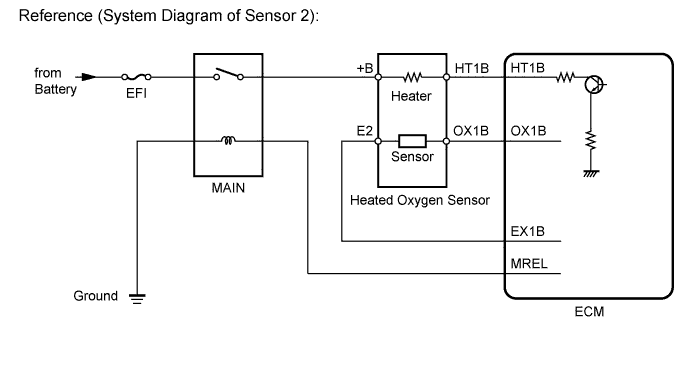
| 11.CHECK HARNESS AND CONNECTOR (HEATED OXYGEN SENSOR - ECM) |
Disconnect the heated oxygen sensor connector.
Disconnect the ECM connector.
Measure the resistance according to the value(s) in the table below.
| Tester Connection | Condition | Specified Condition |
| H5-1 (HT1B) - E22-18 (HT1B) | Always | Below 1 Ω |
| H5-3 (OX1B) - E22-13 (OX1B) | Always | Below 1 Ω |
| H5-4 (E2) - E22-14 (EX1B) | Always | Below 1 Ω |
| Tester Connection | Condition | Specified Condition |
| H5-1 (HT1B) or E22-18 (HT1B) - Body ground | Always | 10 kΩ or higher |
| H5-3 (OX1B) or E22-13 (OX1B) - Body ground | Always | 10 kΩ or higher |
| H5-4 (E2) or E22-14 (EX1B) - Body ground | Always | 10 kΩ or higher |
Reconnect the heated oxygen sensor connector.
Reconnect the ECM connector.
|
| ||||
| OK | |
|
| 12.REPLACE HEATED OXYGEN SENSOR |
Replace the heated oxygen sensor (Click here).
| NEXT | |
|
| 13.PERFORM CONFIRMATION DRIVING PATTERN |
| NEXT | |
|
| 14.CHECK WHETHER DTC OUTPUT RECURS (DTC P0136, P0137 OR P0138) |
Connect the intelligent tester to the DLC3.
Turn the ignition switch to ON.
Turn the tester on.
Enter the following menus: Powertrain / Engine and ECT / Utility / All Readiness.
Input DTCs: P0136, P0137 and P0138.
Check that DTC monitor is NORMAL. If DTC monitor is INCOMPLETE, perform the driving pattern by accelerating the vehicle to a higher speed and using second gear to decelerate the vehicle.
| Result | Proceed to |
| NORMAL (No DTC output) | A |
| ABNORMAL (DTC P0136, P0137 or P0138 output) | B |
|
| ||||
| A | ||
| ||
| ||
| 15.REPLACE AIR FUEL RATIO SENSOR |
Replace the air fuel ratio sensor (Click here).
| NEXT | |
|
| 16.PERFORM CONFIRMATION DRIVING PATTERN |
| NEXT | |
|
| 17.CHECK WHETHER DTC OUTPUT RECURS (DTC P0136, P0137 OR P0138) |
Connect the intelligent tester to the DLC3.
Turn the ignition switch to ON.
Turn the tester on.
Enter the following menus: Powertrain / Engine and ECT / Utility / All Readiness.
Input DTCs: P0136, P0137 and P0138.
Check that DTC monitor is NORMAL. If DTC monitor is INCOMPLETE, perform the driving pattern by accelerating the vehicle to a higher speed and using the second gear to decelerate the vehicle.
| Result | Proceed to |
| NORMAL (No DTC output) | A |
| ABNORMAL (DTC P0136, P0137 or P0138 output) | B |
|
| ||||
| A | ||
| ||
| ||

