Install the instrument panel reinforcement with the 8 bolts.
- Torque:
- for bolt A:
- 20 N*m{ 204 kgf*cm , 15 ft.*lbf }
- for bolt B:
- 18 N*m{ 184 kgf*cm , 13 ft.*lbf }
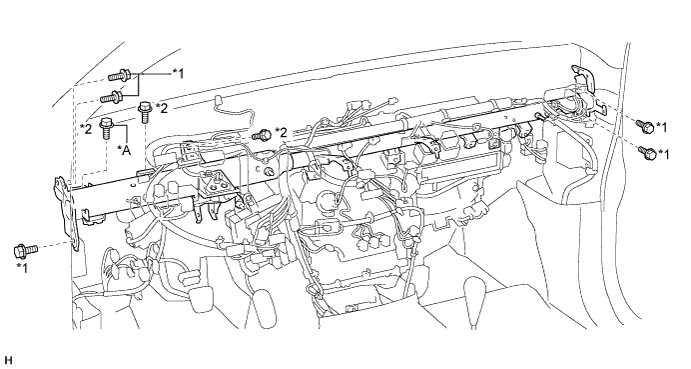
| *A | for Manual Transmission | - | - |
| *1 | Bolt A | *2 | Bolt B |
AIR CONDITIONING UNIT > INSTALLATION |
| 1. INSTALL NO. 3 AIR DUCT |
Attach the 2 claws to install the No. 3 air duct.
| 2. TEMPORARILY INSTALL AIR CONDITIONING UNIT ASSEMBLY |
Temporarily install the air conditioning unit assembly with the bolt and nut.
| 3. INSTALL NO. 1 COOLER UNIT DRAIN HOSE |
Install the No. 1 cooler unit drain hose.
| 4. INSTALL INSTRUMENT PANEL REINFORCEMENT |
Install the instrument panel reinforcement with the 8 bolts.
| *A | for Manual Transmission | - | - |
| *1 | Bolt A | *2 | Bolt B |
Temporarily install the 3 bolts.
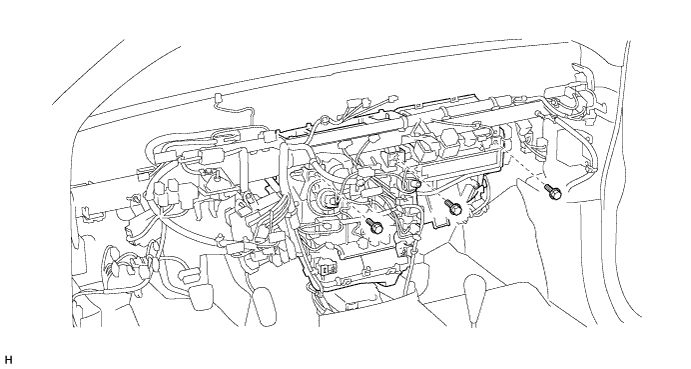
Connect the connectors.
Attach the 12 clamps.
Install the grommet to the vehicle body.
Connect the ground wires to the instrument panel reinforcement with the 2 bolts.
Connect the 2 connectors and attach the 2 clamps.
Connect the connector and attach the 3 clamps.
| 5. INSTALL ECM |
for 1GR-FE:
(Click here)
for 2TR-FE:
(Click here)
for 2TR-FBE:
(Click here)
for 1KD-FTV, w/o Glow Plug Controller:
(Click here)
for 1KD-FTV, w/ Glow Plug Controller:
(Click here)
for 2KD-FTV:
(Click here)
| 6. INSTALL AIR CONDITIONING DUCT SUB-ASSEMBLY (for Automatic Air Conditioning System) |
Attach the 2 claws to install the air conditioning duct sub-assembly.
| 7. INSTALL AIR CONDITIONING UNIT ASSEMBLY |
Tighten the 3 bolts in the order shown in the illustration.
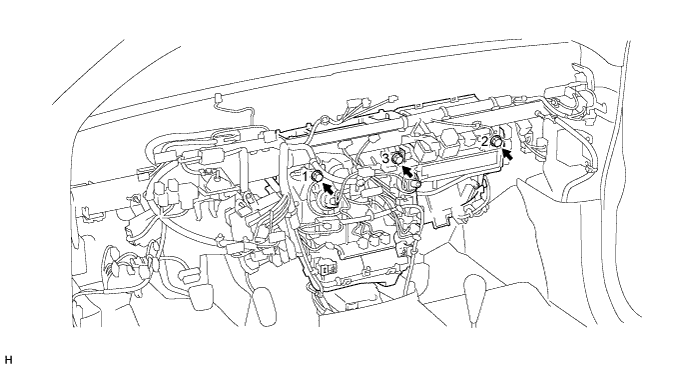
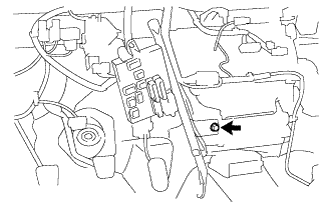 |
Temporarily install the screw.
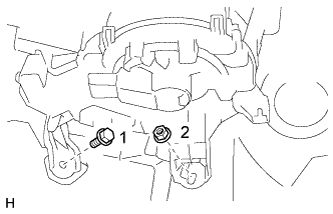 |
Tighten the bolt and nut in the order shown in the illustration.
| 8. INSTALL NO. 1 INSTRUMENT PANEL BRACE SUB-ASSEMBLY |
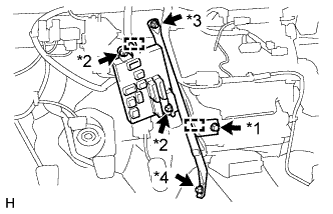 |
Install the driver side junction block with the 2 nuts labeled A.
Connect the connectors.
Attach the 2 clamps.
Install the No. 1 instrument panel brace sub-assembly with the nut labeled B and bolt.
Tighten the screw.
| *1 | Screw |
| *2 | Nut A |
| *3 | Nut B |
| *4 | Bolt |
| 9. INSTALL NO. 4 AIR DUCT |
Attach the 2 claws to install the No. 4 air duct.
| 10. INSTALL NO. 2 AIR DUCT |
Attach the 2 claws to install the No. 2 air duct.
| 11. INSTALL NO. 1 AIR DUCT |
Attach the 2 claws to install the No. 1 air duct.
| 12. INSTALL STEERING COLUMN ASSEMBLY |
| 13. INSTALL LOWER INSTRUMENT PANEL SUB-ASSEMBLY |
| 14. INSTALL DEFROSTER NOZZLE ASSEMBLY |
Attach the 4 clips to install the defroster nozzle assembly.
| 15. INSTALL NO. 3 HEATER TO REGISTER DUCT |
Attach the 4 claws to install the No. 3 heater to register duct.
Install the clip.
| 16. INSTALL NO. 1 HEATER TO REGISTER DUCT |
Attach the 3 claws to install the No. 1 heater to register duct.
Install the clip.
| 17. INSTALL NO. 2 HEATER TO REGISTER DUCT |
Install the No. 2 heater to register duct with the 3 clips.
| 18. INSTALL UPPER INSTRUMENT PANEL SUB-ASSEMBLY |
| 19. CONNECT HEATER WATER OUTLET HOSE |
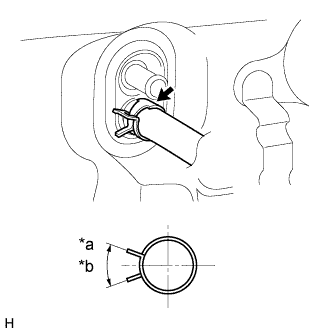 |
Connect the heater water outlet hose and attach the clip.
| *a | Acceptable Range |
| *b | 2 to 40° |
| 20. CONNECT HEATER WATER INLET HOSE |
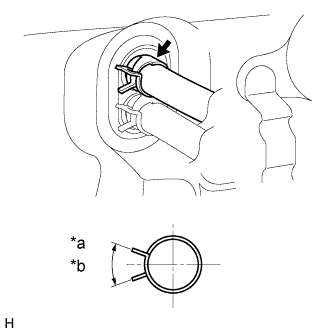 |
Connect the heater water inlet hose and attach the clip.
| *a | Acceptable Range |
| *b | 2 to 40° |
| 21. CONNECT AIR CONDITIONING TUBE AND ACCESSORY ASSEMBLY |
Remove the vinyl tape attached to the air conditioning tube and accessory assembly.
Sufficiently apply compressor oil to a new O-ring and the fitting surface of the air conditioning tube and accessory assembly.
Install the O-ring to the air conditioning tube and accessory assembly.
Connect the air conditioning tube and accessory assembly.
| 22. CONNECT SUCTION HOSE SUB-ASSEMBLY |
Remove the vinyl tape attached to the suction hose sub-assembly.
Sufficiently apply compressor oil to a new O-ring and the fitting surface of the suction hose sub-assembly.
Install the O-ring to the suction hose sub-assembly.
Connect the suction hose sub-assembly and attach the piping clamp.
Install the bolt.
| 23. CONNECT CABLE TO NEGATIVE BATTERY TERMINAL |
| 24. ADD ENGINE COOLANT |
for 1GR-FE:
for 2TR-FE:
for 2TR-FBE:
for 1KD-FTV:
for 2KD-FTV:
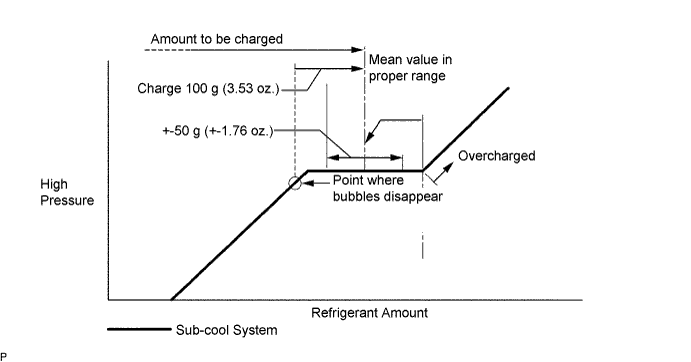
| 25. CHARGE REFRIGERANT |
Perform vacuum purging using a vacuum pump.
Charge refrigerant HFC-134a (R134a).
| 26. WARM UP ENGINE |
Warm up the engine at less than 1,850 rpm for 2 minutes or more after charging refrigerant.
| 27. INSPECT FOR ENGINE COOLANT |
for 1GR-FE:
for 2TR-FE:
for 2TR-FBE:
for 1KD-FTV:
for 2KD-FTV:
| 28. CHECK FOR REFRIGERANT GAS LEAK |
After recharging the refrigerant gas, check for refrigerant gas leakage using a halogen leak detector.
Perform the operation under these conditions:
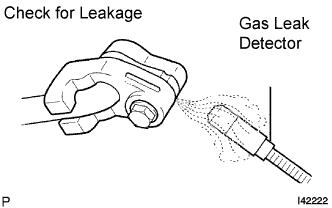 |
Using a gas leak detector, check the refrigerant line for leakage.
If a gas leak is not detected on the drain hose, remove the blower motor control (blower resistor) from the cooling unit. Insert the gas leak detector sensor into the unit and perform the test.
Disconnect the connector and leave the pressure switch on for approximately 20 minutes. Bring the gas leak detector close to the pressure switch and perform the test.
| 29. CHECK SRS WARNING LIGHT |