AUTOMATIC TRANSMISSION ASSEMBLY (for 1KD-FTV) > INSTALLATION |
| 1. INSPECT TORQUE CONVERTER ASSEMBLY |
|
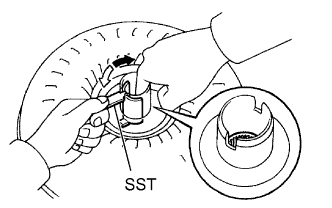
Inspect the 1-way clutch.
Install SST in the inner race of the 1-way clutch.
Press on the serrations of the starter with a finger and rotate it.
Check if it rotates smoothly when turned clockwise and locks when turned counterclockwise.
 | Free |
 | Lock |
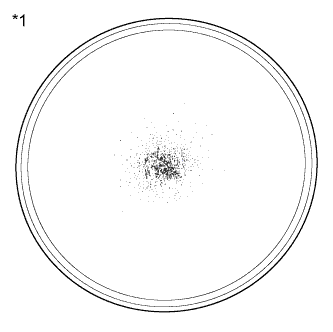 |
Determine the condition of the torque converter clutch.
| *1 | Sample showing maximum allowable amount of powder in ATF |
Check that the following conditions are met:
Replace the ATF in the torque converter clutch.
If the ATF is discolored and/or has a foul odor, stir the ATF in the torque converter clutch thoroughly and drain the ATF with the torque converter facing up.
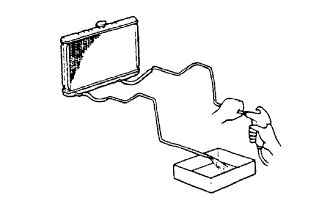 |
Clean and check the oil cooler and oil pipe line.
If the torque converter clutch is inspected or the ATF is replaced, clean the oil cooler and oil pipe line.
If the ATF is cloudy, inspect the oil cooler (radiator).
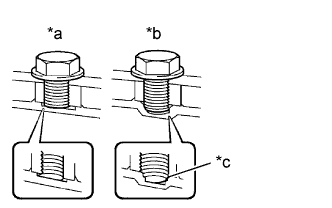 |
Prevent deformation of the torque converter clutch and damage to the oil pump gear.
| *a | Correct |
| *b | Incorrect |
| *c | Bottom is damaged |
When any marks due to interference are found on the end of the bolt for the torque converter clutch and on the bottom of the bolt hole, replace the bolt and torque converter clutch.
All of the bolts should be the same length.
Make sure no spring washers are missing.
| 2. INSTALL TORQUE CONVERTER ASSEMBLY |
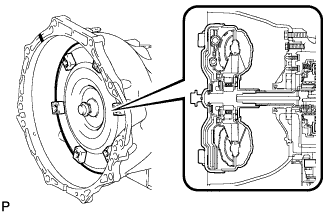 |
Attach the splines of the input shaft and turbine runner.
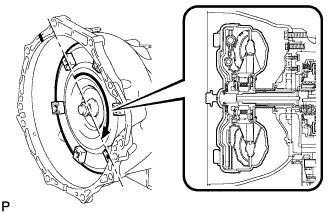 |
Attach the splines of the stator shaft and stator while turning the torque converter assembly.
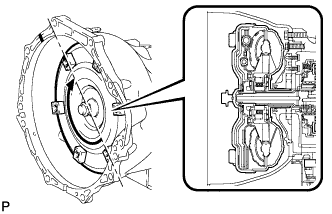 |
Turn the torque converter to engage the key of the oil pump drive gear with the slot on the torque converter assembly.
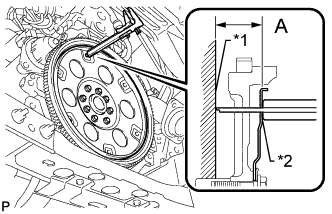 |
Using a vernier caliper and straightedge, measure dimension A between the transmission contact surface of the engine and the torque converter contact surface of the drive plate.
| *1 | Engine Surface |
| *2 | Drive Plate Surface |
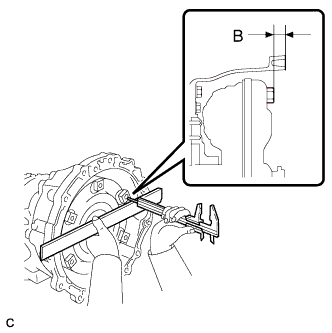 |
Using a vernier caliper and straightedge, measure dimension B shown in the illustration and check that dimension B is more than dimension A, which was measured in the previous step.
| 3. INSTALL TRANSFER ASSEMBLY |
Install the transfer to the transmission.
Install the 2 clamps and 8 bolts.
| 4. INSTALL AUTOMATIC TRANSMISSION ASSEMBLY |
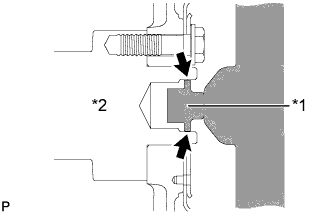 |
Apply clutch spline grease to the surface of the crankshaft that contacts the torque converter centerpiece.
| *1 | Torque Converter Centerpiece |
| *2 | Crankshaft |
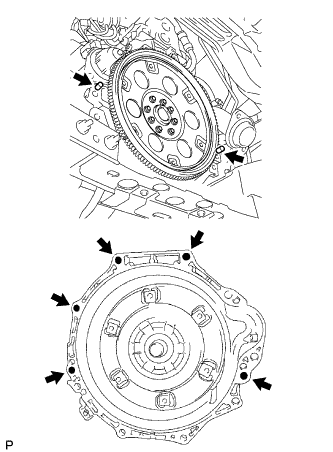 |
Install the transmission to the engine with the 5 bolts.
| 5. INSTALL DRIVE PLATE AND TORQUE CONVERTER SETTING BOLT |
Turn the crankshaft to gain access to the installation locations of the 6 torque converter clutch setting bolts and install each bolt through the hole of the flywheel while holding the crankshaft pulley bolt with a wrench.
| 6. INSTALL STIFFENER PLATE |
Install the No. 2 end plate.
Install the No. 4 cylinder block insulator.
Install the stiffener plate LH to the engine and transmission with the 4 bolts.
Install the stiffener plate RH (with oil cooler tube clamp) to the engine and transmission with the 4 bolts.
| 7. INSTALL STARTER ASSEMBLY |
| 8. CONNECT WIRE HARNESS |
Connect the 8 connectors and attach the 7 clamps.
Connect the wire harness to the automatic transmission housing with the bolt.
Connect the ground cable with the nut.
| 9. INSTALL REAR NO. 1 ENGINE MOUNTING INSULATOR |
Install the engine mounting insulator to the transmission with the 4 bolts.
| 10. INSTALL NO. 3 FRAME CROSSMEMBER SUB-ASSEMBLY |
Connect the ends of the frame crossmember to the vehicle with the 4 bolts and 4 nuts.
Install the No. 3 frame crossmember to the engine mounting insulator with the 4 set bolts.
| 11. INSTALL NO. 1 TRANSMISSION CONTROL CABLE BRACKET |
Install the control cable bracket with the 2 bolts.
| 12. CONNECT TRANSMISSION CONTROL CABLE ASSEMBLY |
Move the shift lever to N.
Turn the control shaft lever clockwise until it stops, and then turn it counterclockwise 2 notches to set it to the N position.
Connect the transmission control cable to the transmission control cable bracket with a new clip, and then connect the cable end to the control shaft lever with the nut.
| 13. CONNECT OIL COOLER TUBE |
Connect the end of the inlet oil cooler tube to the automatic transmission by hand.
Connect the end of the outlet oil cooler tube to the automatic transmission by hand.
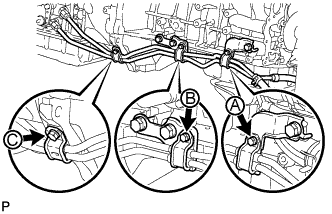 |
Install the 3 clamps with the 3 bolts.
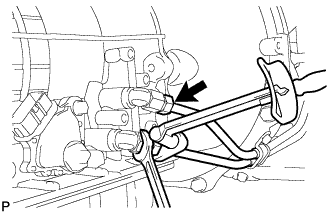 |
Using a union nut wrench, tighten the inlet and outlet tubes.
| 14. INSTALL PROPELLER SHAFT WITH CENTER BEARING ASSEMBLY |
| 15. INSTALL FRONT PROPELLER SHAFT ASSEMBLY |
| 16. INSTALL FRONT EXHAUST PIPE ASSEMBLY |
| 17. INSTALL TRANSFER HIGH AND LOW SHIFT LEVER ASSEMBLY |
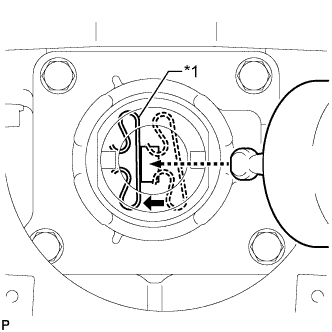 |
While pushing the select return spring to the left with the end of the transfer high and low shift lever, insert the end of the shift lever into the shift fork.
| *1 | Select Return Spring |
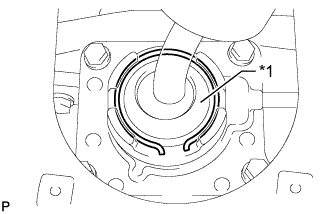 |
While holding down the shift lever cap, install the snap ring to install the transfer high and low shift lever.
| *1 | Shift Lever Cap |
Return the transfer front drive shift boot to its original position.
| 18. INSTALL SHIFT LEVER BOOT ASSEMBLY |
Install the shift lever boot with the 4 screws.
| 19. INSTALL CONSOLE BOX ASSEMBLY |
| 20. ADJUST SHIFT LEVER POSITION |
Adjust the shift lever position (Click here).
| 21. CONNECT CABLE TO NEGATIVE BATTERY TERMINAL |
| 22. ADD TRANSFER OIL |
Remove the case plug (for filler) and gasket.
Pour oil so that the oil level is between 0 to 5.0 mm (0 to 0.197 in.) from the bottom lip of the case plug (for filler) hole.
Wait approximately 5 minutes and check that the oil level has not changed.
Install a new gasket and the case plug (for filler).
| 23. ADD AUTOMATIC TRANSMISSION FLUID |
| 24. INSPECT SHIFT LEVER POSITION |
Inspect the shift lever position (Click here).
| 25. INSPECT FOR EXHAUST GAS LEAK |
| 26. INSTALL NO. 2 ENGINE UNDER COVER |
| 27. INSTALL NO. 1 ENGINE UNDER COVER |