1GR-FE ENGINE CONTROL SFI SYSTEM P0660 Intake Manifold Tuning Valve Control Circuit / Open (Bank 1)
DESCRIPTION
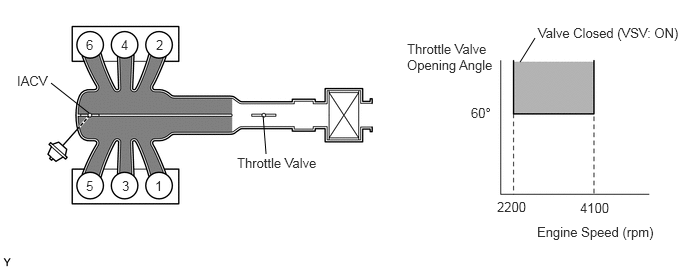
This circuit opens and closes the intake air control valve (intake air surge tank) in response to changes in the engine load in order to increase the intake efficiency using the Acoustic Control Induction System (ACIS).
When the engine speed is between 2200 and 4100 rpm and the throttle valve opening angle is 60° or more, the ECM supplies current to the actuator (on status) to close the intake air control valve. Under other conditions, the intake air control valve is open.
| DTC No. | Detection Item | DTC Detection Condition | Trouble Area | MIL | Memory |
|---|---|---|---|---|---|
| P0660 | Intake Manifold Tuning Valve Control Circuit / Open (Bank 1) | The following conditions are met simultaneously for 0.5 seconds or more (2 trip detection logic):
1.
The voltage of terminal ACIS of the ECM is low when the intake air control valve (for acoustic control induction system) is off (IACV open). 2.
The engine has been started. |
·
Open or short in vacuum switching valve assembly (for ACIS) circuit ·
Vacuum switching valve assembly (for ACIS) ·
EFI-MAIN No. 1 relay ·
ECM |
Comes on | DTC stored |
WIRING DIAGRAM
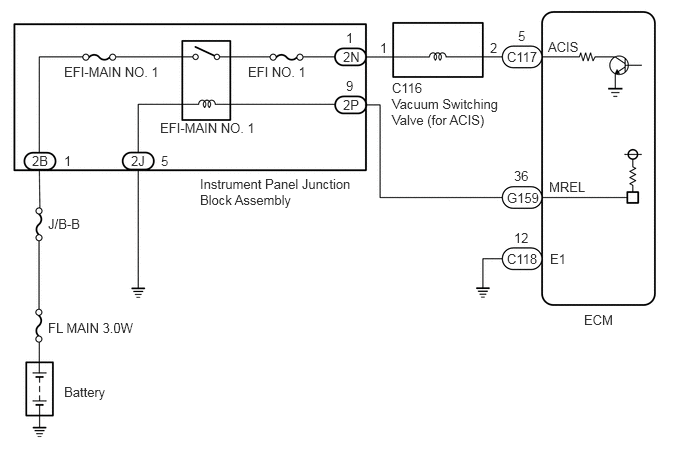
CAUTION / NOTICE / HINT
- NOTICE:
-
Inspect the fuses for circuits related to this system before performing the following procedure.
- HINT:
-
Read freeze frame data using the GTS. The ECM records vehicle and driving condition information as freeze frame data the moment a DTC is stored. When troubleshooting, freeze frame data can help determine if the vehicle was moving or stationary, if the engine was warmed up or not, if the air fuel ratio was lean or rich, and other data from the time the malfunction occurred.
PROCEDURE
Connect the GTS to the DLC3.
Turn the engine switch on (IG).
Turn the GTS on.
Enter the following menus: Powertrain / Engine and ECT / Active Test / Activate the VSV for Intake Control.
- Powertrain > Engine > Active Test
-
Tester Display Activate the VSV for Intake Control - 50004 234 3
Check if operating noise can be heard when operating the intake air control valve using the GTS.
- OK:
Operating noise can be heard.
- Result:
Proceed to OK NG
OK
NG
Inspect the vacuum switching valve assembly (for ACIS).
- Result:
Proceed to OK NG
OK
NG
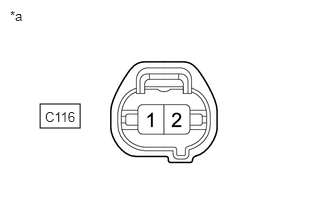
| *a | Front view of wire harness connector
(to Vacuum Switching Valve Assembly (for ACIS)) |
Disconnect the vacuum switching valve assembly (for ACIS) connector.
Turn the engine switch on (IG).
Measure the voltage according to the value(s) in the table below.
- Standard Voltage:
Tester Connection Condition Specified Condition C116-1 - Body ground Engine switch on (IG) 11 to 14 V
- Result:
Proceed to OK NG
OK
NG
Disconnect the intake air control valve connector.
Disconnect the ECM connector.
Measure the resistance according to the value(s) in the table below.
- Standard Resistance:
Tester Connection Condition Specified Condition C116-2 - C117-5 (ACIS) Always Below 1 Ω C116-2 or C117-5 (ACIS) - Body ground and other terminals Always 10 kΩ or higher
- Result:
Proceed to OK NG
OK
NG
Disconnect the instrument panel junction block assembly connector.
Disconnect the intake air control valve connector.
Measure the resistance according to the value(s) in the table below.
- Standard Resistance:
Tester Connection Condition Specified Condition 2N-1 - C116-1 Always Below 1 Ω 2N-1 or C116-1 - Body ground and other terminals Always 10 kΩ or higher
- Result:
Proceed to OK NG
OK
NG