DRIVE SHAFT / PROPELLER SHAFT FRONT DRIVE SHAFT ASSEMBLY REMOVAL
CAUTION / NOTICE / HINT
The necessary procedures (adjustment, calibration, initialization, or registration) that must be performed after parts are removed, installed, or replaced during the front drive shaft assembly removal/installation are shown below.
- Necessary Procedure After Parts Removed/Installed/Replaced:
Replacement Part or Procedure Necessary Procedures Effects/Inoperative when not Performed Link The vehicle height changes due to replacement of suspension components or after performing such operations as removal and reinstallation Headlight leveling ECU assembly initialization Headlight leveling function (  )
Front wheel alignment adjustment ·Clearing zero point calibration data
·Yaw rate and acceleration sensor zero point calibration
VSC malfunctioning ( )
CAUTION / NOTICE / HINT
- HINT:
- ·
Use the same procedure for the RH and LH sides.
·The procedure listed below is for the LH side.
PROCEDURE

 1.REMOVE FRONT WHEEL
51441
2.REMOVE NO. 1 ENGINE UNDER COVER
51442
3.REMOVE NO. 2 ENGINE UNDER COVER
4.DRAIN DIFFERENTIAL OIL
43514C
5.REMOVE FRONT AXLE HUB GREASE CAP LH
43502H
6.REMOVE FRONT AXLE SHAFT NUT LH
89543
7.DISCONNECT FRONT SPEED SENSOR LH
8.DISCONNECT TIE ROD END SUB-ASSEMBLY LH
48069
9.DISCONNECT FRONT LOWER SUSPENSION ARM ASSEMBLY LH
43420
10.REMOVE FRONT DRIVE SHAFT ASSEMBLY LH
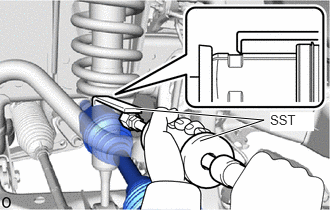
Using SST, remove the front drive shaft assembly LH.
- SST
- 09520-01010
09520-24010 (09520-32040)
- NOTICE:
- ·
Do not damage the differential side gear shaft oil seal LH, inboard joint boot and front drive shaft dust cover LH.
·Do not drop the front drive shaft assembly LH.
·When carrying the front drive shaft assembly LH, hold it horizontally.
- HINT:
-
Hook the SST claw at the position shown in the illustration to remove the front drive shaft assembly LH.
43420G
11.REMOVE FRONT DRIVE SHAFT HOLE SNAP RING
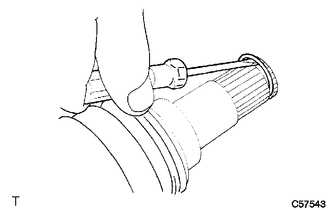
Using a screwdriver, remove the front drive shaft hole snap ring.
- NOTICE:
-
Do not damage the spline of the inboard joint.