Home › Vehicle Exterior › DOOR / HATCH › FUEL LID LOCK CONTROL CABLE ASSEMBLY(for Smart Cab)
RM3250E _59 Vehicle Exterior _038077 DOOR / HATCH _0188856 FUEL LID LOCK CONTROL CABLE ASSEMBLY(for Smart Cab) A

DOOR / HATCH  FUEL LID LOCK CONTROL CABLE ASSEMBLY(for Smart Cab)  INSTALLATION  


PROCEDURE

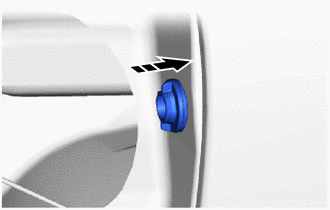
Hide 77377 1.INSTALL FUEL FILLER OPENING LID LOCK RETAINER
B405417C03
0,0 0,0 false
V113147

Install in this Direction


a.

Install a new fuel filler opening lid lock retainer as shown in the illustration.


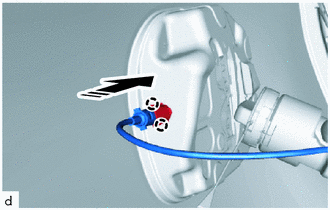
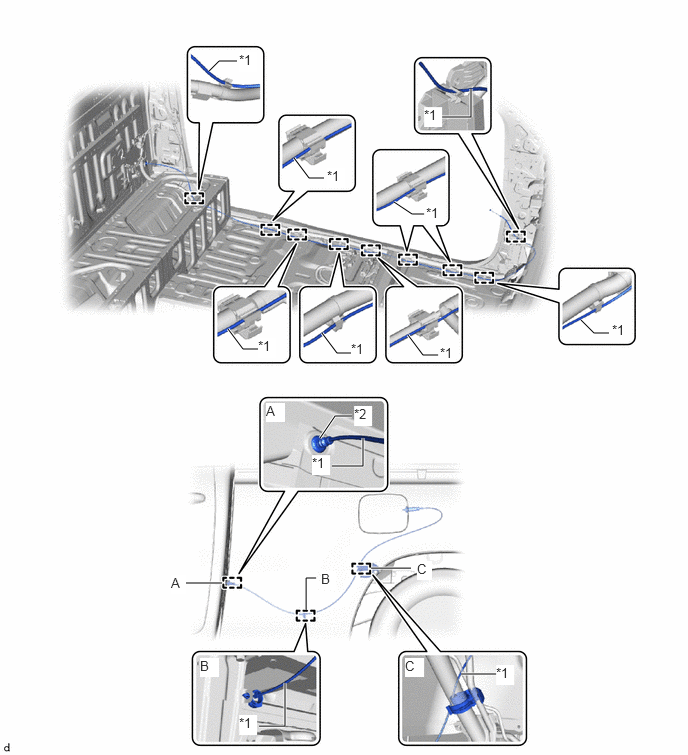
Hide 77035 2.INSTALL FUEL LID LOCK CONTROL CABLE SUB-ASSEMBLY (for LHD)
B405418C03
0,0 0,0 false
V113147

Install in this Direction


a.

Attach the claw to install the fuel lid lock control cable sub-assembly to the fuel filler opening lid lock retainer as shown in the illustration.


b.

Attach the fuel lid lock control cable sub-assembly to each clamp as shown in the illustration.


c.

Install the grommet to the vehicle body.
B408964C02
3.333,4.563 3.49,4.333 3.49,4.333 3.667,4.333 true 3.063,1.646 3.219,1.854 3.219,1.854 3.375,1.854 true 4.104,2.104 4.292,2.229 4.292,2.229 4.417,2.229 true 2.375,3.427 2.531,3.635 2.531,3.635 2.688,3.635 true 3.354,3.469 3.51,3.677 3.51,3.677 3.667,3.677 true 4.25,3.49 4.406,3.698 4.406,3.698 4.563,3.698 true 6.052,3.333 6.188,3.469 6.188,3.469 6.344,3.469 true 4.583,1.219 4.906,1.219 4.906,1.219 4.906,0.927 true 3.458,4.854 3.781,4.854 3.781,4.854 3.781,4.563 true 2.177,0.74 2.281,0.635 2.281,0.635 2.469,0.635 true 2.698,7.563 2.969,7.563 2.969,7.563 2.969,7.115 true 4.802,7.021 5.198,7.021 true 1.896,6.073 2.313,6.073 true 3.865,5.917 4.281,5.917 true 3.188,6.354 3.188,6.021 3.188,6.021 3.292,6.021 true 2.771,4.198 2.969,4.396 0.198,0.198 10 true A 2.083,6.854 2.281,7.052 0.198,0.198 10 true B 4.219,6.854 4.417,7.052 0.198,0.198 10 true C 1.781,5.99 1.938,6.188 0.156,0.198 10 true A 3.344,5.948 3.5,6.146 0.156,0.198 10 true B 4.344,5.844 4.5,6.042 0.156,0.198 10 true C 2.49,0.542 2.677,0.75 0.188,0.208 10 true *1 3.406,1.75 3.594,1.958 0.188,0.208 10 true *1 4.438,2.135 4.625,2.344 0.188,0.208 10 true *1 4.417,1.115 4.604,1.323 0.188,0.208 10 true *1 2.688,3.521 2.875,3.729 0.188,0.208 10 true *1 3.656,3.552 3.844,3.76 0.188,0.208 10 true *1 4.583,3.594 4.771,3.802 0.188,0.208 10 false *1 6.375,3.354 6.563,3.563 0.188,0.208 10 false *1 3.25,4.74 3.438,4.948 0.188,0.208 10 true *1 3.688,4.229 3.875,4.438 0.188,0.208 10 true *2 2.49,7.448 2.677,7.656 0.188,0.208 10 true *1 5.167,6.927 5.354,7.135 0.188,0.208 10 true *1
*1 Fuel Lid Lock Control Cable Sub-assembly *2 Grommet


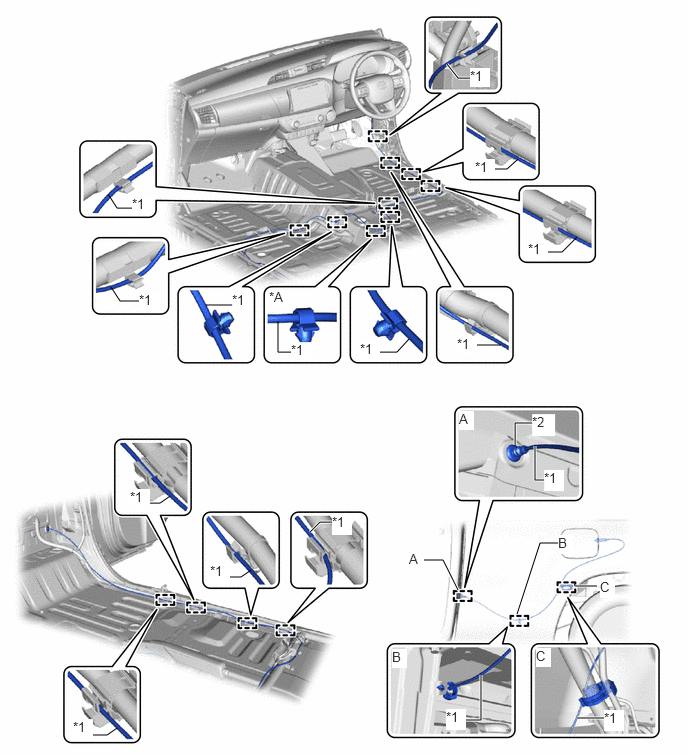
Hide 77035 3.INSTALL FUEL LID LOCK CONTROL CABLE SUB-ASSEMBLY (for RHD)

B405418C03
0,0 0,0 false
V113147

Install in this Direction


a.

Attach the claw to install the fuel lid lock control cable sub-assembly to the fuel filler opening lid lock retainer as shown in the illustration.


b.

Attach the fuel lid lock control cable sub-assembly to each clamp as shown in the illustration.


c.

Install the grommet to the vehicle body.
B404425C08
1.156,2.99 1.25,3.135 1.25,3.135 1.469,3.135 false 4.927,3.594 5.219,3.594 false 2.896,3.344 2.896,3.667 2.896,3.667 3.135,3.667 false 3.896,3.667 4.135,3.667 4.135,3.667 4.26,3.531 false 5.594,2.625 5.854,2.625 5.854,2.625 6.01,2.469 false 5.063,1.76 5.281,1.76 5.281,1.76 5.396,1.656 false 4.656,0.667 4.771,0.813 4.771,0.813 4.896,0.813 true 2.146,3.177 2.438,3.177 false 1.458,5.24 1.667,5.24 1.667,5.24 1.771,5.167 false 2.302,6.01 2.51,6.01 2.51,6.01 2.615,5.938 false 3.229,5.542 3.333,5.438 3.333,5.438 3.521,5.438 true 0.906,7.656 1.115,7.656 1.115,7.656 1.219,7.583 false 4.813,7.5 5.01,7.5 5.01,7.5 5.01,7.031 true 5.719,5 5.573,5 5.573,5 5.573,4.646 true 5.604,4.406 5.365,4.406 5.365,4.406 5.365,4.635 true 4.375,5.833 4.615,5.833 4.615,5.833 4.771,6.146 true 5.99,6.104 6.219,6.104 true 5.385,6.396 5.625,5.656 5.625,5.656 5.896,5.656 true 6.01,7.479 6.344,7.479 true 1.125,2.021 1.219,2.167 1.219,2.167 1.438,2.167 false 1.354,5.094 1.563,5.313 0.208,0.219 10 true *1 2.188,5.865 2.396,6.083 0.208,0.219 10 true *1 0.76,7.49 0.969,7.708 0.208,0.219 10 true *1 3.458,5.354 3.667,5.573 0.208,0.219 10 true *1 5.667,4.896 5.875,5.115 0.208,0.219 10 true *1 4.646,7.385 4.854,7.604 0.208,0.219 10 true *1 2.417,3.042 2.625,3.24 0.208,0.198 10 true *1 3.031,3.563 3.24,3.76 0.208,0.198 10 true *1 3.75,3.552 3.958,3.75 0.208,0.198 10 true *1 4.76,3.5 4.969,3.698 0.208,0.198 10 true *1 5.5,2.51 5.708,2.708 0.208,0.198 10 true *1 4.948,1.656 5.156,1.854 0.208,0.198 10 true *1 4.896,0.708 5.104,0.906 0.208,0.198 10 true *1 5.542,4.313 5.781,4.542 0.24,0.229 10 true *2 4.781,4.281 4.938,4.479 0.156,0.198 10 true A 4.26,5.74 4.417,5.938 0.156,0.198 10 true A 4.083,6.76 4.24,6.958 0.156,0.198 10 true B 5.813,5.573 5.969,5.771 0.156,0.198 10 true B 6.25,6.031 6.406,6.229 0.156,0.198 10 true C 5.583,6.75 5.74,6.948 0.156,0.198 10 true C 6.292,7.396 6.5,7.615 0.208,0.219 10 true *1 1.448,3.042 1.656,3.24 0.208,0.198 10 true *1 1.375,2.042 1.583,2.24 0.208,0.198 10 true *1 2.802,3.01 3.115,3.208 0.313,0.198 10 false *A
*A for 4WD and Pre-Runner without VSC - -
*1 Fuel Lid Lock Control Cable Sub-assembly *2 Grommet


Hide 77306 4.INSTALL FUEL LID LOCK OPEN LEVER SUB-ASSEMBLY (for LHD)

Hide 77306 5.INSTALL FUEL LID LOCK OPEN LEVER SUB-ASSEMBLY (for RHD)

Hide 65638 6.INSTALL REAR WHEEL HOUSE LINER LH

a.

Install the rear wheel house liner.


Hide 58510D 7.INSTALL FRONT FLOOR CARPET ASSEMBLY

a.

Install the floor carpet.


Hide 58774A 8.INSTALL LUGGAGE COMPARTMENT SIDE COVER LH

Hide 62112 9.INSTALL COWL SIDE TRIM BOARD LH (for LHD)

Hide 62111C 10.INSTALL COWL SIDE TRIM BOARD RH (for RHD)

Hide 67914B 11.INSTALL FRONT DOOR SCUFF PLATE LH

Hide 67913B 12.INSTALL FRONT DOOR SCUFF PLATE RH (for RHD)

Hide 62514A 13.INSTALL LOWER QUARTER TRIM PANEL LH

Hide 58810J 15.INSTALL CONSOLE BOX ASSEMBLY (for RHD, w/ Console Box Lid)

Hide 58901A 16.INSTALL REAR CONSOLE BOX SUB-ASSEMBLY (for RHD, w/ Rear Console Box)

Hide 17.INSTALL REAR SEAT CUSHION ASSEMBLY (for RHD)

Hide 18.INSTALL FRONT SEAT ASSEMBLY RH (for RHD)

Hide 19.INSTALL FRONT SEAT ASSEMBLY LH

a.

for Manual Seat:

HINT:

Use the same procedure described for the RH side.


b.

for Power Seat:

HINT:

Use the same procedure described for the RH side.