DOOR LOCK DOOR CONTROL RELAY ON-VEHICLE INSPECTION
CAUTION / NOTICE / HINT
The necessary procedures (adjustment, calibration, initialization or registration) that must be performed after parts are removed, installed or replaced during the door control relay removal/installation are shown below.
| Replacement Part or Procedure | Necessary Procedures | Effects / Inoperative when not Performed | Link |
|---|---|---|---|
| Disconnect cable from negative battery terminal | Drive the vehicle until stop and start control is permitted (approximately 5 to 60 minutes) | Stop and start system | ( ) |
| Memorize steering angle neutral point | Pre-crash safety system | ()
|
- HINT:
- ·
Use the same procedure for RHD and LHD vehicles.
·The procedures listed below are for LHD vehicles.
PROCEDURE

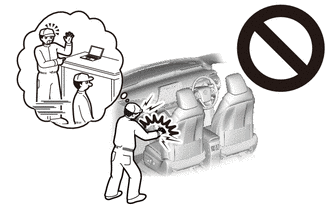
 1. PRECAUTION (w/ Airbag System)
- CAUTION:
-
-
Be sure to read Precaution thoroughly before servicing.
-
for Type A:
-
Click hereVehicle Interior>SUPPLEMENTAL RESTRAINT SYSTEMS>AIRBAG SYSTEM(for Type A)>PRECAUTION
-
for Type B:
-
Click hereVehicle Interior>SUPPLEMENTAL RESTRAINT SYSTEMS>AIRBAG SYSTEM(for Type B)>PRECAUTION
-
for Type C:
-
Click hereVehicle Interior>SUPPLEMENTAL RESTRAINT SYSTEMS>AIRBAG SYSTEM(for Type C)>PRECAUTION
- NOTICE:
-
After turning the ignition switch off, waiting time may be required before disconnecting the cable from the negative (-) battery terminal. Therefore, make sure to read the disconnecting the cable from the negative (-) battery terminal notice before proceeding with work.
-
Click hereGeneral>INTRODUCTION>REPAIR INSTRUCTION>PRECAUTION
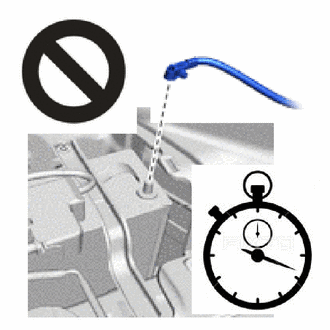
2.DISCONNECT CABLE FROM NEGATIVE BATTERY TERMINAL (w/ Airbag System)
- CAUTION:
-
- ·
Wait at least 90 seconds after disconnecting the cable from the negative (-) battery terminal to disable the SRS system.
·If the airbag deploys for any reason, it may cause a serious accident.
- NOTICE:
-
When disconnecting the cable, some systems need to be initialized after the cable is reconnected.
-
Click hereGeneral>INTRODUCTION>REPAIR INSTRUCTION>INITIALIZATION
45100
3.REMOVE STEERING WHEEL ASSEMBLY
55410C
4.REMOVE INSTRUMENT CLUSTER FINISH PANEL ASSEMBLY
55905J
5.REMOVE CONTROL KNOB SUB-ASSEMBLY
for Manual Cooler System:
Click hereVehicle Interior>HEATING / AIR CONDITIONING>AIR CONDITIONING PANEL(for Manual Cooler System)>REMOVAL
for Manual Air Conditioning System:
55918A
6.REMOVE AIR INLET DAMPER CONTROL LEVER
for Manual Cooler System:
Click hereVehicle Interior>HEATING / AIR CONDITIONING>AIR CONDITIONING PANEL(for Manual Cooler System)>REMOVAL
for Manual Air Conditioning System:
84013A
7.REMOVE INTEGRATION PANEL SUB-ASSEMBLY
for Manual Cooler System:
Click hereVehicle Interior>HEATING / AIR CONDITIONING>AIR CONDITIONING PANEL(for Manual Cooler System)>REMOVAL
for Manual Air Conditioning System:
55900
8.REMOVE AIR CONDITIONING CONTROL ASSEMBLY (for Automatic Air Conditioning System)
84930G
9.REMOVE DOOR LOCK CONTROL RELAY (for LHD)
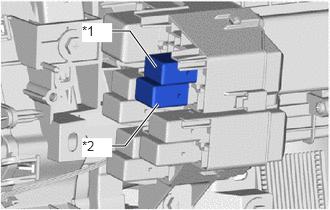
| *1 | No. 1 Door Lock Control Relay |
| *2 | No. 2 Door Lock Control Relay |
Remove the door lock control relay.
84930G
10.REMOVE DOOR LOCK CONTROL RELAY (for RHD)
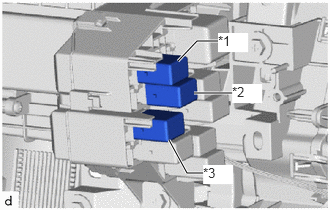
| *1 | No. 1 Door Lock Control Relay |
| *2 | No. 2 Door Lock Control Relay |
| *3 | No. 3 Door Lock Control Relay |
Remove the door lock control relay.
84930G
11.INSPECT NO. 1 DOOR LOCK CONTROL RELAY
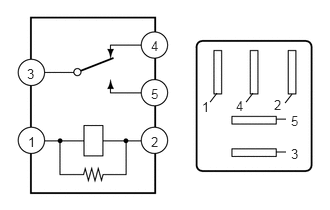
Inspect the No. 1 door lock control relay.
Measure the resistance according to the value(s) in the table below.
- Standard Resistance:
Tester Connection Condition Specified Condition 3 - 4 Battery voltage is not applied to terminals 1 and 2 Below 1 Ω Battery voltage is applied to terminals 1 and 2 10 kΩ or higher 3 - 5 Battery voltage is not applied to terminals 1 and 2 10 kΩ or higher Battery voltage is applied to terminals 1 and 2 Below 1 Ω
If the result is not as specified, replace the No. 1 door lock control relay.
84930H
12.INSPECT NO. 2 DOOR LOCK CONTROL RELAY
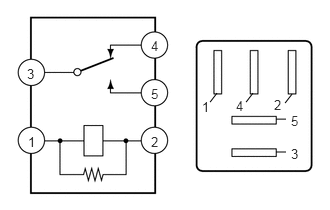
Inspect the No. 2 door lock control relay.
Measure the resistance according to the value(s) in the table below.
- Standard Resistance:
Tester Connection Condition Specified Condition 3 - 4 Battery voltage is not applied to terminals 1 and 2 Below 1 Ω Battery voltage is applied to terminals 1 and 2 10 kΩ or higher 3 - 5 Battery voltage is not applied to terminals 1 and 2 10 kΩ or higher Battery voltage is applied to terminals 1 and 2 Below 1 Ω
If the result is not as specified, replace the No. 2 door lock control relay.
84930H
13.INSPECT NO. 3 DOOR LOCK CONTROL RELAY (w/ Double Locking System)
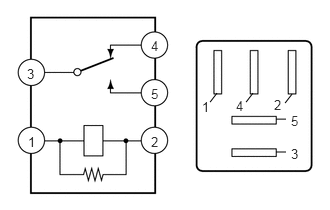
Inspect the No. 3 door lock control relay.
Measure the resistance according to the value(s) in the table below.
- Standard Resistance:
Tester Connection Condition Specified Condition 3 - 4 Battery voltage is not applied to terminals 1 and 2 Below 1 Ω Battery voltage is applied to terminals 1 and 2 10 kΩ or higher 3 - 5 Battery voltage is not applied to terminals 1 and 2 10 kΩ or higher Battery voltage is applied to terminals 1 and 2 Below 1 Ω
If the result is not as specified, replace the No. 3 door lock control relay.
84930G
14.INSTALL DOOR LOCK CONTROL RELAY (for LHD)
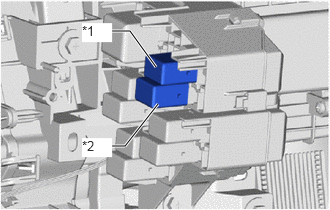
| *1 | No. 1 Door Lock Control Relay |
| *2 | No. 2 Door Lock Control Relay |
Install the door lock control relay.
84930G
15.INSTALL DOOR LOCK CONTROL RELAY (for RHD)
| *1 | No. 1 Door Lock Control Relay |
| *2 | No. 2 Door Lock Control Relay |
| *3 | No. 3 Door Lock Control Relay |
Remove the door lock control relay.
84013A
16.INSTALL INTEGRATION PANEL SUB-ASSEMBLY
for Manual Cooler System:
for Manual Air Conditioning System:
55918A
17.INSTALL AIR INLET DAMPER CONTROL LEVER
for Manual Cooler System:
for Manual Air Conditioning System:
55905J
18.INSTALL CONTROL KNOB SUB-ASSEMBLY
for Manual Cooler System:
for Manual Air Conditioning System:
55900
19.INSTALL AIR CONDITIONING CONTROL ASSEMBLY (for Automatic Air Conditioning System)
55410C
20.INSTALL INSTRUMENT CLUSTER FINISH PANEL ASSEMBLY
45100
21.INSTALL STEERING WHEEL ASSEMBLY
22.CONNECT CABLE TO NEGATIVE BATTERY TERMINAL (w/ Airbag System)
- NOTICE:
-
When disconnecting the cable, some systems need to be initialized after the cable is reconnected.
-
Click hereGeneral>INTRODUCTION>REPAIR INSTRUCTION>INITIALIZATION
23.CHECK SRS WARNING LIGHT (w/ Airbag System)
for Type A:
Click hereVehicle Interior>SUPPLEMENTAL RESTRAINT SYSTEMS>AIRBAG SYSTEM(for Type A)>DIAGNOSIS SYSTEM
for Type B:
Click hereVehicle Interior>SUPPLEMENTAL RESTRAINT SYSTEMS>AIRBAG SYSTEM(for Type B)>DIAGNOSIS SYSTEM
for Type C:
Click hereVehicle Interior>SUPPLEMENTAL RESTRAINT SYSTEMS>AIRBAG SYSTEM(for Type C)>DIAGNOSIS SYSTEM