STOP AND START STOP AND START SYSTEM Stop and Start Priority Control System
DESCRIPTION
When the steering pad switch assembly is used to select a control mode, a status change request signal is sent from the combination meter assembly to the engine stop and start ECU via CAN communication. Cooperative control is performed by the air conditioning amplifier assembly and engine stop and start ECU based on the selected control mode.
When stop and start priority control (long) is selected, the operation time of stop and start control will be extended in order to improve fuel economy.
WIRING DIAGRAM
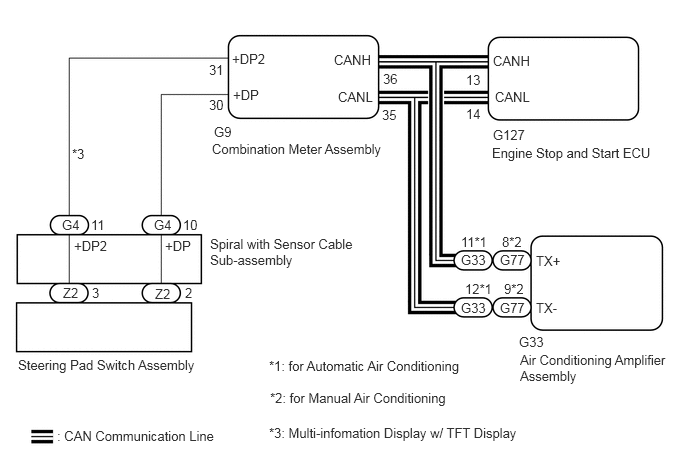
CAUTION / NOTICE / HINT
- NOTICE:
- ·
Before replacing the engine stop and start ECU, read the number of starter operations and total number of engine starts and write it into a new engine stop and start ECU.
Click hereEngine / Hybrid System>STOP AND START>STOP AND START SYSTEM>REGISTRATION
·After replacing the engine stop and start ECU or air conditioning amplifier assembly, reset and perform learning of the air conditioning information in the engine stop and start ECU.
Click hereEngine / Hybrid System>STOP AND START>STOP AND START SYSTEM>REGISTRATION
·After replacing the engine stop and start ECU or airbag sensor assembly, clear and calibrate the deceleration sensor zero point in the engine stop and start ECU.
Click hereEngine / Hybrid System>STOP AND START>STOP AND START SYSTEM>REGISTRATION
·for Automatic Transmission:
When the engine stop and start ECU is replaced, check the electromagnetic oil pump.
Click hereEngine / Hybrid System>STOP AND START>STOP AND START SYSTEM>REGISTRATION
- HINT:
- ·
When stop and start priority control (long) is selected, the operation of the air conditioning system is limited. If the customer reports that the cooling effectiveness of the air conditioning system is poor, check the selected control mode. If stop and start priority control (long) is selected, cancel the control mode and check if the cooling effectiveness of the air conditioning system improves. If it improves, explain to the customer that the operation of the air conditioning system was limited by stop and start control.
·Depending on the vehicle conditions, the stop and start operation time may not change even if stop and start priority control (long) is selected.
PROCEDURE
Check the problem symptoms.
- HINT:
- ·
Check each symptom by checking the suspected areas in the table below.
·By using the GTS and entering the following menus, the selected mode can be confirmed.
Powertrain / Stop and Start / Data List / Stop & Start A/C Mode
- Powertrain > Stop and Start > Data List
-
Tester Display Stop & Start A/C Mode - 50003 227 368
- Result:
Problem Symptoms Trouble Area Proceed to Multi-information display screen does not change after pressing steering pad switch assembly ·Steering pad switch assembly
·Spiral with sensor cable sub-assembly
·Combination meter assembly
·Engine stop and start ECU
·Wire harness or connector (steering pad switch assembly - combination meter assembly)
·Wire harness or connector (engine stop and start ECU - combination meter assembly)
A Multi-information display screen changes without pressing steering pad switch assembly ·Steering pad switch assembly
·Spiral with sensor cable sub-assembly
·Wire harness or connector (steering pad switch assembly - combination meter assembly)
B Multi-information display screen does not change but control mode changes Combination meter assembly C Multi-information display screen changes but control mode does not change ·Air conditioning amplifier assembly
·Wire harness or connector (engine stop and start ECU - air conditioning amplifier assembly)
D Control mode returns to default mode after turning ignition switch ON Engine stop and start ECU E
A
B
C
Click hereVehicle Interior>METER / GAUGE / DISPLAY>METER / GAUGE SYSTEM>HOW TO PROCEED WITH TROUBLESHOOTING
D
E
Using the steering pad switch assembly, check that all functions other than "Stop and Start A/C Mode" can be selected.
- Result:
Result Proceed to Only "Stop and Start A/C Mode" cannot be selected A No function can be selected using the steering pad switch assembly B
A
B
Connect the GTS to the DLC3.
Turn the ignition switch to ON.
Turn the GTS on.
Perform a road test.
Enter the following menus: Powertrain / Stop and Start / Trouble Codes.
- Powertrain > Stop and Start > Trouble Codes
- 50001 227
Read the DTCs.
- Result:
Result Proceed to DTCs are not output A CAN DTCs are output B
A
B
for LHD (w/ Centrl Gateway ECU)
for RHD (w/ Centrl Gateway ECU)
for LHD (w/o Centrl Gateway ECU)
for RHD (w/o Centrl Gateway ECU)
Turn the ignition switch off.
Disconnect the G4 spiral with sensor cable sub-assembly connector.
Disconnect the G9 combination meter assembly connector.
Measure the resistance according to the value(s) in the table below.
- Standard Resistance:
Tester Connection Condition Specified Condition G4-10 (+DP) - G9-30 (+DP) Always Below 1 Ω G4-10 (+DP) - Body ground Always 10 kΩ or higher G9-30 (+DP) - Body ground Always 10 kΩ or higher G4-11 (+DP2) - G9-31 (+DP2)* Always Below 1 Ω G4-11 (+DP2) - Body ground* Always 10 kΩ or higher G9-31 (+DP2) - Body ground* Always 10 kΩ or higher
*: Multi-infomation Display w/ TFT Display
- Result:
Proceed to OK NG
OK
NG
Inspect the spiral with sensor cable sub-assembly.
Click hereVehicle Interior>SUPPLEMENTAL RESTRAINT SYSTEMS>SPIRAL CABLE>INSPECTION
- Result:
Proceed to OK NG
OK
NG
Inspect the steering pad switch assembly.
Click hereSteering>STEERING COLUMN>STEERING PAD SWITCH>INSPECTION
- Result:
Proceed to OK NG
OK
Click hereVehicle Interior>METER / GAUGE / DISPLAY>METER / GAUGE SYSTEM>HOW TO PROCEED WITH TROUBLESHOOTING
NG
Turn the ignition switch off.
Disconnect the G4 spiral with sensor cable sub-assembly connector.
Disconnect the G9 combination meter assembly connector.
Measure the resistance according to the value(s) in the table below.
- Standard Resistance:
Tester Connection Condition Specified Condition G4-10 (+DP) - G9-30 (+DP) Always Below 1 Ω G4-10 (+DP) - Body ground Always 10 kΩ or higher G9-30 (+DP) - Body ground Always 10 kΩ or higher G4-11 (+DP2) - G9-31 (+DP2)* Always Below 1 Ω G4-11 (+DP2) - Body ground* Always 10 kΩ or higher G9-31 (+DP2) - Body ground* Always 10 kΩ or higher
*: Multi-infomation Display w/ TFT Display
- Result:
Proceed to OK NG
OK
NG
Inspect the spiral with sensor cable sub-assembly.
Click hereVehicle Interior>SUPPLEMENTAL RESTRAINT SYSTEMS>SPIRAL CABLE>INSPECTION
- Result:
Proceed to OK NG
OK
NG
Inspect the steering pad switch assembly.
Click hereSteering>STEERING COLUMN>STEERING PAD SWITCH>INSPECTION
- Result:
Proceed to OK NG
OK
Click hereVehicle Interior>METER / GAUGE / DISPLAY>METER / GAUGE SYSTEM>HOW TO PROCEED WITH TROUBLESHOOTING
NG
Connect the GTS to the DLC3.
Turn the ignition switch to ON.
Turn the GTS on.
Perform a road test.
Enter the following menus: Powertrain / Stop and Start / Trouble Codes.
- Powertrain > Stop and Start > Trouble Codes
- 50001 227
Read the DTCs.
- Result:
Result Proceed to DTCs are not output A CAN DTCs are output B
A
B
for LHD (w/ Centrl Gateway ECU)
for RHD (w/ Centrl Gateway ECU)
for LHD (w/o Centrl Gateway ECU)
for RHD (w/o Centrl Gateway ECU)
Connect the GTS to the DLC3.
Turn the ignition switch to ON.
Turn the GTS on.
Perform a road test.
Enter the following menus: Powertrain / Stop and Start / Trouble Codes.
- Powertrain > Stop and Start > Trouble Codes
- 50001 227
Read the DTCs.
- Result:
Result Proceed to DTCs are not output A DTCs are output B
A
B